Move beyond quick crafts and disposable decor. Discover a timeless, adaptable framework for transforming overlooked materials into meaningful, eco-conscious home features—while reducing waste, honoring resources, and deepening your connection to the spaces you inhabit.
Sustainable DIY is not merely a collection of upcycled jar projects or weekend crafts. It is a deliberate practice of seeing potential where others see discard, of aligning creativity with conscience, and of weaving personal narrative into the very fabric of your home. This guide offers more than project instructions—it provides a foundational philosophy and actionable methodology to empower you to create with intention, resourcefulness, and lasting impact. Whether you have ten minutes or ten hours, access to a full workshop or only basic hand tools, this approach meets you where you are and grows with you.
Introduction: Beyond the Craft Trend
Walk into any home goods store or scroll through popular DIY channels, and you’ll encounter a paradox: an overwhelming abundance of “eco-friendly” crafts coexisting with a culture of disposability. A painted mason jar becomes a “sustainable” organizer—until it chips, loses relevance, or is replaced by next season’s trend. True sustainable DIY transcends surface-level aesthetics. It is rooted in principles observed across cultures and centuries: wabi-sabi (finding beauty in imperfection), kintsugi (honoring an object’s history through repair), and circular resource practices documented in communities worldwide long before the term entered mainstream vocabulary.
This approach recognizes that every material carries embedded energy—the water, labor, transportation, and time invested before it reached your hands. When we choose to repurpose a weathered floorboard, mend a torn textile with visible stitching, or transform discarded shipping pallets into functional furniture, we participate in a quiet act of stewardship. We shift from being passive consumers to active participants in a more thoughtful material culture.
Patterns observed across enduring DIY projects reveal a consistent insight: creations rooted in personal meaning and functional purpose tend to remain in use far longer than those driven solely by trend. A bookshelf built from salvaged structural wood carries emotional resonance; a quilt stitched from repurposed textiles becomes a cherished heirloom. This guide synthesizes these observed principles with practical, modern application—providing you with a flexible system to create a home that reflects your values, tells your story, and lightens your footprint, one intentional project at a time.
The Cycle of Intention: A Framework for Meaningful Making
Forget rigid checklists or prescriptive project lists. Sustainable creativity flourishes within a supportive structure—one that guides your thinking without stifling your uniqueness. Analysis of numerous DIY journeys reveals a recurring pattern: the most fulfilling and enduring projects follow a cyclical process of mindful engagement. We call this The Cycle of Intention.
This four-phase framework transforms sustainability from an abstract goal into a tangible, repeatable practice. It applies equally to a five-minute mending session and a multi-week furniture build. By internalizing this cycle, you develop an intuitive lens for evaluating any project opportunity—asking not just “Can I make this?” but “Should I make this, and how?”
The Fundamental Principle: Thoughtful constraints often unlock deeper creativity and more resonant outcomes than unlimited options. Working within boundaries of material availability, skill level, spatial needs, or time cultivates resourcefulness.
Step 1: Source Mindfully — The Foundation of Sustainable Creation
Sourcing is where intention begins. It is the conscious decision about what enters your creative sphere and why. Mindful sourcing moves beyond “free” or “cheap” to consider origin, impact, story, and suitability.
Why This Step is Crucial
Every material choice has a ripple effect. Choosing reclaimed wood over virgin lumber reduces demand for new timber harvesting and avoids energy-intensive milling and shipping processes. Selecting natural fibers (linen, cotton, wool) over synthetics supports biodegradability and reduces microplastic shedding. Even the location of your source matters: locally gathered materials minimize transportation emissions. More profoundly, mindful sourcing builds awareness. You begin to notice resource flows through your community—the construction site discarding usable lumber, the neighbor clearing a garage, the local business receiving regular cardboard shipments. You become part of a local resource network.
How to Source Mindfully: A Practical Toolkit
– The Audit First: Before seeking new materials, conduct a “resource audit” of your own home. Check closets, garages, basements. That old wool sweater? Potential rug material. Cracked ceramic bowl? Mosaic tiles. Unused wooden crates? Shelving components. Start with what you already steward.
– Reclaim Centers & Habitat ReStores: These nonprofit outlets sell donated building materials, furniture, and fixtures. Staff may share item histories (e.g., “This door came from a local renovation”). Visit regularly—inventory changes daily. Inspect items for structural integrity, warping, or hidden damage.
– Online Communities: Platforms like Buy Nothing groups, Freecycle, or neighborhood apps are valuable. Post specific requests (“Seeking clean cardboard tubes,” “Looking for scrap wood under 2ft long”) or browse “free” sections. Always arrange safe, public meetups.
– Business Partnerships: Approach local coffee shops (for burlap sacks), breweries (for grain sacks), bakeries (for flour sacks), or furniture stores (for discarded samples). A polite inquiry can yield consistent material streams.
– Nature’s Gifts (Ethically): Fallen branches after storms, smooth stones from permitted areas, pinecones gathered responsibly. Never harvest living plants, disturb wildlife habitats, or take from protected lands. When in doubt, leave it.
– Thrift Stores & Estate Sales: Look beyond the obvious. Vintage scarves become pillow covers; mismatched china creates mosaic art; sturdy wooden chairs are candidates for reupholstering. Focus on solid wood (oak, maple, walnut) over particleboard.
Common Sourcing Mistakes to Avoid
– Hoarding vs. Curating: Acquiring materials “just in case” leads to clutter. Ask: “Do I have a clear vision for this? Do I have space to store it properly?” If not, pass it on.
– Ignoring Safety: Avoid pressure-treated wood (contains copper compounds), lead-painted items (pre-1978 furniture), or materials with unknown chemical histories. When salvaging wood, check thoroughly for nails or embedded metal using a magnet.
– Overlooking Scale: That beautiful large door might not fit your space. Measure twice before committing.
– Neglecting Emotional Weight: Some reclaimed items carry heavy histories. Honor that weight. If a project feels emotionally charged, proceed with extra care or choose a different material.
Analogy in Action: Mindful sourcing resembles a chef selecting seasonal, local produce. The chef chooses ingredients grown with care, understanding that quality and story infuse the final dish. Similarly, the integrity of your source material shapes your creation’s authenticity.
Consider a maker in the Pacific Northwest. Needing a small balcony desk, they posted in a local sharing group: “Seeking small wooden surface for outdoor desk.” A neighbor offered a warped but solid cedar plank from a dismantled garden box. After sanding and sealing with natural tung oil, mounted on repurposed iron brackets, the desk now holds morning coffee and a journal. Knowing the wood once grew vegetables for a nearby family transforms a functional object into a daily reminder of community and care.
Step 2: Design with Purpose — Aligning Form, Function, and Feeling
Design is where intention takes shape. It bridges the material you’ve sourced and the life it will serve. Purposeful design ensures your creation is not only beautiful but used, loved, and integrated into daily rhythms.
Why This Step is Crucial
A beautifully crafted object that doesn’t solve a real need becomes clutter. Conversely, a purely functional item lacking aesthetic consideration feels cold. Purposeful design harmonizes these elements. It forces clarity: Who is this for? How will it be used? Where will it live? What emotion should it evoke? This prevents wasted effort and materials. It also invites inclusivity—designing a child-height shelf encourages participation; creating a labeled repair station empowers the whole household.
How to Design with Purpose: The Three-Lens Method
Apply these three lenses to every sketch, note, or mental image:
- The Functional Lens:
- Core Question: “What specific problem does this solve?”
- Action: List non-negotiable requirements. For a shelf: weight capacity (holds 10 hardcover books?), dimensions (fits between window and door?), accessibility (reachable for a child?). Sketch rough measurements directly on your sourced material if possible.
-
Pro Tip: Prototype with cardboard. Build a life-size mockup. Sit where you’ll use it. Does the height feel right? This 20-minute step prevents irreversible errors.
-
The Emotional Lens:
- Core Question: “How should this make me (or others) feel?”
- Action: Choose 1–3 feeling words: calm, joyful, grounded, inspired, cozy. Let these guide aesthetic choices. For “calm”: soft edges, muted natural tones. For “joyful”: playful asymmetry, visible hand-stitching.
-
Pro Tip: Create a tiny mood board with fabric swatches or torn magazine images. Notice recurring colors or textures.
-
The Contextual Lens:
- Core Question: “How does this belong in this space, with these people?”
- Action: Observe the intended location. Note light patterns (will sun fade this fabric?), traffic flow, existing colors. Does the design complement or thoughtfully contrast?
- Pro Tip: Take a photo of the space. Sketch your design directly onto the image to visualize scale.
Common Design Mistakes to Avoid
– Over-Engineering: Adding complex joinery unnecessarily. Often, simplicity is stronger and more functional.
– Ignoring Maintenance: Designing a woven basket for a humid bathroom without considering material suitability. Choose finishes and materials suited to the environment.
– Forgetting Disassembly: Designing something permanently fixed when your living situation may change. Incorporate modular elements where possible.
– Copying Blindly: Replicating an online project without adapting it to your needs, space, or available materials. Your version should feel authentically yours.
Real-Life Example: The “Memory Nook” Bench
Challenge: A family wanted a cozy spot by their living room window for reading together, but the space was narrow (28 inches deep). Store-bought benches were too deep or lacked storage.
Purposeful Design Process:
– Functional: Needed to seat two adults comfortably, store children’s books underneath, fit precisely in 28” depth.
– Emotional: “Warm,” “inviting,” “shared.”
– Contextual: Adjacent to a north-facing window, near a heat source (avoid wood warping), existing rug had cream and sage tones.
Solution: Designed a low bench (16” seat height) using two reclaimed oak sections. Cut to exact depth. Added a hinged lid for storage. Upholstered the cushion with a repurposed wool textile. Finished wood with non-toxic beeswax. The bench now holds nightly story time. The visible grain, the soft texture—every detail serves purpose and feeling.
Counter-Example: A maker built an intricate wall-mounted key holder from reclaimed wood with exactly three hooks. Problem? Their household had five members with multiple keys, leashes, and mail. The holder became instantly cluttered and unusable. Within weeks, keys migrated back to the countertop. The design lacked functional alignment with real-life needs.
Design with purpose is not about rigid blueprints. It’s about asking compassionate, clear questions before the first cut or stitch. It transforms creation from a task into a dialogue between maker, material, and home.
Step 3: Create with Care — Honoring Materials and Your Well-being
Creation is the embodied act of bringing design to life. “Care” operates on three levels: care for the material (working with its nature), care for your own physical and mental well-being, and care for your environment (workspace, waste, emissions).
Why This Step is Crucial
Rushing creation leads to errors, frustration, and compromised safety. Honoring the process cultivates mindfulness—a meaningful counterpoint to modern haste. When you sand wood slowly, feeling the grain emerge, you connect deeply with the material’s history. Choosing low-VOC finishes supports indoor air quality. This phase is where sustainability becomes visceral.
How to Create with Care: A Holistic Approach
A. Material-Centered Techniques
– Listen to the Material: Wood has grain direction. Forcing a cut against the grain causes splintering. Metal has memory. Fabric has a nap. Spend five minutes observing your material before acting. Run your hands over it. Note inconsistencies—they may become features.
– Embrace “Flaws” as Features: A knot in wood? Highlight it. A stain on fabric? Incorporate it into a patchwork design or use embroidery to transform it. This embodies wabi-sabi—beauty in imperfection.
– Choose Finishes Wisely:
– Wood: Beeswax + citrus solvent (food-safe, low-VOC), pure tung oil (water-resistant, enhances grain), milk paint (breathable). For high-moisture areas, water-based sealants may be appropriate.
– Fabric: Natural dyes (avocado pits, onion skins), soy-based paints. For mending, visible sashiko stitching with contrasting thread celebrates repair.
– Metal: Linseed oil rubs prevent rust; vinegar + salt patina creates antique effects on copper (research safety first).
B. Creator-Centered Well-being
– Workspace Setup: Ensure good lighting (natural light preferred). Keep tools organized—clutter causes stress. Place a small plant nearby for calm.
– Body Mechanics: Stand on an anti-fatigue mat if working long hours. Keep wrists straight. Take a 5-minute break every 30 minutes to stretch. Hydrate.
– Mindset Shifts:
– Perfectionism → Progress: A slightly uneven stitch tells a human story.
– Rushing → Rhythm: Set a timer for focused work, then rest. Notice the sound of sanding, the smell of wood oil.
– Isolation → Connection: Invite a friend to create alongside you (even virtually).
C. Eco-Conscious Process
– Waste Stream Management: Set up three small bins before starting:
1. Reclaimable Scraps (wood pieces >6”, fabric swatches >4×4”)
2. Compostable (untreated wood shavings, natural fiber scraps)
3. True Waste (minimal—aim for reduction)
– Tool Choices: Hand tools (hand saw, chisels) require no electricity, produce less noise, and offer greater control. Reserve power tools for tasks truly requiring them. Maintain tools well—they last generations.
– Chemical Safety: Work in a ventilated area. Wear nitrile gloves with finishes. Store chemicals securely. Dispose of oil-soaked rags properly (lay flat to dry outdoors before disposal to prevent spontaneous combustion).
Common Creation Mistakes to Avoid
– Skipping Safety Gear: Safety glasses are essential for sanding, cutting, or hammering. Hearing protection for power tools.
– Using Harsh Chemicals Unnecessarily: Research gentler alternatives first (e.g., heat gun + scraper before chemical strippers).
– Ignoring Material Limits: Trying to bend thick, dry wood without proper technique. Respect material properties. Adapt the design instead.
– Working While Exhausted: Fatigue leads to errors. If frustrated, stop. Walk away. Return with fresh eyes tomorrow.
Analogy in Action: Creating with care is like tending a garden. You don’t yank a seedling to check roots; you water gently, provide sunlight, and trust the process. Similarly, attentive making means noticing when wood is splintering (adjust sanding pressure) or when you are tense (take a breath).
A retired maker in the Southwest built simple birdhouses from discarded fence pickets for grandchildren. Instead of power-sanding every sliver smooth, they left subtle tool marks visible. Used non-toxic milk paint in colors the children chose. Drilled drainage holes meticulously. When hanging them, chose locations visible from bedroom windows. The birdhouses aren’t “perfect” by industrial standards—but they sparked conversations about birds, woodworking, and caring for creatures. The care invested became part of the gift’s meaning.
Step 4: Evolve with Grace — Designing for Longevity and Change
No home is static. Families grow, needs shift, aesthetics evolve. Sustainable DIY embraces this truth. “Evolving with grace” means designing creations that can adapt, be repaired, repurposed, or respectfully retired—without becoming landfill.
Why This Step is Crucial
The most sustainable object is one that remains useful and loved for years. But life changes. A nursery shelf becomes irrelevant when the child moves rooms. Projects designed with evolution in mind avoid premature obsolescence. This step closes the loop, ensuring your creation continues its journey responsibly.
How to Design for Evolution: Practical Strategies
A. Build in Adaptability
– Modular Components: Design shelves with adjustable pins instead of fixed brackets. Create room dividers from identical panels that can be rearranged.
– Neutral Foundations, Changeable Accents: Construct a bench frame from durable reclaimed wood. Upholster the cushion in a replaceable cover. When styles change, swap the cover—not the entire bench.
– Scalable Designs: Plan a herb garden spiral that can start small in a container and expand later. Design storage using uniform bins that can be added to over time.
B. Prioritize Repairability
– Visible Mending as Feature: Use contrasting thread for darning socks. Apply kintsugi-inspired techniques (food-safe epoxy with mica powder) to repair ceramics. These repairs become part of the object’s story.
– Document Your Process: Take photos during creation. Note measurements, materials, finishes. Store this “maker’s dossier” with the item. Future you (or the next owner) will appreciate it during repairs.
– Choose Repair-Friendly Materials: Solid wood can be sanded and refinished; particleboard cannot. Natural fibers can be darned; synthetics often unravel.
C. Plan for Graceful Retirement
– Design for Disassembly: Use screws instead of permanent glue where feasible. Label parts lightly with pencil (“Top,” “Left”).
– Know Material Endings: Untreated wood scraps can be composted or used as kindling. Natural fiber textiles can be cut into rags. Metal hardware can be recycled. Research local disposal options before you start.
– Create a “Pass-On” Plan: When a project no longer serves you, photograph it. Write a short note about its story. Offer it first to friends/family, then share in community groups with its history. This honors the object’s journey.
Common Evolution Mistakes to Avoid
– Over-Permanent Solutions: Gluing every joint when screws would allow future adjustment. Painting over beautiful wood grain when a light oil would preserve character and allow future refinishing.
– Ignoring Future Users: Designing a child’s toy with small, non-secure parts that become hazards as the child grows. Design with the next stage in mind.
– Sentimental Hoarding: Keeping a broken, unusable item “because of the memory,” when the memory could be preserved via photo and materials repurposed. Honor the memory; release the object responsibly.
Real-Life Example: The Evolving Play Kitchen
A maker built a play kitchen for their toddler using salvaged cabinet doors and scrap plywood.
– Adaptability: Designed with removable “appliances” (cardboard box oven, fabric sink) that could be swapped. Countertop height was adjustable via hidden brackets.
– Repairability: Used visible, colorful screws. When a drawer handle broke, the child helped choose a new one (a smooth river stone). The repair became a shared activity.
– Graceful Retirement: After five years, the kitchen was disassembled. Cabinet doors became art panels. Plywood was cut into smaller organizers. Hardware was saved. Remaining pieces were shared in a community group for another family to reuse. The materials continued their purposeful journey.
Counter-Example: A beautifully crafted wooden toy chest was built with intricate dovetail joints and sealed with multiple layers of polyurethane. Years later, the hinge broke. Repair required specialized tools and skills the owner lacked. The chest sat unused before being discarded. Had it used simple butt joints with screws and a natural oil finish, repair would have been accessible.
Evolution is not failure—it is wisdom. By designing with change in mind, your creations gain resilience. They become partners in your life’s journey, not relics of a single moment. This mindset shift—from “making an object” to “initiating a relationship with an object”—is the heart of sustainable DIY.
Bringing the Framework to Life: Three Projects Across Skill Levels
Theory gains meaning through practice. These projects demonstrate The Cycle of Intention in action. Each explicitly references framework steps, highlights adaptations, and shares insights. Approach them as adaptable case studies. Notice how decisions were made, not just what was made. Your version should reflect your materials, space, and story.
Project 1: The Story Wall — A Beginner’s Journey in Mindful Sourcing & Purposeful Design
Perfect for: Renters, small spaces, beginners, families, memory-keepers
Time Commitment: 2–4 hours (plus drying time)
Core Framework Steps Illustrated: Sourcing Mindfully, Designing with Purpose
Why It Works: Requires minimal tools, uses accessible materials, solves a universal need (displaying meaningful items without wall damage), and carries deep emotional resonance.
The Intention Behind the Project
In a digital age, physical mementos—children’s drawings, ticket stubs, pressed flowers—often get buried. The Story Wall creates a dedicated, evolving gallery celebrating ordinary moments. Designed for renters, it uses removable mounting. Designed for families, it invites contribution from all ages.
Phase 1: Source Mindfully (Your Material Hunt)
– Primary Material: Wooden embroidery hoops (thrift stores, craft resale shops). Seek mismatched sizes (4”, 6”, 8”) for visual interest. Check for cracks. Why hoops? Circular shape (symbolizing continuity), built-in tension for holding items, inner ring removable for “floating” effect.
– Secondary Materials:
– Backing: Scraps of neutral linen, burlap, or flattened/sturdy paper bags. Avoid synthetics that may yellow.
– Display Items: Gather before building: children’s art, fabric swatches, maps, handwritten notes.
– Mounting: Removable adhesive strips (check weight limits) OR small nails if permitted. Always confirm with landlord first.
– Ethical Sourcing Tip: Prioritize secondhand hoops. If buying new, choose bamboo over plastic.
Phase 2: Design with Purpose (Your Layout Plan)
– Functional Lens: Must hold lightweight paper/fabric securely. Must be rearrangeable. Must not damage walls.
– Emotional Lens: “Nostalgic,” “warm,” “inclusive.”
– Contextual Lens: Measure your wall space. Take a photo. Cut paper circles matching hoop sizes. Arrange on the photo until composition feels balanced. Consider sightlines: child height? Visible from a favorite chair?
– Pro Design Hack: Create “zones.” A cluster of small hoops for recent memories; a single large hoop for a special artifact. Leave intentional negative space for future additions.
Phase 3: Create with Care (Step-by-Step Assembly)
Tools Needed: Scissors, fabric glue or Mod Podge (non-toxic, water-based), pencil, ruler, sandpaper (fine grit), optional: natural beeswax block.
Materials Needed: Hoops, backing material, display items, mounting hardware.
- Prepare the Hoops:
- Gently sand rough edges. Wipe clean.
- Optional Finish: Rub lightly with beeswax block. Buff with soft cloth. Avoid varnishes—they create plastic look and emit VOCs.
-
Care Tip: Work near an open window. Place a damp cloth nearby for messy hands.
-
Create the Backing:
- Remove inner ring. Place outer ring on backing material. Trace circle 1 inch larger. Cut out.
-
For paper backings: Glue two layers together for strength. Let dry completely.
-
Assemble Each “Frame”:
- Place item face down. Center backing circle on top.
- Place outer hoop ring over both. Press inner ring firmly to secure tension. Do not overtighten—can warp hoop or tear paper.
-
Troubleshooting: If loose, add thin cardboard strip behind backing. If paper wrinkles, gently lift inner ring, smooth, reseat.
-
Mount with Care:
- For Removable Strips: Clean wall with rubbing alcohol. Let dry. Apply strips per instructions. Press firmly 30 seconds. Wait one hour before hanging.
- For Nails: Use smallest nails. Pre-drill tiny pilot holes in hoop wood to prevent splitting.
- Mounting Sequence: Start with largest hoop. Use a level. Arrange smaller hoops around it, stepping back frequently.
- Safety Note: For lightweight paper/fabric only. Never hang heavy items this way.
Phase 4: Evolve with Grace (Living With Your Creation)
– Adaptability: Rotate items seasonally. Add a new hoop for a birthday. Remove faded items.
– Repairability: If hoop cracks, replace just that hoop. Keep spares. If adhesive fails, clean residue with dental floss and reapply.
– Pass-On Plan: When moving, disassemble easily. Hoops can be reused for new projects (plant hangers). Share the concept with the next tenant.
Variations for Different Needs
– Small Spaces: Create a single “statement hoop” (12”) displaying a meaningful textile swatch. Mount beside bed or desk.
– Families with Young Children: Use larger hoops (8”+). Let children select items weekly. Use clothespins clipped to hoop rim for ultra-easy swapping.
– Visually Impaired: Incorporate textured elements: sandpaper for “rough seas” on a map, velvet for special occasions. The wall becomes a tactile memory map.
– Budget Alternative: No hoops? Use cardboard circles from shipping boxes. Cover edges with washi tape. Mount with reusable adhesive putty.
Why This Project Embodies Sustainable DIY
It transforms overlooked materials into a vessel for meaning. Requires no power tools, minimal chemicals, near-zero waste. Shifts focus from acquiring decor to curating memory. Value lies in stories held, not material cost. A Story Wall built with care becomes a touchstone—a visual reminder of joy and connection no mass-produced art can replicate.
Project 2: The Living Herb Spiral — An Intermediate Project in Purposeful Design & Creation with Care
Perfect for: Gardeners, cooks, urban homesteaders, educators, intermediate makers
Time Commitment: 4–6 hours (plus planting)
Core Framework Steps Illustrated: Designing with Purpose, Creating with Care, Evolving with Grace
Why It Works: Maximizes small-space gardening efficiency, creates microclimates for diverse herbs, uses reclaimed materials, provides daily utility.
The Intention Behind the Project
Standard herb gardens require significant flat space and group plants with differing needs. A herb spiral solves this elegantly: its vertical, spiraling design creates distinct microclimates in a compact footprint (as small as 3ft diameter). The top (sunny, dry) suits rosemary; the middle (moderate) suits sage; the base (cooler, moister) suits mint and parsley. Built from reclaimed materials, it becomes a sculptural focal point that feeds body and spirit.
Phase 1: Source Mindfully (Your Material Hunt)
– Primary Material: Reclaimed bricks, stones, or broken concrete pieces (“urbanite”).
– Where: Habitat ReStore (often sells “seconds”), construction sites (ask permission), demolition listings, your own property.
– Why reclaimed? Avoids energy cost of new brick production. Gives discarded materials new purpose.
– Safety First: Wear heavy gloves and safety glasses. Inspect for sharp edges. Avoid bricks with heavy paint (potential lead) or chemical residues.
– Secondary Materials:
– Soil: Mix existing garden soil with compost and coarse sand for drainage. Avoid bagged soils with synthetic fertilizers or unsustainable peat moss.
– Plants: Start with small herb seedlings from a local nursery or propagate from cuttings (basil stems in water). Prioritize perennials (rosemary, thyme, sage).
– Optional: Salvaged terra cotta pot shards for drainage layer.
Phase 2: Design with Purpose (Your Site & Structure Plan)
– Functional Lens: Must fit available space. Must provide proper drainage. Must position herbs according to sun/water needs. Must contain mint (plant in buried pot to prevent spreading).
– Emotional Lens: “Abundant,” “serene,” “productive.”
– Contextual Lens:
– Sun: Choose spot receiving 6+ hours of direct sun daily. South or west-facing ideal.
– Proximity: Place near kitchen door for easy harvesting.
– Scale: Sketch spiral on paper. 3ft diameter manageable for most. Height: 18–24 inches at peak.
– Pro Design Hack: Use a garden hose to outline spiral shape on ground before building. Adjust until curve feels organic and fits perfectly.
Phase 3: Create with Care (Step-by-Step Construction)
Tools Needed: Sturdy gloves, safety glasses, shovel, level, rubber mallet (optional), wheelbarrow, trowel.
Materials Needed: Reclaimed bricks/stones, soil mix, compost, sand, herb plants.
- Prepare the Foundation:
- Clear grass/weeds from outlined area. Dig shallow trench (2–3 inches deep) along spiral path for stability and drainage.
-
Care Tip: Work slowly. Kneel on cushion. Hydrate frequently. Honor your body’s limits.
-
Build the Spiral Wall:
- Start at outer base. Place largest, flattest stones first. Bed firmly into soil.
- Stack second layer, staggering joints (do not align seams vertically).
- As you spiral inward and upward, gradually increase height. Use smaller stones to fill gaps. Tap gently with rubber mallet to settle.
- Critical Check: Use level frequently on top surface of each layer. Adjust by adding/subtracting soil underneath stones.
-
Material Wisdom: Let materials guide you. A uniquely shaped stone might become a perfect “step.” Embrace organic variation.
-
Create Drainage & Fill:
- At center (lowest point), place broken pot shards or small stones for drainage.
- Begin filling spiral cavity with soil mix. Start from bottom, work up. Tamp soil gently to eliminate large air pockets (but don’t compact heavily—roots need air).
-
Soil Science: Layer soil types if possible: sandier mix at top (for drought-loving herbs), richer compost mix at base.
-
Plant with Intention:
- Water soil thoroughly before planting. Let settle.
- Plant according to microclimate:
- Top (Sunny/Dry): Rosemary, Thyme, Oregano, Lavender
- Middle (Moderate): Sage, Marjoram, Chives
- Base (Cool/Moist): Mint (in buried pot!), Parsley, Cilantro
- Care Tip: Handle seedling roots gently. Water deeply after planting. Mulch lightly with straw.
Phase 4: Evolve with Grace (Living With Your Creation)
– Adaptability:
– Seasonal Shifts: In cold climates, plant cold-hardy herbs at top. Add annuals (basil) in spring; replace with cold-tolerant options (parsley) in fall.
– Space Constraints: Build a “mini-spiral” in a large container (half whiskey barrel) using smaller stones. Perfect for balconies.
– Accessibility: For mobility challenges, build spiral on a raised platform (using properly cleaned/sealed reclaimed wood) to reduce bending.
– Repairability:
– If stone shifts, carefully remove soil nearby, reset stone, refill.
– Refresh soil annually with compost tea (steep compost in water 24 hours, strain, water plants).
– Prune herbs regularly to encourage growth.
– Graceful Retirement:
– After many years, if structure weakens, dismantle carefully. Reuse stones for path edging. Compost soil. Materials return to the cycle.
Variations for Different Needs
– Shady Yards: Focus on shade-tolerant herbs: mint, parsley, chives, lemon balm. Position to maximize dappled light. Accept slower growth.
– Water Conservation (Arid Climates): Line interior soil cavity with thin gravel layer before adding soil. Creates reservoir. Choose drought-tolerant herbs exclusively. Mulch heavily.
– Educational Tool: Label each herb with painted stone markers. Discuss plant needs, pollinators, microclimates. Children learn responsibility through watering and harvesting.
– No-Dig Alternative: Build spiral wall first. Place thick cardboard inside outline (smothering grass). Fill with soil mix. Cardboard decomposes, adding organic matter.
Why This Project Embodies Sustainable DIY
Transforms “waste” materials into a functional ecosystem. Reduces reliance on store-bought herbs (often plastic-packaged, shipped long distances). Teaches observation—learning how sun, water, and soil interact. Requires ongoing care, fostering daily connection with nature. The scent of crushed thyme, sight of bees on lavender, taste of homegrown basil—these sensory rewards deepen commitment to mindful creation far beyond the initial build.
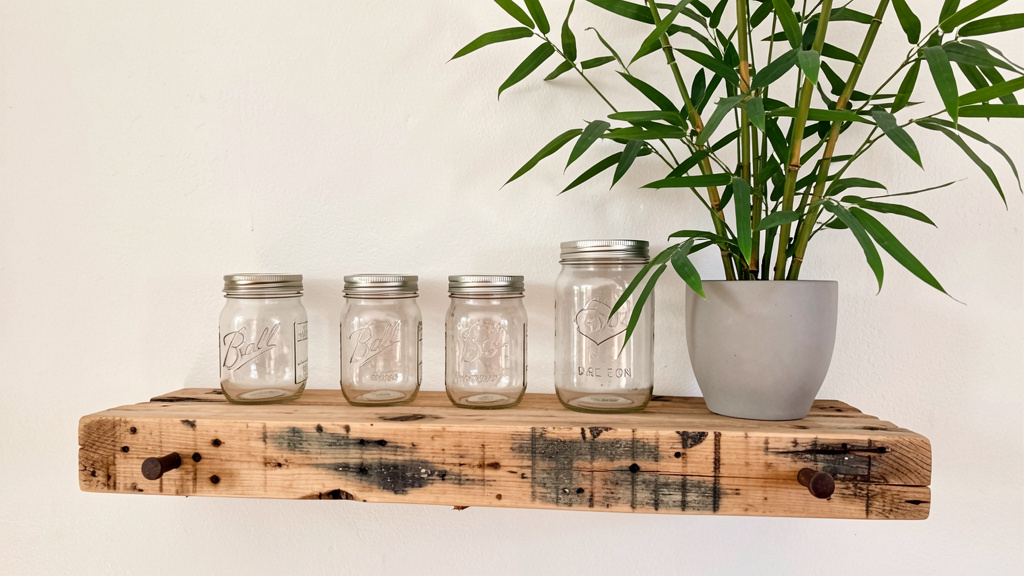
Project 3: Salvaged Wood Floating Shelves — An Advanced Study in Care, Evolution, and Material Honor
Perfect for: Woodworkers, homeowners, advanced makers, those seeking durable pieces
Time Commitment: 8–12 hours (plus finish curing time)
Core Framework Steps Illustrated: All Four Steps of the Cycle, with deep emphasis on Creating with Care and Evolving with Grace
Why It Works: Floating shelves offer clean aesthetics and functional storage. Building them from salvaged wood imbues character and history. This project demands precision, respect for material, and thoughtful engineering—resulting in pieces designed for longevity.
The Intention Behind the Project
Mass-produced floating shelves often use particleboard cores with thin veneers, failing under weight or humidity. This project creates shelves of integrity: solid wood, thoughtfully joined, finished with plant-based oils. They display objects with elegance. The visible grain and history of reclaimed wood (a factory floor, a barn wall) make the shelf itself meaningful. Crucially, the design prioritizes safety, repairability, and adaptability.
Phase 1: Source Mindfully (Your Material Hunt – The Critical Step)
– Primary Material: Solid reclaimed wood planks.
– Ideal Sources:
– Deconstructed Pallets: ONLY use pallets marked “HT” (Heat Treated). Avoid “MB” (Methyl Bromide—toxic). Look for thick hardwood pallets (oak, maple). Disassemble carefully.
– ReStore/Habitat: Seek old doors, tabletops, or shelving units made of solid wood. Inspect for warping, cracks, hidden metal.
– Construction Sites: With explicit permission, ask for cutoffs (ensure wood is untreated).
– Estate Sales: Old furniture with solid wood components.
– Wood Selection Criteria:
– Thickness: Minimum ¾ inch for shelves 24” or shorter; 1 inch+ for longer spans. Thicker = stronger.
– Straightness: Sight down plank length. Minor cupping may be planed out; severe twisting is unusable.
– Defects: Small knots add character. Large cracks, rot, or insect damage compromise strength—avoid.
– Safety Imperative:
– Metal Detection: Run strong magnet over every inch before cutting. Mark metal spots.
– Lead Check: For pre-1978 painted wood, use EPA-recognized lead test kit. If positive, do not sand—dispose properly or use outdoors only.
– Dust Control: Wear N95 respirator when cutting/sanding reclaimed wood.
Phase 2: Design with Purpose (Engineering for Safety & Beauty)
– Functional Lens (Non-Negotiable):
– Weight Capacity: Determine intended use. Books? Heavy ceramics?
– Guideline: For ¾” solid hardwood shelves properly installed into wall studs:
– Span up to 24” may support approximately 25–30 lbs of evenly distributed weight
– Span up to 30” may support approximately 15–20 lbs
– Always err on the side of caution. When in doubt, shorten span, increase thickness, or consult a professional. Test carefully after installation.
– Mounting System: Floating shelves require hidden internal support. Two reliable methods:
1. French Cleat: Angled wooden cleat mounted to wall; shelf has matching cleat. Very strong, adjustable. Best for heavier loads.
2. Metal Rod System: Heavy-duty steel rods embedded into shelf ends, secured into studs. Sleek look, requires precision.
– This Guide Uses French Cleat: More accessible for advanced DIYers, forgiving of minor wall imperfections, allows future height adjustment.
– Emotional Lens: “Timeless,” “grounded,” “authentic.” Let wood’s character shine—avoid over-sanding to sterile smoothness.
– Contextual Lens:
– Stud Finder Essential: Shelves MUST anchor into wall studs (typically 16” or 24” apart). Map stud locations before finalizing shelf dimensions.
– Level Check: Walls/floors rarely perfectly level. Design shelf length to fit between studs where possible.
– Pro Design Hack: Create full-size paper template. Tape to wall. Live with it 24 hours. Adjust before cutting wood.
Phase 3: Create with Care (Precision Craftsmanship)
Tools Needed: Safety glasses, N95 respirator, hearing protection, tape measure, pencil, square, saw (with guide), drill, Forstner bits, sandpaper (80, 120, 220 grit), clamps, level, stud finder, heavy-duty screws (3”+), wood glue.
Materials Needed: Reclaimed wood planks, 1×3 or 1×4 hardwood for cleats, non-toxic wood finish (tung oil, beeswax), natural wood filler (optional).
Part A: Preparing the Wood
1. Mill to Thickness (If Needed): If planks vary, use planer for uniformity. Alternative: Select planks of similar thickness; design to showcase variation.
2. Joint Edges: For multi-plank shelves, joint edges straight using jointer or hand plane for tight seams.
3. Glue-Up (For Wider Shelves):
– Arrange planks face-down. Apply wood glue to edges.
– Clamp tightly. Wipe excess glue immediately.
– Check flatness with straightedge. Cure 24 hours.
– Care Tip: Work in dust-free area. Cover floor. Play calming music—this is meditative work.
Part B: Cutting & Shaping
1. Final Dimensions: Cut shelf to exact length using saw with guide.
2. Create Cleat Pockets:
– On shelf back, mark where cleat sits (typically 1–1.5” down from top edge).
– Hollow out recess (¼” deep) matching cleat profile using Forstner bit or router.
– Precision Matters: Test-fit cleat frequently. Snug fit prevents wobble.
3. Sand Progressively: Start 80 grit, progress to 220. Sand with grain. Wipe dust with tack cloth.
– Honor the Grain: Leave subtle saw marks if they add authenticity. Feel texture—does it invite touch?
Part C: Finishing with Integrity
1. Choose Finish Wisely:
– Tung Oil: Penetrates deeply, enhances grain, water-resistant when cured. Requires 3–4 coats, 24h between coats.
– Beeswax + Citrus Solvent: Softer sheen, easy repair, pleasant scent. Less water-resistant—ideal for low-moisture areas.
– Avoid: Polyurethane (plastic look, higher VOCs), stains with heavy solvents.
2. Apply Finish:
– In ventilated area, apply thin coat with lint-free cloth. Wipe excess after 15 minutes.
– Lightly sand with 320 grit between coats.
– Cure fully per product instructions.
– Care Ritual: As you apply each coat, reflect on the wood’s journey. This mindful act imbues intention.
Part D: Mounting with Absolute Safety
1. Build the Cleats:
– Cut two cleats: wall cleat (mounted vertically), shelf cleat (mounted horizontally on shelf back). Angle cut at 30–45 degrees.
– Sand and finish to match shelf.
2. Mount Wall Cleat:
– Locate studs precisely. Mark centers.
– Hold cleat level at desired height. Pre-drill holes through cleat into studs.
– Secure with 3” structural screws. Double-check level.
3. Attach Shelf Cleat:
– Securely glue and screw mating cleat into recessed pocket on shelf back.
4. Hang the Shelf:
– Lift shelf, align cleats. Slide down until seated. Test stability: Apply gentle downward pressure. Should not shift.
– Critical Safety Check: Place intended load on shelf. Observe 24 hours. Check mounting screws periodically.
Phase 4: Evolve with Grace (A Legacy Piece)
– Adaptability:
– Height Adjustment: French cleat system allows easy repositioning. Need lower shelves? Unhook, remount cleat lower.
– Modular Expansion: Build additional shelves to same cleat system. Create cohesive wall system over time.
– Repairability:
– Scratches/Dings: Sand lightly, reapply finish. For deep scratches, use natural clay-based wood filler, then refinish spot.
– Loose Cleat: Tighten screws. If wood stripped, fill hole with toothpicks + wood glue, dry, redrill.
– Document: Keep small note tucked behind shelf: “Built [Date] from [Source Wood]. Cleat mounted into studs at [Height].” Future owners appreciate this.
– Graceful Retirement:
– If moving, unhook shelves. Cleats remain discreetly for next owner.
– If wood reaches end-of-life decades later, untreated wood can be composted or used as kindling. Metal screws recyclable.
– Pass-On Story: When gifting or selling home, share shelf’s origin story. Connection elevates object beyond function.
Variations for Different Needs
– Renters (Non-Permanent): Build freestanding A-frame ladder shelf from reclaimed wood. No wall mounting. Easily moved.
– Heavy Loads (Book Storage): Increase shelf thickness to 1.5”. Use denser wood (oak, maple). Shorten span to max 24”. Use double French cleats for extra security.
– Curved Shelves: Requires advanced techniques (steam bending). Source thin, flexible wood strips. Only attempt with thorough research and safety gear.
– Budget-Conscious: Use high-quality plywood (Baltic birch) with solid wood edging. Prioritize FSC-certified if new. Still requires careful finishing and mounting.
Why This Project Embodies Sustainable DIY at its Peak
Demands deep respect for material, precision, and unwavering commitment to safety. Transforms discarded wood into functional art of lasting quality. Cultivates patience, skill, and mindfulness. Result is not just storage; a daily reminder of resourcefulness and connection to material history. Shelves hold objects for years, patina deepening with time. May be passed on, carrying stories of creation and care. Represents full maturity of the Cycle of Intention: honoring past, serving present with integrity, designed to evolve gracefully.
Navigating Common Frictions: Your Sustainable DIY Compass
Even with the clearest framework, real-world hurdles arise. Time feels scarce. Skills feel inadequate. Materials feel elusive. Perfectionism paralyzes. These frictions are universal touchpoints. How we navigate them defines our journey. This section offers compassionate, practical strategies. Think of it as your field guide for when the path gets rocky.
Friction 1: “I Don’t Have Enough Time”
The myth of the “weekend warrior” project creates pressure. Sustainable creation thrives in small, consistent moments—not heroic marathons.
Reframe the Narrative:
Shift from “I need a whole Saturday” to “I have 15 minutes today.” Sustainable DIY is cumulative. Sanding one shelf edge while waiting for dinner is progress. Sorting fabric scraps during a TV break builds your resource library.
Micro-Action Strategies:
– The 10-Minute Tidy: Dedicate 10 minutes daily to your creation space. Wipe tools, return items to bins, sweep sawdust. A maintained space reduces startup friction tomorrow.
– Batch Small Tasks: Save all hand-sanding for one evening with music. Do all measuring/cutting in one session. Grouping similar micro-tasks builds momentum.
– Embrace “Slow Making”: Like slow food, slow making values process. Savor the rhythm of sanding. Notice wood’s scent. This mindfulness transforms “chores” into restorative ritual.
– Involve Household: Turn tidying the craft corner into a family activity. Assign age-appropriate micro-tasks (child sorts buttons; partner holds a piece steady).
Remember: A project completed slowly with presence is more sustainable than one rushed with stress. Your engagement in the process matters more than the clock.
Friction 2: “I’m Not Skilled Enough”
Imposter syndrome whispers: “Real makers use power tools. Real makers never make mistakes.” This is a cultural myth. All skill begins with beginner’s mind.
Reframe the Narrative:
Skill is built through intentional practice. Every scratch, every mis-cut, is data. It teaches your hands, eyes, and intuition. The Japanese concept of shokunin describes deep pride in continuous improvement, not perfection.
Progressive Skill-Building Path:
1. Start with Hand Tools: A hand saw, chisel, and sandpaper teach material feedback far better than power tools. You learn grain, resistance, control.
2. Master One Technique: Focus on perfecting one skill per project. Project 1: precise measuring. Project 2: clean sanding. Celebrate that micro-mastery.
3. Seek Targeted Learning:
– Online: Search “beginner [technique]” (e.g., “beginner hand sawing”). Watch 2–3 videos from different creators. Note common tips.
– Local Resources: Community colleges, makerspaces, or hardware stores often offer low-cost workshops. Learning alongside others reduces isolation.
– Mentorship: Ask a skilled friend: “Could I watch you do this once?” Offer to help with their project.
4. Keep a “Lessons Learned” Journal: After each project, jot one thing you’d do differently. “Sanded with grain direction—much smoother result!” This builds objective confidence.
Crucial Reminder: Your unique “imperfect” touch is what makes the piece yours. Machine-perfect edges lack soul. A slightly wobbly stitch tells a human story. Honor your learning curve—it is part of the object’s authenticity.
Friction 3: “I Can’t Find the ‘Right’ Materials”
Scarcity mindset triggers anxiety: “If I don’t get this exact wood, the project fails.” Sustainable sourcing thrives on adaptability.
Reframe the Narrative:
The “right” material is the one that is available, safe, and sparks your intention. Constraints breed creativity. A project adapted to your actual materials will feel more authentically yours.
Adaptive Sourcing Toolkit:
– The “Good Enough” Filter: Ask:
1. Is it structurally sound for this purpose? (No rot, major cracks)
2. Is it safe? (No toxic residues, hidden metal)
3. Does it resonate with my intention? (Color, texture, story)
If yes to all three, it’s the right material.
– Design Pivot Protocol:
– Scenario: Planned shelf from 1×12 planks, but only find 1x8s.
– Pivot: Design narrower shelf. Or join two 1x8s side-by-side. Or embrace narrower profile—design dedicated spice rack.
– Mantra: “The material leads; I follow.”
– Build a “Scrap Library”: Dedicate small bin for usable scraps: wood >6”, fabric >4×4”, interesting hardware. Label contents. Before new project, check library first.
– Community is Key: Post in sharing groups: “Seeking scrap wood for small project.” Be specific. Many makers have cutoffs to share. Offer skill trades (e.g., “I’ll mend jeans for wood scraps”).
Wisdom from Practice: Cherished creations often emerge from unexpected substitutions. A maker intended cedar planter but found weathered pallet wood. Embraced rustic look, sealed with linseed oil, planted succulents. The weathered character became its defining charm—more meaningful than original plan.
Friction 4: “What If I Fail? What If It’s Ugly?”
Perfectionism confuses process with product, and equates mistakes with inadequacy.
Reframe the Narrative:
There are no failures—only experiments, iterations, and learning. “Ugly” is often unfamiliar. A visible repair, asymmetrical shape, bold color choice—these can become beloved features with time.
Antidotes to Perfectionism:
– Define “Success” Differently: Before starting, write: “This project is successful if…”
– …I learn one new technique.
– …I use materials that would have been discarded.
– …I spend 30 minutes creating without judgment.
Shift success from appearance to growth and intention.
– Embrace “Wabi-Sabi” Practice: Intentionally leave one “imperfection” visible. A contrasting stitch. A knot unpainted. This trains your eye to see beauty in authenticity.
– The “Prototype” Rule: For complex projects, build rough version first from cardboard or scrap wood. Expect it to be imperfect. Its purpose is to test dimensions. Removes pressure from final piece.
– Time-Distance Perspective: Ask: “Will this ‘flaw’ matter in one year? Five years?” Often, no. Emotional value of having made it outweighs minor concerns.
– Share the Story: When someone notes a “flaw,” share the story: “This scratch happened when my child helped sand it—now it’s my favorite part.” Reframing transforms perceived flaws into connection points.
Profound Truth: Objects we love most are rarely the “perfect” ones. They are the slightly lopsided mug from a pottery class, the quilt with mismatched squares, the shelf with a visible repair. These imperfections hold memory, effort, and humanity. They are proof of living.
Friction 5: “It Feels Overwhelming—Where Do I Start?”
The scope of sustainability can feel paralyzing. Should I compost? Upcycle everything? Build solar panels?
Reframe the Narrative:
Sustainability is not a destination; it is a direction. Tiny, consistent actions create profound cumulative impact. You are not responsible for solving everything—you are responsible for your next mindful choice.
The “One Degree” Strategy:
Imagine a ship changing course by one degree. Initially imperceptible. Over miles, reaches a different destination. Apply to your DIY practice:
– This Week: Conduct one resource audit. Find three items suitable for repurposing.
– This Month: Complete one small project using only materials you own (Story Wall is perfect).
– This Season: Establish one new habit (e.g., saving cardboard tubes in a bin).
– This Year: Share knowledge. Teach a child to mend a sock. Post project photo with sourcing tips.
Anchor in Your “Why”:
Reconnect to core motivation. Reducing waste? Creating meaning? Teaching resourcefulness? Write your “why” on a sticky note. Place where you create. When overwhelm hits, reread it. Let it guide your next small step.
Final Compass Point: Sustainable DIY is a practice of compassion—for the planet, communities, future generations, and crucially, for yourself. Release pressure to be perfect. Celebrate showing up. Honor the effort. Your journey, with all its beautiful imperfections, is exactly what the world needs. Start where you are. Use what you have. Do what you can. The rest will unfold.
Your Questions, Answered
These questions reflect real queries gathered from makers. Answers blend practical guidance with underlying principles.
Q: How do I find reclaimed materials near me without spending hours searching?
A: Build a targeted sourcing system. First, identify 2–3 reliable local sources: a Habitat ReStore, a specific community sharing group, a friendly local business (coffee shop for burlap sacks). Bookmark websites or save contact info. Set a recurring calendar reminder: “First Saturday: Visit ReStore.” Second, optimize online searches: Use group search filters (“Free,” your city). Save frequent searches. Third, network intentionally: Tell friends, “I’m collecting clean cardboard tubes—let me know if you have any!” People enjoy helping with specific requests. Start small—dedicate 20 minutes weekly. Consistency beats marathon searches.
Q: Are “upcycled” projects always more sustainable than buying new?
A: Not automatically—it depends on the full lifecycle. Consider:
– Energy Input: Does the upcycling process require significant energy (e.g., melting plastic)? Hand-tool projects generally have lower impact.
– Longevity: Will the upcycled item last? A poorly constructed item may break quickly, creating more waste. Prioritize sturdy builds.
– Material Safety: Avoid upcycling items with toxic histories (pressure-treated wood, lead-painted furniture). When in doubt, choose different material.
– Opportunity Cost: Time spent on complex upcycle could be used for higher-impact actions (reducing consumption). Balance is key.
Guiding Principle: Upcycling is most sustainable when it uses already-discarded materials, requires minimal additional resources, creates a durable, loved item, and prevents landfill. When these align, it’s a powerful choice.
Q: What’s the safest way to clean and prepare reclaimed wood?
A: Safety is paramount. Follow this protocol:
1. Initial Inspection: Wear gloves. Check for nails, screws, staples. Remove with pry bar or pliers.
2. Metal Scan: Run strong magnet over entire surface. Mark detected metal spots.
3. Cleaning: For surface dirt, scrub with stiff brush and mild soap (Castile soap) + water. Rinse. For mold/mildew, use 1:1 white vinegar/water solution. Scrub, rinse thoroughly. Never use bleach—it leaves residues and weakens wood.
4. Drying: Air-dry completely in ventilated area, off the ground. Time varies by thickness and humidity. Wood must be bone-dry before finishing.
5. Final Sanding: Start coarse (60–80 grit) to remove grime, progress to fine (150–220 grit). Wear N95 respirator and safety glasses. Sand with grain.
Critical: If wood has unknown chemical treatments, heavy paint (pre-1978), or severe rot, do not use for indoor projects. Repurpose outdoors or dispose properly.
Q: I live in an apartment with no outdoor space or garage. Can I still do sustainable DIY?
A: Absolutely—apartment-friendly sustainable DIY thrives on scale and creativity. Focus on:
– Small-Scale Projects: Mending clothing, fabric scrap coasters, desktop herb garden in repurposed jars, making paper from junk mail.
– Workspace Solutions: Use folding table stored in closet. Work on large cutting board over bathtub (for messy projects—cover edges with towels). Designate “project tote” (large basket) for tools/materials; store under bed.
– Ventilation: For finishing, work near open window with fan blowing outward. Choose low-VOC or zero-VOC finishes (beeswax, milk paint).
– Community Resources: Seek local makerspaces or tool libraries—often affordable memberships with dedicated workspace. Partner with neighbor who has balcony for messy steps.
– Mindset: Your constraint (small space) is a creative catalyst. It encourages precision, minimalism, and projects of deep personal meaning. Many profound creations begin on a kitchen table.
Q: How do I know if a finish (stain, sealant) is truly non-toxic?
A: Navigate marketing claims with these steps:
1. Check VOC Content: Look for “Zero VOC” or “Low VOC” on label. VOCs harm indoor air quality. Reputable brands disclose this.
2. Read Full Ingredient List: Avoid: formaldehyde, toluene, xylene, methylene chloride. Seek recognizable ingredients: tung oil, linseed oil, beeswax, citrus solvent, plant-based resins.
3. Seek Third-Party Certifications: Green Seal, Greenguard Gold, or ECOS Certified indicate rigorous testing.
4. Research the Brand: Reputable eco-brands transparently share ingredient sourcing and practices on websites.
5. Trust Senses Cautiously: Truly low-impact finishes have mild, natural scents. Strong chemical odors = red flag. However, some toxins are odorless—never rely solely on smell.
Trusted Options: Pure tung oil (check “polymerized” vs. raw), Rubio Monocoat (plant-based), Tried and True Wood Finish (beeswax + linseed oil), milk paint (The Old Fashioned Milk Paint Co.). When in doubt, contact manufacturer directly.
Q: What should I do with project scraps too small to reuse?
A: Implement a tiered scrap management system before creating:
– Tier 1: Reclaimable Scraps (>6” wood, >4×4” fabric): Store in labeled bins for future projects (mosaics, patchwork).
– Tier 2: Compostable (untreated wood shavings, natural fiber scraps like cotton/linen/wool): Add to home compost or municipal green waste. Confirm: Synthetics and treated wood do NOT compost.
– Tier 3: True Waste (plastic packaging, metal shavings): Minimize this stream. For unavoidable items:
– Metal: Collect; take to scrap metal recycler.
– Clean wood scraps: Some municipalities accept; otherwise, use as kindling (if untreated).
– Fabric scraps: Some animal shelters accept clean cotton for bedding; contact first.
Pro Tip: Keep a small “scrap journal.” Note what scraps you generate most. This informs future projects. Goal isn’t zero waste overnight, but conscious reduction and responsible diversion.
Q: How can I involve my children in sustainable DIY safely and meaningfully?
A: Age-appropriate involvement builds lifelong values. Structure is key:
– Ages 2–5: Sensory exploration. “Help” sort fabric scraps by color. Use washable natural paints on wood scraps. Make playdough from flour/salt/water. Safety: Constant supervision; non-toxic materials; no small parts.
– Ages 6–10: Introduce basic tools with guidance. Sanding blocks on scrap wood. Safety scissors to cut fabric for pouch. Plant seeds in repurposed containers. Assign “jobs”: “You’re in charge of the glue stick!”
– Ages 11+: Teach tool safety progressively. Hand sawing soft wood (balsa) with supervision. Simple sewing. Designing their own small project (bookmark from scrap leather).
Universal Tips:
– Set Clear Boundaries: “Tools stay on the red mat.” “We clean up before snack.”
– Celebrate Process: Praise effort (“You sanded so carefully!”) over perfection.
– Connect to Values: “We’re using this old shirt to make a tote bag so it doesn’t go to landfill. Great job helping!”
– Start Small: 15–20 minute sessions prevent overwhelm. End on a high note.
Goal isn’t perfect projects—it’s fostering curiosity, responsibility, and joy in creating together.
Q: Is buying secondhand materials (thrifted fabric, ReStore wood) truly sustainable if I’m “taking” from donation streams?
A: This is nuanced. The answer lies in intentional participation:
– Support the System: Shopping at Habitat ReStore or thrift stores directly funds their charitable missions (affordable housing, community programs). You support circular economy infrastructure.
– Donate Back: Commit to donating your own usable materials when you no longer need them. Close the loop.
– Prioritize Truly Discarded Items: Focus energy on materials headed for landfill (construction cutoffs, business discards, community “free” sections) before shopping donation streams.
– Mindful Consumption: Buy only what you will genuinely use. Avoid hoarding “just in case.” This ensures resources flow to those who need them.
Your participation, when thoughtful, strengthens the entire reuse ecosystem.
Q: How do I store reclaimed materials safely until I’m ready to use them?
A: Proper storage preserves materials and prevents hazards:
– Wood: Store flat on sawhorses or shelves in a dry, covered area. Stack with spacers (“stickers”) between layers for airflow to prevent warping. Cover with breathable cloth (not plastic) to reduce dust while allowing moisture exchange.
– Fabric/Textiles: Wash if possible. Store folded in breathable cotton bags or acid-free boxes. Add lavender sachets to deter moths (avoid mothballs—they contain toxins). Keep in cool, dark place to prevent fading.
– Metal: Wipe clean. Store in dry area. Lightly coat with mineral oil to prevent rust if storing long-term.
– General: Label containers clearly (“Oak scraps >12””, “Linen swatches”). Keep in accessible location so you remember you have them. Regularly review your stash—release items you won’t use to make space for what you will.
Q: What are the most common beginner mistakes in sustainable DIY, and how can I avoid them?
A: Awareness prevents frustration:
1. Skipping the Design Phase: Jumping straight to cutting. Fix: Spend 15 minutes sketching, measuring space, prototyping with cardboard.
2. Underestimating Time: Planning a 2-hour project that takes 6. Fix: Double your time estimate. Break into micro-sessions.
3. Ignoring Safety: Skipping goggles or respirator “just this once.” Fix: Keep safety gear visible and accessible. Make it non-negotiable.
4. Hoarding Materials: Acquiring without a plan. Fix: Adopt “one in, one out” rule for your stash. Only acquire when you have a clear project vision.
5. Comparing to Perfection: Scrolling polished social media projects. Fix: Curate your feed. Follow makers who share process, not just polished results. Celebrate your own progress.
Remember: Every maker was once a beginner. Mistakes are data, not failure. Be kind to yourself.
Conclusion and Next Step
Sustainable DIY is not about achieving perfection or accumulating projects. It is a practice—a way of moving through the world with greater awareness, care, and connection. It invites us to slow down, to see value where others see waste, and to weave our values into the very spaces we inhabit. The Cycle of Intention—Source Mindfully, Design with Purpose, Create with Care, Evolve with Grace—offers a compass, not a map. Your path will be uniquely yours, shaped by your hands, your home, and your heart.
Recap: The Three Anchors
1. Intention Over Inventory: Start with why before what. A project rooted in personal meaning and real need will endure far longer than one chasing trends.
2. Constraints as Catalysts: Limited space, time, tools, or materials are not barriers—they are invitations to innovate with greater creativity and resourcefulness.
3. Progress, Not Perfection: Honor the wobble in your stitch, the visible repair, the story in the wood grain. These are not flaws; they are fingerprints of humanity and care.
The 24-Hour Rule
Within the next 24 hours, take one tiny, tangible step:
→ Open one drawer or closet and identify one item you already own that could be repurposed.
→ Take a photo of a space in your home that feels “unfinished” and sketch one simple idea on it.
→ Message one local business or community group to inquire about material availability.
This micro-action breaks inertia. Momentum follows.
The Bigger Picture
Each mindful choice ripples outward. When you mend a garment, you honor the labor and resources embedded within it. When you build a shelf from reclaimed wood, you divert material from landfill and create a functional heirloom. When you share your process with a child or neighbor, you plant seeds of resourcefulness. These acts, multiplied across communities, reshape our relationship with stuff—from disposable to cherished, from extractive to regenerative. You are not just making objects; you are participating in a quieter, more compassionate way of living. One intentional creation at a time.
Explore Our Complete System:
The Mindful Mender’s Handbook: Visible Repair Techniques for Textiles | Zero-Waste Workshop: Setting Up an Eco-Conscious Creation Space | Seasonal Crafting Calendar: Projects Aligned with Nature’s Rhythms | Community Sourcing Guide: Building Local Networks for Material Exchange | Non-Toxic Finishes Deep Dive: A Maker’s Guide to Safe and Beautiful Results | Adaptive Design Principles: Creating Flexible Home Solutions | The Legacy Project: Designing Heirloom-Quality Pieces with Reclaimed Materials