Unlock the full potential of your drill/driver with advanced techniques, material-specific strategies, and pro-level troubleshooting that transforms this everyday tool into a precision instrument.
For most DIY enthusiasts and weekend warriors, the drill and driver represents reliable utility—hanging a shelf, assembling flat-pack furniture, or driving the occasional screw. Yet beneath this surface of routine utility lies a profound depth of capability waiting to be unlocked. This guide moves decisively beyond the foundational mechanics of “how to hold the trigger” to explore the nuanced interplay of tool physics, material science, and human technique that separates adequate results from true mastery. Whether you’ve wrestled with a stripped screw head buried deep in hardwood, watched a drill bit skate across polished tile, or felt the sickening snap of a broken bit inside concrete, the solutions reside not in purchasing more tools, but in deepening your understanding of the instruments you already own. Based on documented patterns observed across professional woodworking forums, maker communities, and workshop repair logs, the root cause of most drill-related frustrations stems not from user error, but from an incomplete understanding of the dynamic relationship between tool, accessory, and material. This guide bridges that gap with actionable, field-tested strategies designed to elevate your confidence and competence with every pull of the trigger—transforming frustration into fluency.
Introduction
Step into any hardware aisle, and you’re met with an overwhelming symphony of specifications: 20V MAX™, 1,500 in-lbs of torque, brushless motors, hammer function, impact-rated. Marketing relentlessly emphasizes raw power and technological novelty, yet rarely addresses the subtle artistry required to translate that potential into clean, precise, repeatable results. The consequence? A pervasive cycle of minor but demoralizing setbacks: screws driven flush one moment and stripped the next; holes that wander off-center despite careful marking; bits that overheat, dull prematurely, or fracture under pressure; projects delayed by avoidable errors that erode confidence. These are not indicators of incompetence—they are symptoms of fragmented knowledge. True mastery begins with a fundamental perspective shift: viewing the drill/driver not as a simple hole-making appliance, but as a precision instrument whose output is directly shaped by informed choices and deliberate actions. Industry standards published by the American National Standards Institute (ANSI) and the Builders Hardware Manufacturers Association (BHMA) provide essential frameworks for tool safety and performance. However, proficiency emerges when these standards are translated into context-aware decisions on the workshop bench or job site. This guide synthesizes mechanical engineering principles, material science insights, and technique refinements observed across cabinetry, metal fabrication, and construction trades to deliver a comprehensive, actionable roadmap. By the conclusion, you will possess a robust mental framework for approaching any drilling or driving task with foresight, precision, and unwavering confidence—turning your drill/driver into the most versatile and trusted tool in your arsenal.
The Precision Power Framework: Three Layers to Mastery
Achieving consistent, professional-grade results with a drill or driver is never accidental. It is the deliberate product of a three-layered system addressing the tool’s inherent capabilities, the material’s physical properties, and the human technique applied. Developed through analysis of high-performing workflows across precision trades, this framework transforms guesswork into a repeatable, adaptable methodology. Each layer is interdependent; neglecting any single component introduces vulnerability. Selecting the perfect carbide-tipped bit (Layer 2) proves futile if the tool’s clutch is misadjusted for the task (Layer 1). Conversely, flawless tool setup cannot compensate for poor body mechanics or inconsistent angle control (Layer 3). Mastery emerges from the synergistic integration of all three layers. The following sections deconstruct each layer with granular detail—not merely prescribing actions, but illuminating the underlying “why” that empowers adaptive problem-solving across countless unforeseen scenarios. This is not a collection of isolated tips; it is a cohesive system designed to build intuitive competence.
Layer 1: Tool Intelligence – Decoding Your Drill/Driver’s Language
Before a single hole is drilled or screw driven, mastery begins with fluency in your tool’s capabilities, limitations, and communication signals. Modern drills and drivers convey critical information through specifications, physical feedback, and adjustable features. Learning to interpret this language prevents damage to materials, accessories, and the tool itself. This layer transcends brand loyalty or voltage comparisons to focus on universal mechanical principles applicable to virtually any drill/driver encountered—from a vintage corded model to the latest brushless cordless system.
Decoding the Specs: Voltage, Torque, RPM, BPM—Translating Numbers into Real-World Capability
When evaluating a drill or driver, specifications like voltage (V), torque (in-lbs or Nm), revolutions per minute (RPM), and blows per minute (BPM) are far more than marketing metrics—they are direct predictors of performance boundaries. Voltage primarily correlates with potential power output and runtime capacity in cordless tools. A 12V tool offers exceptional portability, balance, and control for light-duty tasks: assembling furniture, driving small trim screws into softwood, or detail work where finesse outweighs brute force. An 18V or 20V MAX™ tool (note: “MAX” is a branding convention; nominal voltage remains ~18V) delivers the versatile power band required for the majority of household and workshop projects—from drilling pilot holes in dimensional lumber to driving structural screws into pressure-treated deck framing. For sustained high-demand applications—drilling large-diameter holes in dense hardwoods, mixing thick compounds, or extensive masonry work—a higher-voltage platform (28V/36V) or a dedicated corded model provides uninterrupted power. Crucially, higher voltage alone does not guarantee superior performance; it must be harmonized with motor design, gearing efficiency, and thermal management. A well-engineered 18V brushless motor often outperforms a poorly designed higher-voltage brushed counterpart due to reduced energy loss and smarter power delivery.
Torque, measured in inch-pounds (in-lbs) or Newton-meters (Nm), quantifies rotational force—the tool’s capacity to drive screws or penetrate resistant materials. Impact drivers excel here, utilizing concussive rotational impacts (measured in BPM) to deliver high peak torque with reduced user fatigue. Contextualize these numbers: driving a structural screw into dense hardwood may require substantial torque; assembling furniture with small screws demands minimal force. Misapplying a low-torque tool to a high-resistance task leads to stalled motors or stripped screw heads. Conversely, deploying a high-torque impact driver on delicate materials like particleboard cabinet backs, thin-gauge metal, or finished hardwood surfaces risks surface damage or joint failure. Always match the tool’s torque profile to the task’s demands. This is where the adjustable clutch (explored next) becomes indispensable for drill/drivers. Impact drivers lack clutches; their torque delivery is inherently aggressive. Reserve them for applications where maximum driving force is required and surface precision is secondary (framing, deck construction). For finish carpentry, cabinetry, or electronics assembly, the controlled torque of a drill/driver with a precise clutch is essential.
RPM indicates rotational speed. Higher RPMs (1,500–2,000+) are optimal for drilling small-diameter holes in soft materials—pilot holes in pine, clearance holes in drywall—where chip evacuation is easy. Lower RPMs (300–600) provide greater torque control and reduced heat generation for driving screws, drilling large holes (over 1/2-inch), or working in dense materials like maple, brass, or thick steel. Variable-speed triggers are critical for mastery. The ability to feather the trigger for delicate tasks (starting a screw in a hinge) or apply full speed for aggressive material removal defines expert usage. Hammer drills introduce BPM (blows per minute), a percussive axial action synchronized with rotation. This mechanism is designed specifically for fracturing brittle materials like concrete, brick, or tile. Without hammer mode engaged, even a high-torque drill will overheat and rapidly dull bits when encountering masonry. Understanding these specifications allows you to select the right tool from your existing collection. When uncertainty arises, consult the tool’s manual for the manufacturer’s stated intended applications and limitations. Reputable brands rigorously test these boundaries; respecting them extends tool life and ensures safety.
The Clutch: Your Secret Weapon for Screw Control and Material Preservation
Often relegated to an afterthought or misunderstood as a “power limiter,” the adjustable clutch ring (typically numbered 1–20+ on drill/drivers) is arguably the single most important feature for precision screw driving and material preservation. Located just behind the chuck, this ring controls the precise torque threshold at which the internal clutch disengages with an audible “click,” preventing over-driving. Lower numbers (1–6) deliver minimal rotational force, ideal for delicate operations: securing brass hinges on a fine cabinet door without crushing the wood, driving screws into drywall without breaking the paper face, fastening thin plywood backs, or working with softwoods like cedar where screws can easily sink past the surface. Mid-range settings (7–15) handle the vast majority of general-purpose tasks: driving deck screws into pressure-treated lumber, assembling outdoor furniture, installing shelf standards, or driving into medium-density hardwoods like cherry or walnut. Higher settings (16–20+) approach the tool’s maximum rotational capacity, reserved for driving large lag bolts into structural timber, self-tapping screws into thick steel studs, or situations requiring maximum force where over-driving is not a concern. The highest setting, often marked with a drill bit icon, disengages the clutch entirely, dedicating all power to drilling mode.
Mastering clutch calibration eliminates the most pervasive screw-driving frustrations. Consider attaching a shelf bracket to a hardwood cabinet: set the clutch too high, and the screw may bury itself deep into the wood, weakening the joint or marring the surface. Set it too low, and the clutch clicks prematurely after only partial engagement, leaving the screw protruding. The solution is systematic calibration: secure a scrap piece of the exact material you are working with. Insert the intended screw type. Begin at a conservative mid-range setting (e.g., 10). Drive the screw. Observe the result. If the screw sits proud, increase the setting incrementally and repeat. If it sinks too deep, decrease the setting. Continue this iterative process until the screw head sits perfectly flush or at the desired countersunk depth. For critical applications requiring absolute consistency—pocket hole joinery, installing multiple hinges—combine clutch calibration with a physical depth stop: wrap a piece of masking tape around the screw shaft at the desired penetration depth. When the tape meets the surface, stop driving. This dual-method approach (clutch + visual stop) delivers reliable repeatability. Impact drivers lack this nuanced control; their high-torque bursts are ideal for structural fastening where precise depth is secondary to holding power. However, for any task where surface integrity, joint strength, or aesthetic finish matters, the drill/driver’s clutch is irreplaceable. This deliberate calibration transforms screw driving from a gamble into a predictable, repeatable process—preserving materials, saving time on corrections, and building profound user confidence.
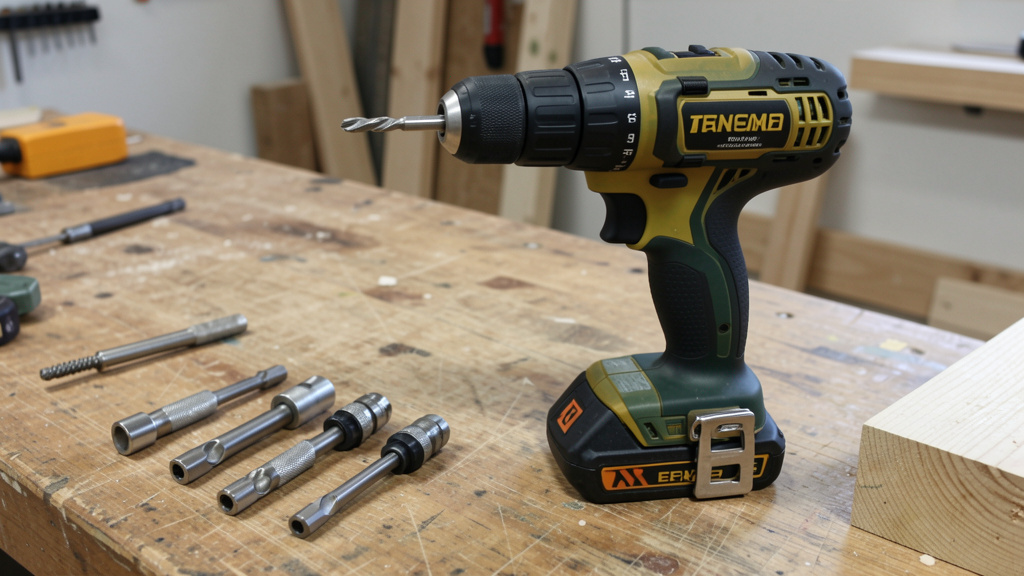
Chuck Types, Bit Security, and the Critical Role of Concentricity
The chuck—the mechanism securing the bit to the tool—is the critical mechanical interface between human intention and physical result. Wobble, slippage, bit ejection, or inconsistent hole placement almost always originate here. Understanding chuck types, proper tightening protocols, and bit shank compatibility is non-negotiable for precision.
Keyless chucks (tightened by hand) dominate consumer and prosumer tools for speed and convenience. However, “hand-tight” is insufficient. The recommended protocol: insert the bit shank fully into the chuck jaws until it bottoms out. Firmly grasp the chuck collar with one hand. With the tool unplugged or battery removed, press the trigger in reverse (counterclockwise rotation) for 1–2 seconds while maintaining firm pressure on the collar. This “reverse-tightening” technique utilizes the motor’s rotation to seat the bit jaws with improved concentricity (alignment), minimizing microscopic play that causes wobble. For maximum security during high-torque applications (driving large lag bolts, using hole saws), or if the chuck feels loose, use the provided chuck key (if applicable) to apply a final snug turn—never overtighten with excessive force, as this can strip the chuck’s internal threads. After tightening, perform the “wiggle test”: grasp the bit near the tip and attempt to move it side-to-side. Any perceptible movement indicates inadequate tightening or chuck wear.
Chuck jaw configuration matters significantly. Two-jaw chucks, found on older or budget tools, are inherently prone to bit runout (wobble). Three-jaw chucks provide superior concentricity and grip, distributing clamping force evenly around the bit shank. If your drill consistently produces off-center holes despite careful technique, inspect the chuck: clean jaws meticulously with a soft brass brush and isopropyl alcohol to remove embedded metal shavings, wood resin, or corrosion. Check for visible wear, pitting, or misalignment of the jaws. A worn chuck cannot be reliably tightened and should be serviced or replaced. For users of impact drivers or those prioritizing speed and security, the 1/4-inch hex collet system is transformative. Impact drivers universally use this spring-loaded collet that accepts bits with hex-shaped shanks. Insertion is instantaneous: push the bit in until it clicks; removal requires pulling back the collet sleeve. This system delivers minimal slippage under torque, excellent concentricity, and rapid bit changes. However, hex-shank bits are not universally compatible with standard drill chucks without an adapter sleeve. When selecting bits, prioritize those with precisely machined shanks—cheap, mass-produced bits often feature undersized, tapered, or irregular shanks that slip under load. A simple field test: insert the bit into the chuck or collet. Attempt to rotate the bit by hand while the chuck is tightened. If it spins freely, the fit is poor. Quality bits require significant force to rotate manually when properly seated. Investing in reputable bit brands (look for hardened steel, precise machining, and consistent shank dimensions) and maintaining chuck integrity pays exponential dividends in precision, safety, and reduced accessory replacement costs. Remember: a wobbling bit cannot drill a straight hole, no matter the user’s skill.
Layer 2: Material Mastery – Reading the Surface Before You Drill
A master craftsman never approaches a material blindly. Wood grain direction, metal crystalline structure, concrete aggregate composition, and plastic polymer density all dictate strategy. This layer teaches you to “read” the material—assessing its inherent properties to select the optimal bit geometry, rotational speed, applied pressure, and preparatory steps. Skipping this critical assessment phase is the primary catalyst for tear-out, bit failure, uneven holes, and compromised workpieces. Material mastery is the bridge between tool intelligence and technique execution.
Wood: Grain Direction, Density Variations, and the Science of Tear-Out Prevention
Wood is anisotropic—it exhibits vastly different mechanical properties depending on the direction of force relative to its grain structure. Drilling with the grain (parallel to the long fibers) offers minimal resistance. Drilling across the grain (perpendicular to fibers) requires moderate force. Drilling against the grain (entering the end grain surface) presents the highest resistance due to the dense concentration of severed fiber ends. Hardwoods like oak, maple, walnut, and cherry possess tight, interlocking grain structures that resist drilling but yield exceptionally clean holes when sharp bits and proper technique are employed. Softwoods like pine, cedar, and fir are easier to penetrate but are prone to splintering due to softer earlywood bands, resin pockets, and inconsistent density. Plywood, MDF, and particleboard introduce additional complexities: layered veneers can delaminate, and composite materials are highly abrasive to bit edges.
Preventing Tear-Out on Exit Holes: Tear-out—the splintering or blowout of wood fibers on the exit side of a drilled hole—is the most common wood drilling frustration. The gold-standard solution is the two-sided drilling method: clamp the workpiece securely. Drill only halfway through from the primary (show) side. Flip the workpiece precisely. Align the emerging pilot hole. Complete the hole from the opposite side. The initial hole guides the bit, ensuring perfect alignment while the second pass cleanly shears the remaining fibers. For situations where flipping is impossible (e.g., drilling into a wall stud), employ a sacrificial backing board: clamp a scrap piece of the same wood species tightly against the exit side. The drill bit exits cleanly into the scrap, leaving a pristine hole in the workpiece. As the bit nears breakthrough, consciously reduce drill speed and applied pressure; the decreased force minimizes the lever action that rips fibers. For visible surfaces where perfection is paramount (fine furniture, cabinet doors), use a brad-point bit (also called dowel bits). Its defining feature is a sharp, central spur that scores the wood perimeter before the cutting lips engage, resulting in sharp entry and exit holes with minimal tear-out. Forstner bits, while typically used in drill presses, can be handheld with extreme care and a guide block for flat-bottomed holes; their rim cuts cleanly ahead of the center point.
Density and Grain Considerations in Practice: Drilling into end grain demands slower speeds, sharper bits, and steady, consistent pressure. The dense fiber concentration generates significant heat and resistance. Lubrication is rarely needed for wood, but a light wax coating on the bit shank (rubbed with a paraffin candle) can reduce friction in resinous softwoods like pine, preventing pitch buildup that dulls bits. When working with plywood or veneered panels, apply low-tack painter’s tape over the intended drill point. The tape stabilizes the surface veneer fibers during bit entry, significantly reducing chipping. Always drill pilot holes for screws in hardwoods, near board edges (within 1 inch), or when using long screws. The pilot hole diameter should approximate the screw’s minor diameter (the solid core beneath the threads). Skipping this step in dense materials risks splitting the workpiece—a failure in fine woodworking that often requires part replacement. Understanding these nuances transforms wood from a passive substrate into a responsive partner in the crafting process.
Metal: Lubrication Protocols, Speed Discipline, and Avoiding Work Hardening
Metal drilling demands disciplined respect for heat generation, material hardness, and crystalline structure. High-speed steel (HSS) bits are suitable for most DIY metal tasks involving mild steel, aluminum, brass, and copper. For stainless steel, cast iron, or other hardened alloys, cobalt alloy bits (M35 containing 5% cobalt, or M42 with 8% cobalt) are recommended—their enhanced heat resistance maintains a cutting edge where standard HSS would rapidly dull. The cardinal rule for metal drilling: slow speed and steady, consistent pressure. High RPMs generate excessive frictional heat, which can soften the bit’s cutting edge and potentially “work-harden” the metal surface at the drill point. Work hardening occurs when the metal’s crystalline structure deforms under heat and pressure, becoming significantly harder and more resistant to further cutting—a cycle that leads to bit failure. For small bits in mild steel, moderate RPMs are ideal; for larger bits, reduce speed significantly. If your drill lacks fine variable speed control, use short, controlled trigger bursts with cooling intervals.
Lubrication is essential for metals beyond thin sheet aluminum. Cutting oil, specialized drilling lubricants, or light motor oil applied directly to the drill point serves critical functions: reduces friction, dissipates heat, and aids in evacuating metal shavings (swarf). Reapply lubricant frequently during the drilling process. For deep holes (>2x bit diameter), withdraw the bit completely every few seconds to clear accumulated swarf. Trapped shavings cause binding, increase heat, accelerate bit wear, and can lead to bit breakage. Center-punching is absolutely critical: use a spring-loaded center punch to create a small, precise dimple at the exact drill point location. This dimple traps the bit tip, preventing “walking” (the bit skating across the smooth metal surface) and ensuring accurate hole placement. When drilling thin metal sheets (less than 1/16-inch), sandwich the workpiece securely between two pieces of sacrificial wood. The wood backing prevents deformation of the thin metal and provides support for a clean exit hole. Aluminum and brass are “gummy” metals prone to clogging bit flutes; use bits with polished flutes and higher clearance angles designed for non-ferrous metals. Never engage hammer mode when drilling metal—the percussive action damages both the bit tip and the workpiece surface integrity. Patience and process discipline yield clean holes; haste guarantees frustration.
Masonry, Concrete, and Tile: Specialized Bits, Technique, and Dust Management
Concrete, brick, block, stone, and ceramic tile belong to the category of brittle, abrasive materials requiring specialized carbide-tipped masonry bits. Standard twist bits will dull instantly, overheat, or shatter upon contact. The carbide tip (a tungsten carbide insert brazed to the steel shaft) is engineered to withstand the extreme abrasion of aggregate and silica. Hammer drill mode is mandatory. The synchronized percussive action (BPM) chips away the material while rotation clears the debris. Begin drilling at low speed with firm, consistent forward pressure. Let the tool’s hammer mechanism do the work; excessive user-applied force fatigues the motor and increases user fatigue without improving drilling speed. For holes deeper than 1 inch, periodically withdraw the bit completely to clear dust buildup from the flutes. Clogged flutes drastically reduce drilling efficiency, cause overheating, and can bind the bit. Water cooling can extend bit life during extensive concrete drilling sessions; a slow drip of water at the drill point suppresses dust (a critical health consideration) and cools the bit. However, never use water with standard electrical tools unless the drill is explicitly rated for wet conditions and plugged into a GFCI-protected circuit. For most DIYers, frequent bit withdrawal for dust clearing is the safer, more practical protocol.
Drilling into ceramic or porcelain tile presents unique challenges due to the hard, brittle glaze. Standard masonry bits will skate and crack the tile. Use a carbide-tipped tile bit or a spear-point (glass/tile) bit designed specifically for this purpose. Apply masking tape in a cross pattern over the intended drill point to minimize slippage and contain minor chips. Begin drilling at the absolute lowest possible speed without hammer action engaged. Apply firm, steady pressure until the bit penetrates the glazed surface (you’ll feel a distinct change in resistance). Once the bit has “bitten” and created a stable pilot hole through the glaze, then engage hammer mode (if drilling into the substrate behind the tile, like concrete backer board) and gradually increase speed. For holes entirely within the tile (e.g., for a soap dish anchor), continue without hammer mode at low speed. Diamond-tipped hole saws are ideal for larger openings in tile but require very slow speeds, constant water cooling (using a specialized wet-cutting attachment), and significant patience. Always wear a NIOSH-approved respirator (P100 rating) when drilling concrete, brick, or tile—silica dust is a severe respiratory hazard with long-term health consequences. Dust extraction attachments that connect to a shop vacuum are highly recommended for health and visibility.
Composites, Plastics, and Specialty Materials: Navigating Unique Challenges
Materials like MDF (Medium-Density Fiberboard), particleboard, PVC pipe, acrylic sheets, and laminates present distinct drilling challenges. MDF and particleboard are highly abrasive due to their resin-and-wood-fiber composition, generating fine, pervasive dust. Always wear a respirator (N95 minimum). Use sharp brad-point or spur bits designed for clean cuts in composites; standard twist bits tend to tear the surface. Clamping a backing board is essential to prevent blowout on the exit side. Plastics (PVC, ABS, acrylic, polycarbonate) are prone to two failure modes: melting from frictional heat and cracking from internal stress. Use bits specifically designed for plastic (featuring higher rake angles and polished flutes) or standard HSS bits at very slow speeds with light, consistent pressure. Backing boards are non-negotiable. For large holes in plastic sheeting, step bits (Unibits) are ideal—they gradually increase the hole size in concentric steps, minimizing stress concentration and reducing the risk of cracking. Always clamp workpieces securely; vibration during drilling can propagate cracks in brittle plastics. When drilling laminated surfaces (like Formica countertops), place masking tape over the drill point to prevent chipping of the laminate layer. For carbon fiber composites—a material increasingly found in DIY projects like drone frames—specialized diamond-coated or carbide bits are required, and dust collection is critical due to the hazardous nature of carbon fiber particles. Research material-specific protocols thoroughly before proceeding. The unifying principle across all composites: sharp bits, slow speeds, light pressure, and robust support.
Layer 3: Technique Execution – The Human Element in Precision
Even with perfect tool selection and profound material understanding, poor physical technique will undermine results. This layer refines your biomechanical interaction with the tool—body positioning, trigger modulation, angle maintenance, depth awareness, and situational mindfulness. These skills are honed through deliberate, mindful practice, not brute force or haste. Technique is where knowledge becomes embodied skill.
The Pilot Hole Principle: Why This Non-Negotiable Step Saves Time and Prevents Catastrophe
A pilot hole—a small-diameter hole drilled precisely where a screw will be driven or a larger bit will follow—is the cornerstone of precision woodworking, metalworking, and assembly. Its purposes are multifaceted and critical: it guides the screw or larger bit with absolute accuracy, drastically reduces the torque required to drive the screw (protecting screw heads, preserving clutch settings, and reducing user fatigue), prevents splitting in wood (especially near edges or in hardwoods), minimizes work hardening in metal, and ensures the screw threads bite cleanly into the material for maximum holding power. The pilot hole diameter should correspond to the screw’s minor diameter (the solid core beneath the threads). Using a pilot hole chart specific to screw type and material is highly recommended for critical work. Skipping this step in dense materials or near edges is a gamble with high stakes: snapped screws embedded deep in hardwood, stripped screw heads requiring extraction, cracked workpieces necessitating part replacement, or screws driven at an angle due to initial resistance. In metal, pilot holes prevent bit walking and reduce the force needed to start the tap or screw. Make pilot holes an ingrained habit for any screw longer than 3/4 inch, any screw driven near a board edge (within 1 inch), any screw driven into hardwood, or any screw where precise placement is critical. The brief time invested in drilling a pilot hole consistently saves significant time and frustration later. This principle extends to enlarging holes: always drill a small pilot hole first before using a larger bit or hole saw. The pilot guides the larger tool, preventing walking and ensuring concentricity.
Screw Driving Without Stripping: The Triad of Bit Fit, Alignment, and Torque Control
Stripped screw heads represent one of the most universal frustrations in DIY and professional work alike. Yet, this outcome is almost entirely preventable through attention to three interconnected factors: bit-to-screw compatibility, perfect alignment, and appropriate torque application.
First, bit fit is paramount. A Phillips #2 bit must fully seat within a Phillips #2 screw recess with minimal wobble. Even a slight mismatch concentrates driving force on the screw’s delicate edges rather than engaging the full recess geometry, significantly increasing the risk of cam-out (slipping) and stripping. Inspect bits regularly; replace them at the first sign of rounding on the driving edges. For critical applications or frequent use, consider upgrading to square-drive (Robertson) or star-drive (Torx) screws and bits. These geometries offer vastly superior engagement, distribute driving force more evenly across multiple contact points, and are dramatically more resistant to cam-out. Many modern furniture kits and automotive applications use Torx for this reason. Second, perfect perpendicular alignment is non-negotiable. Even a minor deviation from 90 degrees to the screw head exponentially increases the risk of cam-out and stripping. Use your body position to stabilize the tool: stand squarely facing the work, brace your non-dominant hand on the tool body near the chuck for stability, and align your dominant hand on the trigger. For hard-to-reach screws, use an offset screwdriver attachment or a right-angle drill adapter to achieve proper alignment. Third, torque control is executed through clutch settings (on drill/drivers) and trigger discipline. Set the clutch conservatively and test on scrap. When driving, apply smooth, steady trigger pressure. Avoid “bump firing” (rapidly tapping the trigger), especially with impact drivers, as sudden torque spikes are a primary cause of stripped heads on smaller screws. If a screw begins to resist unexpectedly, stop immediately. Forcing it guarantees failure. Options include: verifying the pilot hole is adequate, checking for obstructions, or applying a drop of lubricant (like beeswax) to the screw threads. Prevention through this triad of fit, alignment, and control is infinitely more efficient than recovery.
Advanced Maneuvers: Angled Drilling, Pocket Holes, Countersinking, and Depth Control
Not all holes are perpendicular. Mastery includes executing specialized techniques with confidence and precision.
Angled Drilling: Required for pocket hole joinery, certain furniture repairs, or structural bracing. Freehand angled drilling is exceptionally difficult to execute accurately. The solution is a guide block: clamp a scrap wood block with a pre-drilled hole at the exact desired angle (e.g., 15 degrees) firmly to your workpiece. The drill bit follows the guide hole, ensuring perfect angle replication. Commercial pocket hole jigs automate this process with precision-machined guides and built-in clamps, making strong, hidden joints accessible to all skill levels. Without a jig, the guide block method is highly effective.
Countersinking: Creating a conical recess so a flat-head screw sits perfectly flush with or below the surface. This requires a two-step process: first, drill the pilot hole for the screw shank. Second, use a dedicated countersink bit (a conical cutter with flutes) to create the recess. Match the countersink angle to the screw head angle (typically 82 degrees for standard flat-head screws). For efficiency, combination drill/countersink bits exist—they drill the pilot hole and countersink in a single pass. Test depth on scrap material. For a clean, professional finish, use a countersink bit with a depth stop collar.
Depth Control: Critical for shelf pins, hinge cups, or any application requiring consistent hole depth. Commercial depth stop collars that clamp onto the drill bit are affordable and highly effective. DIY alternatives: wrap masking tape around the bit shaft at the desired depth mark. When the tape reaches the surface, stop drilling. For extreme precision (e.g., drilling stopped holes for dowels), a drill press is ideal, but a handheld drill with a guide block featuring a depth stop pin can achieve excellent results with practice.
Overhead and Confined Space Drilling: Fatigue and loss of control are major risks. Secure the workpiece whenever possible. Use a drill with a side handle attachment for enhanced stability and leverage. Maintain a wide, stable stance. Take frequent breaks to avoid muscle fatigue, which leads to loss of angle control and accidents. For deep holes requiring bit extensions, support the bit near the chuck with your non-dominant hand to minimize wobble and vibration. These advanced techniques transform the drill/driver from a simple tool into a versatile fabrication instrument capable of executing complex joinery and repairs.
The Fundamental Principle: Mastery is not defined by tool ownership or raw power; it is the seamless, intentional dialogue between your understanding of the tool’s capabilities, your respect for the material’s properties, and the precise, mindful execution of technique. When these three elements align in harmony, every hole is intentional, every screw is secure, every project advances with confidence, and the tool becomes a true extension of your skill.
Beyond Drilling: Creative Applications and Accessory Mastery
The drill/driver’s utility extends far beyond creating holes and driving fasteners. With the right accessories and adapted techniques, it becomes a multi-functional workshop powerhouse capable of mixing, sanding, polishing, and more. However, each application demands specific safety protocols, speed adjustments, and awareness of tool limitations. Expanding your accessory knowledge unlocks new project possibilities while maximizing the value of your core tool investment.
Mixing and Stirring: From Paint to Epoxy—Protocols for Success and Safety
Drill-powered mixers save immense time and physical effort compared to hand stirring. For latex or oil-based paints, use a Jiffy-style mixer paddle at low speed (under 600 RPM) to avoid splashing and introducing air bubbles. For thick, viscous materials—joint compound, tile mortar, epoxy resins, or concrete patching compounds—use a heavy-duty paddle mixer with robust welded construction designed for high-torque applications. Critical safety and tool preservation note: Not all drills are rated for mixing. Mixing thick materials places extreme, sustained strain on the motor, gearbox, and clutch. Lightweight or older cordless drills (especially brushed motors under 18V) lack the thermal management and gearing durability, leading to rapid overheating or motor burnout. Corded drills specifically marketed for mixing, or high-torque brushless cordless models (18V+ with metal gearboxes), are strongly recommended. Always secure the mixing container firmly—a helper holding it is insufficient; use clamps or a dedicated mixing bucket holder. Start at the absolute lowest speed setting. Gradually increase speed only as the material begins to incorporate. Stop periodically to scrape the sides and bottom of the container with a putty knife. Never use hammer mode. For small batches of resins or sauces, miniature whisk attachments are available. Remember: the drill provides rotation; your technique (scraping, speed control) ensures thorough mixing. When finished, clean the paddle immediately—dried compound is difficult to remove.
Sanding, Polishing, and Surface Preparation: Controlled Abrasion Techniques
Drill-powered sanding attachments—typically a rubber or plastic backing pad with hook-and-loop surface for attaching sandpaper discs—are excellent for contour sanding, rust removal on curved metal surfaces, or preparing large flat areas where orbital sanders are impractical. Speed is critical: operate at low speeds (under 1,000 RPM) to maintain control, prevent burning the workpiece (especially wood or plastic), and avoid overheating the sandpaper adhesive. For metal polishing, use felt bobs, cloth wheels, or sisal buffs designed for drill use, paired with appropriate polishing compounds. Paramount safety considerations: Always wear ANSI Z87.1-rated safety glasses—abrasive particles can cause serious eye injury. Wear a NIOSH-approved dust mask (N95) for sanding operations. Secure loose clothing, jewelry, and long hair. Never use sanding discs or wire wheels designed for angle grinders—they are rated for much higher RPMs and can shatter catastrophically when used on a drill. Verify the accessory’s maximum RPM rating matches or exceeds your drill’s capability. For delicate surfaces like automotive paint correction, a dedicated dual-action (DA) polisher is vastly superior; drill attachments lack the orbital action and speed control needed to avoid swirl marks. Use drill-powered sanding/polishing for aggressive material removal or preparation tasks where finesse is secondary.
Hole Saws, Spade Bits, and Forstner Bits: Expanding Your Hole-Making Capacity
For holes larger than 1/2 inch, standard twist bits become inefficient. Specialized large-hole bits unlock new capabilities:
- Hole Saws: Consist of a cylindrical saw blade (bi-metal for wood/metal, carbide-grit for tile/masonry) mounted on an arbor with a pilot drill bit. Ideal for plumbing pipe pass-throughs or electrical conduit openings. Use at slow speeds with steady pressure. Withdraw frequently to clear debris from the teeth. The pilot bit is crucial for centering; ensure it’s sharp and protrudes slightly beyond the saw teeth. For clean exit holes in wood, use a backing board. Hole saws generate significant torque—use a drill with a side handle and maintain a firm two-handed grip.
- Spade Bits (Paddle Bits): Feature a flat, paddle-shaped blade with a sharp point and cutting lips. Fast and aggressive for rough carpentry holes in wood (running wire, rough plumbing). Leave a rougher hole with potential tear-out on exit. Not suitable for metal or precise work. Use a backing board. The sharp point can be hazardous—store carefully.
- Forstner Bits: The premium choice for clean, flat-bottomed holes in woodworking (concealed hinge cups, dowel joints). Cut a precise rim first, then shear the interior. Require significant downward pressure and benefit immensely from a drill press for perfect perpendicularity. Can be used handheld with extreme care, a guide block, and very slow speed. Always use a backing board.
When using any large-diameter bit, support the bit near the chuck with your non-dominant hand to minimize vibration and wobble. Ensure the workpiece is clamped securely—large bits exert substantial torque that can spin an unsecured workpiece violently.
Emergency and Improvised Uses: Resourcefulness with Caution
In resource-constrained situations, creativity can extend utility—but safety must never be compromised. A drill can power a makeshift buffer (soft cloth securely wrapped around a bolt inserted in the chuck) for polishing metal edges. A wire brush attachment (specifically rated for drill use) effectively removes rust from tools or hardware. Critical boundaries: Only use accessories explicitly designed and rated for drill/driver use. Verify secure attachment before operation. Start at the lowest possible speed and increase only if stable. Never use damaged or improvised attachments (e.g., wrapping sandpaper around a bolt). Never compromise on personal protective equipment (PPE). While resourcefulness is valuable, recognize when a task requires a dedicated tool—attempting to cut metal with a grinding wheel not rated for your drill’s RPM is dangerously reckless. True mastery includes knowing the limits of adaptation.
Troubleshooting Common Drill and Driver Challenges
Even experienced users encounter setbacks. Mastery is defined not by avoiding problems, but by possessing a systematic diagnostic framework to resolve them efficiently and safely. This section provides clear pathways for the most frequent issues, turning frustration into learning opportunities and reinforcing foundational principles.
Stripped Screw Heads: Recovery Protocols and Prevention Strategies
Recovery Pathway: If the screw head is partially stripped but the screw is still accessible:
1. Rubber Band Method: Place a wide rubber band flat over the screw head. Insert the correct bit firmly into the rubber band and screw head. The rubber band fills voids and provides additional grip. Apply steady, slow pressure while driving counterclockwise (to remove).
2. Precision Pliers: If the screw protrudes slightly, use needle-nose vise-grips locked firmly onto the shaft. Turn counterclockwise.
3. Screw Extractor Kit: For deeply embedded stripped screws: Select a left-hand drill bit slightly smaller than the screw shaft. Drill carefully into the center of the screw head (left-hand bits often back the screw out as you drill). If not, switch to the extractor bit (reverse-threaded taper), tap it lightly into the pilot hole with a hammer, and turn counterclockwise with a wrench. Apply penetrating oil beforehand if the screw is seized.
4. Dremel/Grinder Method (Last Resort): Carefully cut a new slot into the screw head with a rotary tool cutoff wheel, then use a flat-head screwdriver. Risky—can damage surrounding material.
Prevention is Paramount: Prevention strategies (perfect bit fit, perpendicular alignment, conservative clutch settings, pilot holes) are always vastly preferable to recovery. Prevention saves time, preserves the workpiece, and avoids the stress of extraction. When prevention fails, methodical recovery preserves the project.
Broken Bits: Extraction Techniques and Root Cause Analysis
Bits fracture due to excessive side-loading (bending force), dullness requiring excessive pressure, sudden binding, or material inconsistencies (hidden nails in wood, aggregate in concrete). Extraction Protocol:
* Protruding Shank: Use needle-nose pliers or vise-grips to grip and twist counterclockwise.
* Flush or Below Surface: Use a pin vise (small hand drill) to grip the broken shank. Tap a small center punch into the very center of the broken bit to create a starting point for a left-hand drill bit. Drill carefully with a left-hand bit (often backs the fragment out). Specialized broken tap extractors can grip the inside of a hollow bit shank.
* In Chuck: If the bit breaks off inside the chuck jaws, use needle-nose pliers. For flush breaks, carefully drill a small hole into the shank for grip, or use a screw extractor designed for this purpose. Prevention through proper technique is critical.
Root Cause Analysis: After extraction, analyze why it broke: Was the bit dull? Was hammer mode engaged for masonry? Was excessive side pressure applied? Was the bit appropriate for the material? Learning from the failure prevents recurrence.
Wandering Holes: Diagnosing Drift and Implementing Corrections
A hole that drifts off the marked center point (“walking”) stems from several causes:
* Cause: Bit tip not seated securely before rotation begins (common on hard surfaces like metal, tile, or finished wood).
* Solution: Center-punch the mark (metal/tile) or use a brad-point bit (wood). Start drilling at very low speed until the bit bites and establishes the hole path, then increase speed.
* Cause: Dull bit lacking a sharp central point to anchor.
* Solution: Sharpen or replace the bit.
* Cause: Improper angle at initiation.
* Solution: Ensure the drill is perfectly perpendicular at the moment of contact. Use a drill guide block clamped to the workpiece.
* Cause: Excessive initial pressure causing the bit to skid.
* Solution: Apply light pressure initially until the bit is seated, then increase steady pressure. Implementing these corrections ensures pinpoint accuracy on every hole.
Overheating Tools: Causes, Immediate Response, and Prevention
Overheating is a critical warning sign indicating the tool is overloaded or malfunctioning. Immediate Action: Stop work immediately. Unplug the corded drill or remove the battery from the cordless model. Place the tool in a well-ventilated area away from combustibles. Allow it to cool completely (30+ minutes) before inspecting. Common Causes & Prevention:
* Dull Bits: Require excessive force and generate heat. Solution: Maintain sharp bits; replace worn accessories.
* Incorrect Speed: High RPM in dense materials. Solution: Reduce speed; let the tool work at its optimal pace.
* Continuous Heavy Use: Extended drilling/mixing without breaks. Solution: Take 60-second breaks every 5 minutes during demanding tasks.
* Blocked Cooling Vents: Dust/debris accumulation. Solution: Clean vents regularly with compressed air or a soft brush.
* Internal Failure: Worn brushes (in brushed motors), failing bearings. Solution: If overheating persists after addressing external factors, discontinue use and seek professional service. Ignoring overheating risks permanent motor damage.
Battery Drain and Performance Degradation: Diagnostics and Care
Rapid or unexpected battery drain can stem from several sources:
* Battery Age/Cycle Life: Lithium-ion batteries degrade over time (typically 2-3 years or 300-500 charge cycles). Capacity diminishes gradually.
* Temperature Extremes: Performance diminishes below 40°F (4°C) or above 100°F (38°C). Store and charge at room temperature.
* High-Load Applications: Mixing thick materials, drilling large holes in dense stock, or using dull bits demand maximum current, draining batteries faster.
* Parasitic Drain: Faulty battery management system (rare). Care Protocol: Store batteries at 40-60% charge in a cool, dry place. Avoid full discharges; recharge when the tool indicates low power. For multi-battery users, rotate usage to ensure even wear. Clean battery contact terminals with isopropyl alcohol if corrosion is visible. If a battery swells, leaks, or fails to hold a charge, stop use immediately, place it in a non-flammable container, and contact the manufacturer for safe disposal/recycling instructions. Never puncture or incinerate lithium-ion batteries.
Chuck Slippage Under Load: Securing the Critical Interface
If the bit slips or spins within the chuck during operation:
1. Re-tighten: Remove the battery/unplug. Insert the bit fully. Perform the reverse-tightening technique (trigger in reverse while holding chuck collar firmly).
2. Clean: Disassemble the chuck (if user-serviceable per manual) or use compressed air and a brush to remove embedded debris from the jaws. Wipe jaws with isopropyl alcohol.
3. Inspect: Check for worn, chipped, or misaligned jaws. A worn chuck cannot grip securely and requires replacement.
4. Verify Bit Shank: Ensure the bit shank is clean, dry, and of correct diameter. A undersized or oily shank will slip. Prevention through regular chuck maintenance ensures reliable power transfer and safety.
Safety Deep Dive: Beyond the Basic Goggles
Safety is the immutable foundation upon which all mastery is built. While safety glasses are universally recommended, this section addresses nuanced hazards often overlooked in basic guides—transforming safety from a checklist item into an integrated mindset. True safety proficiency anticipates risks before they manifest.
Kickback Awareness and Proactive Prevention
Kickback—the sudden, violent reaction of the tool when a bit binds or catches—is a leading cause of drill-related injuries. High-risk scenarios include: using large-diameter bits (hole saws, spade bits), dull bits encountering unexpected resistance (a knot in wood, aggregate in concrete), or the bit catching on the edge of a workpiece. Prevention Protocol:
* Grip: Maintain a firm, two-handed grip. Use the side handle attachment whenever provided, especially for hammer drilling or large bits.
* Stance: Position your body to the side of the bit’s rotational plane, not directly behind it. This minimizes injury risk if kickback occurs.
* Workpiece Security: Clamp materials securely to a stable surface. Never hold small workpieces in your hand.
* Bit Condition: Use sharp, appropriate bits. Dull bits require excessive force and are prone to binding.
* Awareness: Anticipate binding points—drilling through layered materials, near edges, or into unknown substrates. Reduce speed and pressure approaching these zones. This proactive stance transforms kickback from a surprise hazard into a manageable risk.
Electrical Safety for Corded Tools: Beyond the GFCI
Corded drills offer unlimited runtime but introduce electrical hazards. Essential Protocols:
* Pre-Use Inspection: Examine the power cord meticulously before every use. Look for cuts, fraying, exposed wires, or damaged insulation near the plug or tool housing. Never use a damaged cord.
* Environment: Never use corded tools in wet conditions, damp basements, or on wet surfaces unless the tool is explicitly rated for wet use and plugged into a GFCI (Ground Fault Circuit Interrupter) protected outlet. GFCIs are non-negotiable for outdoor or damp-location use—they cut power within milliseconds of detecting a ground fault, preventing electrocution.
* Cord Management: Keep the power cord clear of the drilling path. Position yourself so the cord trails behind you, away from the bit. Use cord clips to secure the cord to your work surface, preventing accidental pulling or cutting.
* Outlet Safety: Use a grounded (three-prong) outlet. Never remove the ground pin. Ensure the outlet is in good condition. For extension cords, use heavy-duty, outdoor-rated cords of appropriate gauge (14-gauge for runs under 100 feet) to prevent voltage drop and overheating.
Battery Safety Protocols: Respecting Lithium-Ion Chemistry
Modern lithium-ion batteries are powerful but demand respect. Critical Safety Practices:
* Physical Integrity: Never puncture, crush, bend, or disassemble batteries. Damage can cause internal short circuits, leading to thermal runaway (fire or explosion).
* Temperature Extremes: Avoid charging or storing batteries in direct sunlight, hot vehicles, or near heat sources. Do not charge below freezing temperatures.
* Charging: Use only the manufacturer’s designated charger. Charge on a non-flammable surface (concrete floor, metal tray), away from combustible materials (paper, sawdust, curtains). Never charge unattended overnight or while sleeping. Modern chargers have safety cutoffs, but vigilance is key.
* Damage Response: If a battery is dropped, swollen, leaking, emitting odor, or feels excessively hot, stop use immediately. Place it in a non-flammable container (metal bucket with sand) outdoors, away from structures. Contact the manufacturer or a hazardous waste facility for disposal instructions. Do not dispose of in household trash.
Hearing and Respiratory Protection: The Invisible Hazards
Prolonged exposure to drill noise and airborne particles poses significant long-term health risks often underestimated in DIY settings.
* Hearing Protection: Hammer drills and impact drivers consistently exceed 90 decibels (dB)—the threshold for potential hearing damage with prolonged exposure. Wear ANSI-rated hearing protection (earmuffs or high-fidelity earplugs) for any session exceeding 15 minutes. This is not optional for health preservation.
* Respiratory Protection: Drilling generates hazardous dust:
* Wood Dust (MDF, Particleboard): Contains formaldehyde and fine particulates linked to respiratory issues. Use at minimum an N95 respirator; P100 is preferred.
* Silica Dust (Concrete, Brick, Tile): Causes silicosis, a debilitating and irreversible lung disease. A NIOSH-approved P100 respirator is the absolute minimum; a powered air-purifying respirator (PAPR) is ideal for extensive work.
* Metal Dust: Can contain toxic metals (lead in old paint, chromium in stainless steel). Use appropriate respiratory protection.
Work in well-ventilated areas. Use dust extraction attachments connected to a shop vacuum whenever possible. Your long-term health is worth the minor inconvenience of proper PPE.
Securing Workpieces: The Forgotten Safety Imperative
An unsecured workpiece is a projectile hazard. Clamping is not merely for accuracy—it is a critical safety step. Use bench vices, F-clamps, or bar clamps rated for the task. Ensure clamps are tight and the workpiece cannot shift, rotate, or lift during operation. Never hold small pieces (less than 6 inches) in your hand while drilling. This simple practice prevents severe hand injuries and ensures precision. Integrate clamping into your pre-operation ritual for every single task.
Maintenance Rituals: Extending Tool Life, Performance, and Safety
A well-maintained tool performs more reliably, delivers better results, lasts significantly longer, and is inherently safer. Neglect accelerates wear, introduces failure points, and diminishes user confidence. Integrate these maintenance practices into your workflow—they require minimal time but yield exponential returns. Think of maintenance not as a chore, but as an investment in your tool’s partnership with you.
After-Use Cleaning Protocol: The 60-Second Habit
Make this non-negotiable after every use, regardless of project size:
1. Exterior: Wipe the entire tool body, handle, and chuck area with a dry microfiber cloth. For stubborn grime or resin (common after wood projects), use a cloth slightly dampened with isopropyl alcohol—never immerse the tool in liquid. Avoid solvents that can damage plastic housings or labels.
2. Chuck: Open the chuck fully. Use a soft-bristled brush (an old toothbrush works perfectly) to remove wood dust, metal shavings, or debris from between the jaws. Compressed air can help dislodge stubborn particles—hold the tool securely and blow air away from your face. Wipe jaws with a dry cloth.
3. Battery Contacts (Cordless): Inspect the metal contacts on both the battery and tool. If corroded or dirty, gently clean with a cotton swab dipped in isopropyl alcohol. Allow to dry completely before reinserting.
4. Cord (Corded): Coil the cord loosely (avoid tight kinks) and inspect for damage along its entire length. Store hanging or in a figure-eight loop. This 60-second ritual prevents buildup that leads to chuck slippage, electrical issues, and premature wear.
Lubrication: Precision Application, Not Generous Pouring
Most modern drills feature sealed bearings and gearboxes requiring no user lubrication. However, targeted lubrication enhances function and prevents seizing:
* Chuck Threads: Every 3-6 months, apply a tiny drop of light machine oil (3-in-1 oil) or white lithium grease to the external threads of the chuck where it screws into the spindle. Rotate the chuck several times to distribute. Wipe away excess. This prevents the chuck from freezing in the open or closed position.
* Chuck Jaws: A microscopic amount of grease on the jaw threads can ensure smooth operation. Apply sparingly with a toothpick—excess attracts abrasive dust.
* Critical Warning: Never use WD-40 as a lubricant. It is primarily a water displacer and solvent; it evaporates quickly and leaves a residue that attracts dust and grime, accelerating wear. Use lubricants specifically designed for tools. When in doubt, consult your tool’s manual—many manufacturers explicitly state “no user lubrication required.”
Battery Care for Longevity and Reliability
Lithium-ion battery health is managed through usage habits:
* Partial Discharges: Avoid fully draining batteries to 0%. Recharge when the tool indicates low power (typically around 20% remaining). Deep discharges stress the cells.
* Storage Charge Level: For storage longer than one week, store batteries at approximately 40-60% charge. Storing fully charged or fully depleted accelerates capacity loss.
* Temperature Management: Store batteries in a cool, dry place (room temperature ideal). Avoid garages or sheds with extreme temperature swings. Never leave batteries in a hot vehicle.
* Rotation: If you own multiple batteries, rotate their use to ensure even wear cycles. Label them if helpful.
* Long-Term Storage (>1 Month): Store at 40% charge in a protective case, in a cool location. Check charge level every 3 months and top up to 40% if needed. Proper care can extend battery life by years.
Bit Care, Sharpening, and Strategic Organization
Dull bits are a primary cause of poor drilling results and tool strain. Implement a bit management system:
* Sharpening HSS Bits: High-speed steel bits used in wood and soft metals can be sharpened effectively. Use a dedicated drill bit sharpener (benchtop or handheld) or a bench grinder with a drill bit sharpening jig. Maintain the original 118-degree point angle and equal lip lengths. Test sharpness on scrap material. Sharpening restores performance and is economical.
* Carbide-Tipped Bits: Masonry and tile bits with carbide tips cannot be practically sharpened at home. Replace them when performance declines (requires excessive force, wanders, overheats).
* Cleaning: Remove pitch buildup from wood bits using a bit cleaner solution or light solvent. Clean metal bits of cutting oil residue.
* Organization: Store bits in a labeled case, rack, or magnetic strip. Group by type (twist, brad-point, masonry) and size. Protect cutting edges from contact with other metal objects. A well-organized bit collection saves time, prevents damage, and ensures you always select the right bit for the job. Designate sets: a “precision” set for fine work (kept meticulously sharp), a “general” set for everyday tasks, and a “rough” set for demolition or dirty jobs. This extends the life of your best bits.
Periodic Professional Servicing: Knowing When to Seek Expertise
Even with diligent user maintenance, internal components wear. Service Triggers:
* Noticeable loss of power or torque
* Unusual noises (grinding, clicking, excessive whining)
* Excessive vibration not caused by bit imbalance
* Chuck that slips consistently despite cleaning/tightening
* Trigger that feels gritty, sticks, or has inconsistent speed control
* After exposure to significant moisture or impact
For tools used heavily (daily in trade settings), schedule professional servicing annually. For occasional DIY use, servicing every 2-3 years is prudent. Authorized service centers have the expertise, genuine parts, and diagnostic equipment to restore your tool to optimal condition. Keep proof of purchase for warranty claims. Viewing servicing as routine maintenance, not a failure, ensures your tools remain reliable partners for decades.
Budget-Conscious Mastery: Workarounds, Smart Substitutions, and Technique Over Tool Cost
Mastery is not contingent on an expensive toolkit. Resourcefulness, informed choices, and refined technique consistently outweigh raw tool cost. This section empowers you to achieve professional results with accessible resources, focusing investment where it matters most.
DIY Drill Guides, Jigs, and Depth Stops: Precision Without Premium Price Tags
Commercial drill guides are excellent, but effective alternatives are easily crafted:
* Perpendicular Drill Guide: Cut a scrap block of hardwood (2x2x2 inches). Drill a perfectly perpendicular hole through its center using a drill press or by carefully aligning with a square. Clamp this block to your workpiece; the drill bit follows the guide hole. For angled holes, drill the guide hole at the desired angle.
* Depth Stop: Wrap masking tape around the drill bit shaft at the exact depth you need to drill. When the tape reaches the surface, stop. For repeated holes, use a rubber O-ring slid onto the bit shaft—it’s more durable than tape.
* Pocket Hole Jig Alternative: Clamp two scrap blocks to your workpiece to form a V-shaped channel at the desired angle (typically 15 degrees). The drill bit rides along the channel. While less precise than a commercial jig, it works for non-critical joints.
* Screw Depth Guide: Wrap tape around the screw shaft at the desired penetration depth. Drive until the tape meets the surface. These simple, zero-cost solutions democratize precision.
Strategic Bit Selection: Quality Over Quantity, Purposeful Investment
Avoid the trap of massive, cheap bit sets filled with low-quality, undersized bits that dull instantly and slip in the chuck. Instead:
* Prioritize Core Bits: Invest in a small set of high-quality bits for your most frequent tasks. For woodworking: a set of brad-point bits (1/16″ to 1/4″ in 1/32″ increments). For general use: a few high-speed steel twist bits in commonly used sizes (1/16″, 1/8″, 3/16″, 1/4″). For occasional masonry: one carbide-tipped bit in the size you use most (often 3/16″ or 1/4″).
* Buy Reputable Brands on Sale: Wait for holiday sales at hardware stores. Brands like Bosch, DeWalt, Milwaukee, and Irwin offer significant value during promotions. A single quality brad-point bit outperforms numerous discount bits.
* Sharpen, Don’t Replace: Learn to sharpen HSS bits. A handheld sharpener pays for itself after saving a few bits. This mindset shift—from disposable to maintainable—saves money and builds skill.
* Borrow or Rent Specialized Bits: Need a 4-inch hole saw for one project? Borrow from a neighbor, rent from a tool library, or rent the bit itself from a hardware store. Avoid buying single-use specialty items.
When to Rent vs. Buy: Economic and Practical Decision Framework
For infrequent, high-demand tasks, renting is often the wisest choice:
* Rent: Rotary hammers for multiple concrete holes, heavy-duty mixers for large mortar batches, specialized bits (large hole saws, diamond core bits), tools requiring significant storage space.
* Buy: Tools used monthly or more frequently, tools critical to your core projects, tools where technique development requires familiarity (your primary drill/driver).
Hardware stores offer affordable half-day or daily rentals. Factor in the total cost of ownership: purchase price + storage + maintenance + infrequent use. Renting preserves capital for strategic investments in your most-used tools.
Technique as the Ultimate Force Multiplier
A sharp bit, correct speed setting, and steady technique in a modest 12V drill will consistently outperform a dull bit, incorrect speed, and poor technique in a top-tier 20V tool. Focus your energy on mastering fundamentals:
* Sharpness is Power: A sharp bit requires less force, generates less heat, produces cleaner holes, and reduces strain on the tool motor.
* Speed Discipline: Slowing down for dense materials or large bits prevents overheating and bit failure.
* Body Mechanics: Proper stance and grip improve control and reduce fatigue, leading to better results.
This mindset reduces the perceived need for constant upgrades and cultivates deeper skill. Mastery is earned through mindful practice, not purchased off the shelf.
Improvised Safety Gear: A Strong Caveat
While resourcefulness is valuable, personal protective equipment (PPE) is non-negotiable and not a place for improvisation. Safety glasses cost less than $10 and prevent permanent eye damage. A proper N95 respirator costs a few dollars and protects your lungs. Do not substitute swim goggles for safety glasses (they lack side protection and impact rating) or a damp cloth for a respirator (it offers negligible filtration for hazardous dust). Invest in certified PPE—it is the most cost-effective safety measure you will ever make. Your health and vision are irreplaceable.
Your Questions, Answered
Q: What’s the fundamental difference between a drill/driver and an impact driver? When should I choose one over the other?
A: The core difference lies in torque delivery. A drill/driver uses continuous rotational force and features an adjustable clutch for precise control over screw depth and drilling versatility. An impact driver delivers rotational force in rapid, concussive bursts (impacts), generating significantly higher peak torque in a more compact, lightweight body, with no clutch. Use a drill/driver for: Drilling holes of any size/material, driving screws where depth control is critical (cabinetry, trim, furniture assembly), tasks requiring variable speed control (sanding, polishing), and situations where reactionary torque on your wrist must be minimized. Use an impact driver for: Driving long screws or lag bolts into dense materials (decking, framing, structural posts), working with self-tapping screws in metal studs or automotive applications, situations requiring maximum torque with minimal user fatigue, and tasks where surface marring from the chuck is not a concern. Many serious DIYers and professionals own both; for a single-tool solution, a high-quality drill/driver with a robust clutch offers greater overall versatility.
Q: How can I definitively tell when a drill bit is dull and needs sharpening or replacement?
A: Look for these clear indicators: requiring noticeably more pressure to drill than before; producing rough, splintered, or burnt-looking holes; generating excessive heat or smoke during use; making a high-pitched squealing or grinding noise instead of a smooth cutting sound; visibly wandering off the intended path despite proper technique; or showing rounded, chipped, or discolored (blued from heat) cutting edges upon close inspection. For high-speed steel (HSS) bits used in wood or soft metals, sharpening is economical and effective. Carbide-tipped masonry or tile bits cannot be practically sharpened at home and should be replaced when performance degrades. As a practical guideline, inspect bits after every major project. Keeping dedicated “precision” and “rough duty” sets helps manage bit life effectively.
Q: Is it safe to use my standard cordless drill to mix thinset mortar or epoxy for a tiling project?
A: Proceed with extreme caution. Mixing thick, viscous materials like thinset mortar, epoxy, or joint compound places immense, sustained strain on the drill’s motor, gearbox, and clutch—far beyond typical drilling or driving loads. Lightweight or older cordless drills (especially those with plastic gearboxes or brushed motors under 18V) are highly susceptible to overheating, gear stripping, or motor burnout. Only use your drill for mixing if: It is explicitly rated by the manufacturer for mixing applications (check the manual), it is a high-torque brushless model (18V+), and you follow strict protocols: use the lowest speed setting possible, secure the bucket firmly with clamps (never hold it), take frequent 60-second cooling breaks every 2-3 minutes of mixing, and stop immediately if the tool becomes hot to the touch or strains audibly. For peace of mind and tool preservation, renting a dedicated mixing paddle drill or using a corded drill specifically designed for mixing is strongly recommended for anything beyond very small batches.
Q: Why does my drill bit constantly “walk” or skate across the surface when I try to drill metal, and how do I stop it permanently?
A: Bit walking occurs because the smooth, hard surface of metal provides no initial grip for the bit tip to bite into. The solution is a two-part protocol: First, create a precise starting point using a spring-loaded center punch. Place the punch tip exactly on your marked spot and strike the top firmly with a hammer. This creates a small, sharp dimple that traps the drill bit tip. Second, begin drilling at the absolute lowest possible speed with firm, steady downward pressure. Maintain this low speed until the bit has cut a shallow guide hole (about 1/16 inch deep), establishing its path. Only then gradually increase speed to the recommended RPM for the bit size and material. Using a drill guide block clamped to the metal can provide additional initial stability. Always use cutting fluid to reduce heat and friction. This combination of mechanical anchoring (center punch) and controlled initiation eliminates walking.
Q: What is the scientifically correct pilot hole size for wood screws, and how do I determine it without a chart?
A: The pilot hole diameter should match the screw’s minor diameter—the diameter of the solid core shaft beneath the threads. A too-small pilot hole increases splitting risk and driving torque; too large reduces holding power. Practical determination method: Hold the screw horizontally next to a drill bit. The drill bit should be slightly smaller than the outer threads of the screw but larger than the smooth core shaft. For softwoods (pine, cedar), the pilot hole can be slightly smaller than the minor diameter to maximize holding power. For hardwoods (oak, maple) or screws driven near edges, the pilot hole should match or be very slightly larger than the minor diameter to prevent splitting. When in doubt, test on a scrap piece of the exact material: drill the pilot hole, drive the screw, and assess. The screw should require firm pressure to drive but not cause the wood to split, and the threads should bite cleanly into the wood fibers surrounding the hole. Many quality screw packages include recommended pilot sizes—consult them when available.
Q: Can I accidentally damage my drill by using hammer mode on wood or metal?
A: Yes. Hammer mode adds a percussive axial action designed solely to fracture brittle materials like concrete, brick, or tile. Using hammer mode on wood, metal, plastic, or any non-masonry material is detrimental: it causes excessive, unnecessary vibration that accelerates wear on the tool’s internal hammer mechanism, gears, and bearings; it can damage the workpiece (cracking wood, deforming metal); and it significantly reduces drilling efficiency and control. Always verify the mode selector is set to “DRILL” (rotation only) before engaging any non-masonry material. Make it a pre-operation habit: Material = Wood/Metal/Plastic? → Mode = DRILL. Material = Concrete/Brick/Tile? → Mode = HAMMER DRILL. This simple discipline preserves your tool’s longevity and ensures optimal performance.
Q: How can I achieve a perfectly straight, perpendicular hole with a handheld drill without access to a drill press?
A: Achieving consistent perpendicularity handheld requires aids and refined technique. First, use a drill guide block: clamp a scrap wood block with a pre-drilled, perfectly perpendicular hole to your workpiece; the drill bit follows this guide. Affordable commercial drill guides with built-in bubble levels offer excellent accuracy. Technique refinement: Position your body squarely facing the work. Use both hands—one on the trigger, the other stabilizing the tool body near the chuck. Align the drill visually using a small machinist’s square held against the chuck and workpiece before starting. Begin drilling at very low speed to establish the hole path precisely; once the bit is seated (after 1/8 inch), you can gradually increase speed while maintaining steady pressure and alignment. Practice this sequence on scrap wood to build muscle memory. For critical applications where perfection is mandatory (dowel joints, hinge mortises), investing in or accessing a drill press is justified—but for most DIY needs, the guide block method delivers remarkable accuracy.
Q: My keyless chuck is stuck tightly closed and I cannot open it to change bits. What safe methods can I use to free it?
A: Proceed methodically and safely: First, ensure the drill is unplugged or the battery is removed. Insert the chuck key (if your model has one) into the appropriate hole. Tap the key handle gently with a rubber mallet or hammer in the opening direction (usually counterclockwise). For keyless chucks: Wrap the chuck teeth securely with electrical tape or leather to protect the surface. Use adjustable pliers or a pipe wrench to grip the taped chuck firmly. Turn counterclockwise with steady pressure. Apply a few drops of penetrating oil (like PB Blaster) into the chuck mechanism and let it sit for 15-30 minutes to loosen corrosion. If accessible, insert a flat-head screwdriver into the chuck’s internal jaws (through the front) and gently pry while turning. Never use excessive force that could damage the chuck or spindle. If these methods fail, the chuck may be seized due to internal corrosion or damage—consult a professional tool repair service. Prevention: Regularly clean and lightly lubricate the chuck threads; avoid overtightening.
Q: Are there any common household materials that are exceptionally dangerous or ill-advised to drill with a standard drill?
A: Yes. Exercise extreme caution or avoid entirely: Tempered or Safety Glass: Drilling almost certainly causes catastrophic shattering. Requires specialized diamond core bits, constant water cooling, and expert technique—strongly recommend professional service. Unknown Walls: High risk of striking electrical wires (electrocution hazard), plumbing pipes (water damage), or gas lines (explosion hazard). Always use a quality stud finder with AC wire detection and verify by drilling a tiny pilot hole with a non-conductive bit first. Carbon Fiber Composites: Generate hazardous conductive dust; requires specialized bits, full respiratory protection (P100), and dust extraction. Asbestos-Containing Materials (old insulation, tiles): Drilling releases deadly fibers—do not disturb; consult abatement professionals. When uncertain about a material’s composition or hazards, research thoroughly or consult a professional. Safety must always override curiosity or convenience.
Q: How frequently should drill bits be replaced under typical DIY usage?
A: Bit lifespan is highly variable, dependent on material drilled, technique used, bit quality, and maintenance. However, general guidance: High-speed steel (HSS) twist bits used primarily in softwoods may maintain good performance for many hours of cumulative use under proper conditions. The same bits used frequently in hardwoods or abrasive composites (MDF) may require sharpening more often. Carbide-tipped masonry bits used for occasional home projects can last for numerous holes if used correctly (hammer mode engaged, proper speed, dust cleared). Replace bits when they exhibit clear dullness indicators (requiring excessive force, poor hole quality, overheating). For the typical DIYer using bits occasionally, a quality bit set can last many years with proper care (cleaning, storage, sharpening HSS bits). The key is proactive inspection before each use—not adhering to a rigid calendar schedule. Keep a “rough duty” set for demanding tasks to preserve your precision bits.
Conclusion and Next Step
Mastering your drill and driver is a journey of integrating tool knowledge, material understanding, and refined technique. This guide has equipped you with a systematic framework—the Precision Power Framework—to approach any drilling or driving task with confidence and precision. By internalizing the three layers of mastery, you transform a common tool into a versatile extension of your skill, capable of delivering professional results across a vast array of materials and applications.
-
Recap: The three foundational pillars are: (1) Tool Intelligence—understanding your drill/driver’s specifications, clutch function, and chuck mechanics; (2) Material Mastery—adapting your approach to the unique properties of wood, metal, masonry, and composites; and (3) Technique Execution—applying mindful body mechanics, pilot holes, and alignment for consistent accuracy. These layers are interdependent; neglecting one compromises the whole system.
-
The 24-Hour Rule: Within the next day, select one technique from this guide to practice deliberately. For example, calibrate your drill’s clutch settings on a scrap piece of wood matching your next project’s material, or inspect and clean your chuck. This small, immediate action solidifies knowledge into muscle memory and builds momentum for continued growth.
-
The Big Picture: Drill and driver proficiency is not an isolated skill—it is a cornerstone of workshop competence. The precision, problem-solving, and safety mindset cultivated here transfers directly to other tools and projects, elevating your overall craftsmanship. As you apply these principles, you’ll find that the confidence gained extends beyond the workshop, fostering a deeper connection to the things you create and repair.
Explore Our Complete System:
Workshop Safety Fundamentals | Advanced Wood Joinery Techniques | Tool Maintenance Mastery | Material Selection Guide for DIYers | Precision Measuring and Marking | Electrical Safety for Home Projects | Sustainable Workshop Practices