Stop Guessing and Start Solving: A Step-by-Step Framework to Rescue Any Paint Job, From Peeling to Blistering and Beyond
That unsightly crack, blister, or patch of peeling paint on your wall isn’t merely cosmetic damage—it’s a visible symptom of a deeper systemic issue. Slapping on a fresh coat without addressing the root cause significantly increases the likelihood of recurrence, often accelerating deterioration beneath the surface. This comprehensive guide transforms you from a frustrated painter into a confident diagnostician and craftsman. We’ll walk you through a proven four-step diagnostic framework to identify exactly why your paint failed, provide meticulous, step-by-step repair protocols for twelve common failure modes, and equip you with prevention strategies grounded in established industry standards and widely accepted field practices. Whether you’re facing minor discoloration on a bathroom ceiling or widespread adhesion concerns on exterior siding, this guide delivers the clarity, actionable steps, and nuanced understanding required for repairs that endure.
Introduction: Why Paint Fails—and Why Most Repairs Fall Short
Paint functions as a sophisticated protective system designed to shield substrates while providing aesthetic value. When failure occurs prematurely, it rarely stems from a single factor. Environmental conditions, substrate integrity, surface preparation quality, product selection, application technique, and the age of existing coatings interact in complex ways that compromise the entire system. Industry analysis consistently identifies inadequate surface preparation as a leading contributor to paint failure. Yet, most repair attempts focus exclusively on the visible symptom, not the underlying condition. This reactive approach consumes time, materials, and motivation while delivering temporary results. True repair requires shifting perspective: paint failure communicates unmet needs within your home’s environment. Sustainable solutions emerge only when diagnosis precedes action. This guide establishes that foundation. By understanding the why behind each failure mode, you gain the power to execute repairs with precision and confidence. Remember: a successful paint repair isn’t about covering up the past; it’s about building a resilient, scientifically sound foundation for the future.
The Root Cause Diagnostic Framework: Your 4-Step Path to a Lasting Fix
Before reaching for sandpaper, primer, or a roller, pause. Effective repair begins with accurate diagnosis. This four-step framework, synthesized from widely referenced professional painting protocols and adapted for homeowner application, ensures you address the true source of the problem. Skipping any step risks repeating the failure—and potentially worsening the underlying condition. This methodology transforms uncertainty into actionable clarity.
Step 1: Observe and Document the Failure Pattern with Precision
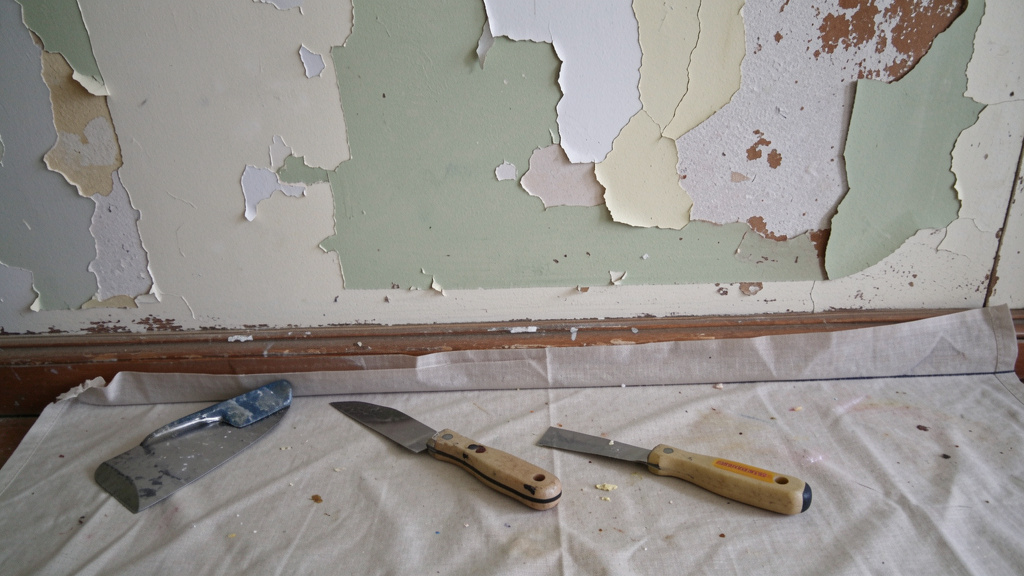
Closely examine the failed area under consistent lighting. Take clear, well-lit photographs from multiple angles (close-up, mid-range, and contextual views showing surrounding surfaces). Document these critical details:
- Location Specifics: Is the failure isolated to one wall, a specific room quadrant, or widespread? Note exposure (north vs. south wall), proximity to moisture sources (bathroom fixtures, kitchen sinks, exterior leaks, windows), heat sources (radiators, direct sunlight through windows), or high-traffic zones (hallways, door frames).
- Visual Characteristics: Describe the failure with precision. Is paint peeling in large continuous sheets or fragmented flakes? Are blisters raised uniformly or clustered? What is the crack pattern: deep interconnected fissures (alligatoring), fine surface lines (checking), or random hairline fractures? Is discoloration uniform yellowing, spotty mildew growth, or chalky residue? Use a magnifying glass for subtle details. Note texture: powdery, sticky, brittle, or rubbery.
- Temporal Context: When was the original paint job completed? When did failure first appear? Did onset coincide with a specific event (seasonal humidity shifts, plumbing repair, new appliance installation, HVAC changes)? Track progression: has it worsened rapidly or slowly?
- Substrate Identification: What material lies beneath? Drywall, plaster, wood trim, metal door, concrete block, or previously painted surfaces? What was the prior coating system (latex, oil-based enamel, stain, wallpaper)? If possible, gently scrape a tiny inconspicuous area to observe layer sequence.
Why this step is crucial: Patterns reveal causes with remarkable reliability. Blistering confined exclusively to a south-facing exterior wall often indicates heat-driven moisture vapor pressure. Peeling concentrated around window frames frequently points to water intrusion from compromised seals. Uniform alligatoring across an entire wall may suggest incompatible coating layers or excessive film thickness. Documentation creates an objective reference that prevents emotional or rushed decisions during Step 2. It also provides essential context if consulting a professional later.
Common mistake to avoid: Assuming all peeling stems from “low-quality paint.” While product quality matters, paint rarely acts alone. It functions as a symptom indicator—like a fever signaling illness. Focusing blame on the paint product ignores the environmental or preparatory conditions that caused the system to fail.
Step 2: Identify the Failure Mode Using the Paint Failure Atlas
Match your documented observations to the specific failure modes detailed comprehensively in the Paint Failure Atlas section of this guide. Precision in naming the failure mode is essential for selecting the correct repair path. For instance:
- If you observe raised, fluid-filled bubbles that feel soft when gently pressed, and popping one releases moisture, you are diagnosing Blistering.
- If paint is lifting in large, continuous sheets with a clean separation line revealing bare substrate or a previous coat beneath, Peeling is the primary mode.
- If the surface displays a deep, interconnected network of cracks resembling reptile skin across the entire painted area, Alligatoring is present.
- If rubbing the surface leaves a fine, colored powder on your fingers with noticeable fading, Chalking is occurring.
Pro Tip: Keep this guide open beside you during inspection. Cross-referencing your notes with the detailed failure descriptions eliminates guesswork and emotional bias. This step transforms vague concerns (“the paint looks bad”) into a precise, actionable diagnosis (“moisture-induced peeling originating from condensation behind bathroom tile”). Accuracy here forms the cornerstone of repair success.
Step 3: Trace Back to the Root Cause(s) Using the Diagnostic Tree
This is the cognitive peak of the entire repair process. Every visible failure mode stems from one or more root causes. Use this diagnostic tree to work backward systematically. Ask these questions sequentially:
The Fundamental Principle: Paint failure is a conversation between the coating, the substrate, and the environment. Your job is to listen carefully to what each element is communicating—and respond to the underlying message, not just the surface noise.
- Surface Preparation Audit: Was the surface clean, dry, sound, and properly profiled (roughened for mechanical adhesion)? Common oversights: painting over dirt, grease, wax residues, chalky weathered paint, or glossy surfaces without deglossing; failing to repair cracks, holes, or delaminated areas; not removing all loose or flaking previous coats; skipping primer on porous or stained areas.
- Moisture Intrusion Investigation: Is liquid water or excessive humidity present? Sources include roof leaks, plumbing leaks behind walls, window/door seal failures, condensation from poor ventilation (bathrooms, kitchens), high ambient humidity, painting on a damp surface, or inadequate drainage near foundation walls. Moisture is frequently the most destructive force to paint adhesion.
- Product and Application Review: Was the correct paint type selected for the substrate and environment (e.g., interior vs. exterior, latex vs. oil, mildew-resistant formula for damp areas)? Were application conditions suitable (moderate temperatures, substrate dryness, adequate ventilation, no precipitation expected)? Were manufacturer instructions followed for mixing, coverage rates, and drying times between coats? Was paint applied too thickly?
- Environmental Stress Assessment: Has the surface been exposed to extreme or unusual conditions? Examples: intense UV radiation on sun-drenched walls causing binder degradation; thermal expansion/contraction cycles on metal surfaces or exterior wood; chemical exposure (harsh cleaners, pool chemicals, cooking oils); abrasion in high-traffic zones; or pollution in industrial areas.
- Substrate Integrity Check: Is the underlying material itself compromised? Examples: wood degradation from chronic moisture exposure; rust formation on ferrous metals; efflorescence (salt deposits) migrating through masonry; drywall paper delamination; plaster cracks from structural movement; or previous patching compounds that weren’t sealed.
Real-world diagnostic example: A homeowner noticed peeling paint on their bathroom ceiling directly above the shower. Documentation revealed peeling was worst within a 2-foot radius of the showerhead, with soft, swollen drywall texture beneath failed paint. Step 2 identified it as moisture-related peeling with substrate involvement. Step 3 traced the root cause: the bathroom lacked adequate ventilation, and the existing window was rarely opened. Chronic steam condensation saturated the drywall paper over time, breaking the bond between paint and primer while degrading the substrate. The repair protocol required: 1) Installing a properly vented exhaust fan to eliminate the moisture source, 2) Removing all damaged drywall section and replacing it, 3) Treating adjacent areas for potential microbial growth, 4) Sealing new drywall with a moisture-resistant primer, 5) Applying a bathroom-specific paint with mildew-inhibiting properties. Without addressing the ventilation deficit (root cause), repainting would likely have failed within weeks.
Step 4: Select and Execute the Targeted Repair Protocol
Armed with a precise diagnosis and verified root cause, select the repair protocol from the relevant section of the Paint Failure Atlas. Each protocol is engineered to eliminate the root cause while restoring surface integrity. For the bathroom example, the protocol sequence was essential: fix ventilation before any surface work. This framework prevents the “cosmetic patch” trap. By investing time in diagnosis, you save significant effort and material waste later. Lasting repair is always systematic, never symptomatic.
The Paint Failure Atlas: Diagnosis, Repair, and Prevention for 12 Common Problems
This section serves as your definitive visual and technical reference. For each failure mode, we provide:
– Clear Identification: Specific visual and tactile cues for confident recognition.
– Root Cause Analysis: Detailed breakdown of contributing factors.
– Step-by-Step Repair Guide: Actionable, safety-conscious instructions with material specifications.
– Prevention Protocol: Proactive measures for future projects.
– Critical Mistakes to Avoid: Common pitfalls that sabotage repairs.
Peeling Paint: The Adhesion Breakdown
Identification: Paint detaches from the substrate or underlying coat in flakes, sheets, or patches. Edges are often curled upward. When gently scraped with a putty knife, it releases easily with minimal resistance, revealing bare substrate or a previous coat beneath. Common locations: exterior siding (especially near ground level or under eaves), window/door trim, interior walls in humid rooms (bathrooms, kitchens), and areas with previous water exposure.
Root Cause Analysis: Peeling signifies a loss of adhesion at the paint-substrate interface. Primary triggers include:
– Moisture Intrusion: Liquid water penetration behind the paint film (from leaks, condensation, or high humidity) creates pressure that mechanically pushes paint off. Water also swells wood substrates, breaking the bond.
– Inadequate Surface Preparation: Painting over contaminants (dirt, grease, wax, chalky residue) or a glossy surface without sanding creates a weak boundary layer. Failure to remove all loose previous coats is equally critical.
– Coating Incompatibility: Applying latex paint directly over multiple layers of aged oil-based paint without a bonding primer. Flexibility differences cause stress at the interface.
– Painting on Damp Surfaces: Trapping moisture beneath the new coat during application sets the stage for future failure as that moisture seeks escape.
Step-by-Step Repair Guide:
1. Safety Protocol: Wear ANSI-approved safety glasses, nitrile gloves, and a NIOSH-approved respirator. Critical: If your home was built before 1978, assume lead-based paint may be present. Follow EPA Renovation, Repair and Painting (RRP) guidelines: contain the work area with plastic sheeting sealed at edges, use wet scraping methods to minimize dust, and clean with a HEPA vacuum. When uncertain, use an EPA-recognized lead test kit before proceeding.
2. Complete Removal of Failed Paint: Using a flexible putty knife or dedicated paint scraper, remove all loose, flaking, or poorly adhered paint. Work methodically until you reach firmly bonded edges. Test adhesion by pressing firmly with your thumb—if it moves or feels hollow, remove it. For large areas on wood, a random orbital sander (medium grit) may be efficient, but avoid aggressive sanding that damages the substrate. Why this matters: Leaving even small areas of compromised paint creates a weak boundary where failure will propagate under the new coat.
3. Surface Cleaning: Wash the entire area (including sound surrounding paint) with a trisodium phosphate (TSP) substitute solution (follow package dilution ratios) using a stiff nylon brush. This removes chalk, dirt, grease, and mildew residues. For confirmed mildew (black/green spots), use a diluted bleach solution after TSP cleaning (never mix chemicals). Rinse thoroughly with clean water. Allow to dry completely—use fans and dehumidifiers to accelerate drying. Verify dryness by pressing plastic sheeting tightly against the surface for one hour; no condensation should form underneath.
4. Substrate Repair: Fill cracks, holes, or damaged areas with an appropriate compound. For drywall: lightweight spackling compound. For wood: exterior-grade wood filler (for outdoors) or water-based wood filler (indoors). For masonry: acrylic-modified patching cement. Sand smooth once fully cured. If wood shows signs of degradation (soft, crumbly texture), it must be cut out and replaced—painting over compromised substrate is structurally unsound.
5. Priming Bare and Feathered Areas: Apply a high-quality bonding primer to all bare substrate and feathered edges where old paint was sanded smooth. For problem areas (water stains, knots, or bonding latex over oil), use a stain-blocking primer: shellac-based types for maximum adhesion and stain blocking, or oil-based primers for flexibility on wood. Apply with a brush for edges and a small roller for larger areas. Feather the primer slightly onto the surrounding sound paint. Why primer is essential: It seals the substrate, blocks stains from bleeding through, and creates a uniform surface for topcoat adhesion. Skipping primer often leads to visible patchiness (“flashing”) and reduced durability.
6. Topcoat Application: Once primer is fully dry (check manufacturer’s recoat time), apply your finish paint. Use a paint formulated for the specific surface and environment (e.g., 100% acrylic latex for exterior wood siding; mildew-resistant satin for bathrooms). Cut in edges with a high-quality angled brush, then roll the field with an appropriate nap roller. Maintain a “wet edge” to avoid lap marks. Apply two thin coats rather than one thick coat for optimal film formation.
Prevention Protocol:
– Always clean surfaces thoroughly with TSP substitute before painting. Rinse and verify dryness.
– Sand glossy surfaces to a dull finish to create “tooth” for mechanical adhesion.
– Use a moisture meter on wood substrates when possible; moisture content should be low before painting.
– Address moisture sources before painting: fix leaks, install exhaust fans in bathrooms/kitchens, ensure proper grading and drainage around foundations.
– Select primers and paints specifically designed for the substrate and exposure conditions. When in doubt, consult paint department professionals with photos of your project.
Critical Mistakes to Avoid:
– Mistake: Painting over peeling paint after merely sanding the curled edges smooth. Result: The new paint bonds to the failing old layer, not the substrate. Failure recurs rapidly along the original weak boundary.
– Mistake: Skipping primer on bare wood, drywall, or patched areas. Result: Uneven paint absorption causes poor adhesion, visible patchiness (“flashing”), and reduced durability. Primer is insurance, not an optional step.
– Mistake: Ignoring the moisture source (e.g., repainting a leaky window frame without resealing the glass). Result: Repair fails within weeks or months as moisture re-enters the system. Diagnosis must precede action.
Blistering and Bubbling: Trapped Pressure Under the Film
Identification: Raised bubbles or blisters of varying sizes appear on the paint surface. Blisters may feel soft and fluid-filled when gently pressed, or hard if air-filled. Popping a blister often reveals moisture, a separation between paint layers, or a contaminated surface beneath. Common on exterior walls exposed to direct sun and rain cycles, metal doors/garage doors, and surfaces painted while damp or in high humidity.
Root Cause Analysis: Blisters form when pressure builds beneath the paint film, forcing it away from the substrate. Contributing factors:
– Moisture Vapor Pressure: Water trapped behind the paint (from leaks, condensation, or painting on a damp surface) evaporates when heated by sunlight. The expanding vapor creates pressure that lifts the paint film. This is especially common on dark-colored surfaces that absorb heat.
– Heat Exposure: Direct sun on dark paints can heat the substrate enough to vaporize residual moisture or soften the paint film itself, causing bubbling even without liquid water present.
– Solvent Entrapment: Applying paint too thickly, or applying a second coat before the first is fully dry, traps solvents or water within the film. As temperatures rise, these volatiles expand, creating bubbles.
– Surface Contamination: Painting over wax, oil, grease, or silicone-based polishes causes the paint to bead up and blister as it cures due to poor wetting of the surface.
Step-by-Step Repair Guide:
1. Identify and Eliminate the Moisture Source (Essential First Step): Inspect thoroughly for roof leaks, plumbing leaks behind walls, failed window/door seals, or condensation issues. Repair leaks, recaulk penetrations, improve drainage, or install ventilation before any surface work begins. Why: Repairing blisters without fixing the moisture source is futile—the repair will likely fail again.
2. Allow Complete Drying: After addressing the moisture source, allow the substrate to dry thoroughly. This may take several days depending on material, humidity, and temperature. Use fans, dehumidifiers, and open windows to accelerate drying. Verify dryness with the plastic sheet test. For wood, a moisture meter should indicate low moisture content.
3. Remove Blistered Paint: Once the surface is confirmed dry, scrape off all blistered areas down to sound, well-adhered paint or bare substrate. Sand the edges to feather them smoothly into the surrounding area. Remove all dust with a tack cloth or vacuum with a brush attachment.
4. Clean and Prime: Clean the area with TSP substitute to remove any residues. For surfaces prone to moisture (exterior wood, masonry), apply a penetrating primer or a moisture-resistant bonding primer. In recurring cases, consider a vapor-permeable primer that allows residual moisture to escape slowly without damaging the paint film. For metal surfaces, use a rust-inhibiting primer after ensuring all corrosion is removed.
5. Repaint with Breathable Coatings: Select a high-quality, vapor-permeable paint. For most exterior applications, 100% acrylic latex paint offers superior breathability. Apply in thin, even coats under suitable conditions (moderate temperature, low humidity, no direct sun on the surface during application). Consider lighter colors on surfaces with known moisture history.
Prevention Protocol:
– Never paint on a damp surface. Check weather forecasts; avoid painting if rain is expected within 48 hours. Test substrate dryness with the plastic sheet method.
– Ensure surfaces are clean and free of all contaminants (wax, oil, grease) using appropriate cleaners. Rinse thoroughly.
– Allow adequate drying time between coats as specified by the paint manufacturer—do not rush.
– For exterior surfaces in sunny locations, choose lighter colors to reduce heat buildup. Specify paints formulated for high breathability.
– Install vapor barriers correctly during construction/renovation to manage moisture movement.
Critical Mistakes to Avoid:
– Mistake: Popping blisters and painting directly over the punctured areas. Result: Trapped moisture remains, causing new blisters to form rapidly around the repair site.
– Mistake: Using a non-breathable paint over a surface with moisture history. Result: Moisture becomes trapped behind an impermeable film, accelerating blistering and substrate damage.
– Mistake: Rushing the drying process after fixing a leak. Result: Painting before the substrate is fully dry leads to immediate re-blistering. Patience is a critical repair material.
Cracking and Alligatoring: When the Paint Film Loses Flexibility
Identification:
– Checking: Shallow cracks penetrating only the top coat of paint, often in a random pattern.
– Cracking: Deeper cracks extending through multiple paint layers down to the substrate.
– Alligatoring: A specific, severe pattern of deep, interconnected cracks resembling alligator or crocodile skin. Usually affects the entire painted surface uniformly. The paint film may feel rigid and brittle.
Root Cause Analysis: Cracking occurs when the paint film cannot expand and contract with the substrate due to temperature fluctuations, humidity changes, or substrate movement. Contributing factors:
– Excessive Film Thickness: Applying paint too thickly (especially oil-based paints or enamels) creates a rigid, inflexible film prone to cracking as it cures and ages.
– Coating Incompatibility: Applying a rigid topcoat over a more flexible primer or existing coat. Stress builds at the interface during movement.
– Natural Aging and UV Degradation: Paint binders break down over time, especially oil-based paints exposed to sunlight. Loss of elasticity leads to cracking. Alligatoring is often the end-stage of this process.
– Poor Quality Paint: Low-cost paints may contain insufficient binders or flexible resins to maintain film integrity through environmental cycles.
– Substrate Movement: Wood expands and contracts significantly with humidity changes. If the paint film lacks flexibility, it cracks. Structural settling can also cause cracking in plaster or drywall seams.
Step-by-Step Repair Guide:
1. Complete Removal of Failed Paint Film: Alligatoring typically requires total removal of the cracked paint system down to bare substrate. Sanding, scraping, or chemical stripping is necessary. Feather the edges of any remaining sound paint smoothly. Why total removal is essential: Cracks create pathways for moisture; leaving brittle paint invites rapid recurrence. The goal is a clean, sound foundation.
2. Substrate Assessment and Repair: Inspect the bare substrate thoroughly. For wood: check for warping, degradation, or excessive movement. Secure loose boards. For drywall/plaster: repair cracks with joint compound, reinforcing with mesh tape for movement cracks. Sand smooth once dry. Address any underlying structural issues before proceeding.
3. Priming with Flexibility in Mind: Apply a high-quality bonding primer appropriate for the substrate. For exterior wood prone to movement, an oil-based primer can provide excellent adhesion and slight flexibility. For surfaces with only minor checking (top coat cracked but primer intact), light sanding followed by a flexible primer may suffice. Ensure primer fully seals the surface.
4. Repainting with Elastic Formulations: Select a topcoat specifically formulated for flexibility and durability. For exterior wood: 100% acrylic latex paint is ideal due to its superior elasticity and UV resistance. For high-movement areas (exterior trim, doors), consider paints labeled “flexible” or “elastomeric.” Apply in thin, even coats—never thick. Follow manufacturer’s coverage recommendations. Two thin coats outperform one thick coat.
Prevention Protocol:
– Use high-quality paints with documented flexibility ratings (check technical data sheets). Premium paints contain higher levels of binders and resins that maintain elasticity.
– Apply paint in thin coats according to manufacturer specifications. Avoid “loading” the brush or roller excessively.
– Ensure compatibility between primer and topcoat. When repainting over unknown coatings, use a universal bonding primer. Generally: latex over latex is safe; oil over oil is safe; when switching systems, use a bonding primer.
– For surfaces prone to movement (exterior wood siding, doors), choose paints specifically engineered for flexibility and expansion/contraction cycles.
– Allow proper drying time between coats to prevent solvent entrapment that can cause brittleness.
Critical Mistakes to Avoid:
– Mistake: Filling cracks with caulk or spackle and painting over without removing the brittle, alligatored paint film. Result: Cracks will telegraph through the patch and reappear rapidly. The rigid old film continues to move independently.
– Mistake: Using interior-grade paint on exterior surfaces. Result: Rapid degradation from UV exposure and temperature swings leads to premature cracking and alligatoring. Exterior paints contain UV stabilizers and flexible binders interior paints lack.
– Mistake: Applying paint in cold temperatures below the manufacturer’s minimum. Result: Paint film forms improperly, becoming brittle and prone to cracking even before full cure.
Chalking: The Powdery Residue of Degradation
Identification: A fine, chalky powder rubs off on your hand when you wipe the painted surface. Color fading is usually evident, especially on darker hues. Common on exterior surfaces exposed to sunlight and weather, particularly south- and west-facing walls. Light chalking is normal weathering; heavy chalking indicates premature failure.
Root Cause Analysis: Chalking is a natural weathering process where ultraviolet (UV) radiation breaks down the paint binder (resin), releasing pigment particles to the surface. Excessive or premature chalking indicates:
– Low-Quality Paint: Inexpensive paints use lower-grade binders with poor UV resistance, accelerating degradation.
– Incorrect Paint Type: Using interior paint on exterior surfaces (lacks UV inhibitors) or using a paint not formulated for the specific exposure.
– Over-Thinning: Adding excessive water or solvent beyond manufacturer recommendations weakens the binder concentration.
– Extreme Environmental Exposure: Intense, prolonged UV exposure (high-altitude locations, reflective surfaces nearby) or chemical pollutants can accelerate chalking.
Step-by-Step Repair Guide:
1. Assess Chalking Severity: Wipe the surface firmly with a dark cloth. Light chalking (slight color transfer) may only require cleaning. Heavy chalking (significant powder residue, visible fading) requires more aggressive preparation.
2. Surface Cleaning: For light chalking: wash thoroughly with a garden hose and soft brush using a TSP substitute solution. For heavy chalking: gentle pressure washing may be necessary. Use low pressure, hold nozzle at a safe distance and angle, and work from bottom to top to avoid driving water behind siding. Critical: Allow ample drying time after washing before proceeding. Verify dryness with plastic sheet test.
3. Remove Persistent Chalk: After washing and drying, wipe the surface again. If powder remains, lightly sand with medium-grit sandpaper or use a wire brush on masonry. The goal is a clean, sound surface free of loose particles. Vacuum or tack cloth to remove dust.
4. Prime with a Sealer Primer: Apply a high-quality exterior bonding primer designed for chalky surfaces. These primers contain resins that penetrate and bind residual chalk, creating a stable base. Do not skip this step—paint will not adhere properly to chalk.
5. Repaint with UV-Resistant Paint: Select a premium 100% acrylic latex exterior paint with high UV resistance ratings. Look for labels indicating “advanced durability,” “fade-resistant,” or “for sun-exposed areas.” Apply two coats for maximum protection and color retention.
Prevention Protocol:
– Invest in premium-grade exterior paints specifically formulated with high levels of UV-resistant binders and pigments. The initial cost is offset by significantly longer service life.
– Never use interior paint on exterior surfaces. Interior paints lack the necessary UV stabilizers and weatherability.
– Avoid over-thinning paint. Follow manufacturer dilution guidelines precisely.
– In extreme sun climates, consider lighter paint colors which absorb less heat and UV radiation, reducing degradation stress.
Critical Mistakes to Avoid:
– Mistake: Painting directly over a heavily chalky surface after a quick hose-down. Result: New paint adheres to the loose chalk layer, not the substrate. Entire coating system will fail prematurely.
– Mistake: Using a standard primer not designed for chalky surfaces. Result: Primer fails to bind the chalk, leading to poor adhesion and rapid failure of the topcoat.
– Mistake: Skipping the second topcoat. Result: Inadequate film thickness provides insufficient UV protection, accelerating future chalking.
Mildew and Mold: The Living Stain
Identification: Black, green, brown, or gray fuzzy spots, streaks, or patches. Often appears in damp, shaded, poorly ventilated areas: bathroom ceilings/walls (especially near showers), kitchen backsplashes, north-facing exterior walls, window sills, and areas with poor air circulation. Distinct musty odor is common. Critical distinction: Mildew is surface-level fungal growth; mold can penetrate deeper. Both require treatment before painting.
Root Cause Analysis: Fungal growth requires four elements: moisture, organic food source (paint binders, dust, soap scum), warmth, and lack of airflow/sunlight. Contributing factors:
– Chronic Moisture: Inadequate ventilation in bathrooms/kitchens, leaks, condensation on cold surfaces (windows, pipes), high humidity levels.
– Poor Surface Hygiene: Accumulation of soap scum, cooking oils, or dust provides nutrients for growth.
– Paint Formulation: Standard paints lack sufficient mildewcides. Using interior paint in damp areas accelerates growth.
– Shading and Poor Airflow: North-facing walls, dense landscaping against siding, or tightly packed furniture against walls create ideal microclimates for growth.
Step-by-Step Repair Guide:
1. Safety First: Wear N95 respirator, goggles, and gloves. Ensure excellent ventilation. For large areas or suspected significant mold growth, consult a professional. Do not disturb large colonies dry—this releases spores.
2. Kill the Growth: Prepare a cleaning solution. For most mildew: mix diluted bleach solution. Alternative for bleach-sensitive surfaces: Use a commercial mildewcide cleaner or a solution of borax per gallon of water. Apply solution to affected area with a sponge or spray bottle. Let dwell for 10–15 minutes (do not let dry). Scrub gently with a soft brush. Rinse thoroughly with clean water. Critical: Test solution on a small inconspicuous area first. Never mix bleach with ammonia or other cleaners.
3. Dry Completely: Use fans and dehumidifiers to dry the area rapidly. Moisture left after cleaning invites immediate regrowth. Verify dryness before proceeding.
4. Prime with Mold-Inhibiting Primer: Apply a primer specifically formulated with mildewcides. These primers seal the surface and create an inhospitable environment for future growth. Ensure full coverage of all treated areas.
5. Repaint with Mildew-Resistant Paint: Select a topcoat labeled “mildew resistant” or “for humid areas.” Most premium bathroom/kitchen paints and exterior paints contain added mildewcides. For severe problem areas, consider adding a mildewcide additive to the paint per manufacturer instructions. Apply two coats for maximum protection.
Prevention Protocol:
– Eliminate Moisture Sources: Install and use exhaust fans in bathrooms and kitchens (run for 20+ minutes after showering/cooking). Fix leaks promptly. Improve insulation on cold surfaces to reduce condensation. Use dehumidifiers in damp basements.
– Improve Airflow: Trim vegetation away from exterior walls. Avoid placing furniture directly against walls in damp rooms. Use ceiling fans to circulate air.
– Choose the Right Paint: Always use paints with built-in mildewcides in bathrooms, kitchens, laundry rooms, and exterior shaded areas. Look for labels specifying “advanced mildew resistance.”
– Routine Maintenance: Clean surfaces periodically with mild soap and water to remove nutrient sources (soap scum, dust). Ensure exhaust fans are clean and functioning.
Critical Mistakes to Avoid:
– Mistake: Painting over mildew without killing and removing it first. Result: Growth continues beneath the paint film, causing blistering, discoloration, and eventual coating failure. Spores can also migrate through the paint.
– Mistake: Using standard primer or paint without mildewcides in prone areas. Result: Rapid regrowth occurs within months, often worse than before due to trapped moisture.
– Mistake: Inadequate drying after cleaning. Result: Residual moisture trapped under primer/paint creates an ideal environment for immediate regrowth.
Efflorescence: The White, Crystalline Bloom on Masonry
Identification: White, powdery, fluffy, or crystalline deposits on brick, concrete, stucco, or stone surfaces. Often appears after rain or during humid periods, and may seem to “grow” overnight. Wiping removes powder temporarily, but it reappears as moisture moves through the masonry. Common on basement walls, chimneys, retaining walls, and exterior foundation walls.
Root Cause Analysis: Efflorescence is not a paint failure per se, but a substrate condition that causes paint failure. It occurs when: 1) Water penetrates the masonry, 2) Dissolves soluble salts within the concrete, mortar, or soil, 3) Carries salts to the surface as water evaporates, 4) Salts crystallize on the surface. Painting over efflorescence traps salts and moisture, causing severe blistering and adhesion loss.
Step-by-Step Repair Guide:
1. Address the Moisture Source (Critical First Step): Efflorescence is a symptom of water intrusion. Inspect and repair: improve grading around foundation to slope water away, clean gutters/downspouts, install or repair footing drains, seal cracks in foundation walls, apply waterproofing coatings to exterior below-grade walls. Without fixing the water source, efflorescence will recur.
2. Remove Existing Efflorescence: Once moisture source is addressed and surface is dry, remove deposits mechanically. Use a stiff nylon or brass wire brush. For stubborn deposits, a diluted muriatic acid solution can be used with extreme caution: wear full PPE, apply to small area, scrub, and rinse thoroughly with clean water multiple times. Alternative: Commercial efflorescence removers are safer and effective. Test any chemical on a small area first. Allow surface to dry completely.
3. Verify Dryness and Salt Depletion: After cleaning and drying, tape plastic sheeting tightly to the surface for 24 hours. If condensation forms under the plastic, moisture is still migrating—wait longer. Repeat cleaning if white deposits reappear after drying.
4. Apply a Masonry Sealer or Primer: Use a penetrating silane/siloxane water repellent or a specialized masonry primer designed to block salts. These products allow vapor transmission while blocking liquid water and salts. Do not use standard primers—they will fail.
5. Repaint with Breathable Masonry Paint: Select a high-quality elastomeric or 100% acrylic masonry paint formulated for breathability. These allow residual moisture vapor to escape without damaging the paint film. Apply according to manufacturer instructions, typically two coats.
Prevention Protocol:
– Water Management is Key: Proper site grading, functional gutters/downspouts directed away from foundation, and adequate drainage are the most effective prevention strategies.
– Use Quality Masonry Materials: During construction/repair, specify low-alkali cement and clean aggregates. Install proper vapor barriers and weep holes in retaining walls.
– Apply Water Repellents Proactively: On new or cleaned masonry, apply a breathable silane/siloxane water repellent before painting to reduce water absorption.
– Ensure Adequate Curing Time: New concrete or mortar must cure fully before painting to allow initial moisture and salts to dissipate.
Critical Mistakes to Avoid:
– Mistake: Painting directly over visible efflorescence. Result: Salts and moisture trapped beneath paint cause severe blistering, peeling, and substrate damage. Repair becomes exponentially more difficult.
– Mistake: Using a non-breathable paint or sealer. Result: Traps moisture within the masonry, accelerating deterioration and guaranteeing paint failure. Breathability is non-negotiable.
– Mistake: Skipping moisture source repair. Result: Efflorescence returns rapidly, undermining any surface treatment. Diagnosis must address the root cause—water intrusion.
Wrinkling: The Orange Peel Gone Wrong
Identification: Paint dries with a rough, wrinkled, or puckered texture resembling dried fruit skin or coarse orange peel. Wrinkles may be uniform across the surface or localized. Common on doors, cabinets, trim, and any surface where paint was applied too thickly.
Root Cause Analysis: Wrinkling occurs when the surface of the paint film dries faster than the underlying layer, causing the top skin to contract and wrinkle as the bottom layer continues to cure and shrink. Contributing factors:
– Excessive Film Thickness: Applying paint too heavily in one pass.
– High Temperatures or Direct Sunlight: Accelerates surface drying while underlying paint remains wet.
– Poor Ventilation: Traps solvents/water vapor beneath the surface skin.
– Contaminated Surface: Wax, oil, or grease causes uneven drying and poor flow.
– Applying Second Coat Too Soon: Traps solvents from the first coat.
Step-by-Step Repair Guide:
1. Allow Full Cure: Wait until the wrinkled paint is completely hard and dry (may take several days). Attempting repair too soon damages the film further.
2. Sand Smooth: Using progressively finer grits, sand the entire wrinkled area until smooth. Feather edges into surrounding sound paint. Remove all sanding dust with a tack cloth or vacuum.
3. Clean Surface: Wipe with a TSP substitute solution to remove contaminants, then rinse and dry thoroughly.
4. Prime if Necessary: If sanding exposed bare substrate, apply appropriate primer. For previously painted surfaces in good condition, priming may not be needed if using the same paint type.
5. Repaint Correctly: Apply paint in thin, even coats. Use proper tools: high-quality synthetic brushes for latex, natural bristle for oil; correct roller nap length. Work in shaded areas or during cooler parts of the day. Maintain a wet edge. Allow full recommended drying time between coats. For critical surfaces (doors, cabinets), consider using a paint conditioner to improve flow and leveling.
Prevention Protocol:
– Apply paint in thin coats. “Less is more” – it’s better to apply two thin coats than one thick coat.
– Paint under ideal conditions: moderate temperatures, low humidity, good ventilation, and avoid direct sun on the surface during application.
– Ensure surfaces are clean and free of contaminants before painting.
– Follow manufacturer’s recoat times precisely—do not rush.
– For high-gloss finishes or critical surfaces, use additives designed to improve flow and leveling.
Critical Mistakes to Avoid:
– Mistake: Trying to “smooth out” wrinkles while paint is still wet. Result: Disturbs the film further, creating more defects and potentially introducing contaminants.
– Mistake: Sanding only the high points of wrinkles. Result: Leaves valleys that show through the new coat. Entire area must be sanded uniformly smooth.
– Mistake: Repainting under the same conditions that caused wrinkling. Result: Wrinkling recurs immediately.
Burnishing: Unwanted Shine in High-Traffic Areas
Identification: Paint develops a shiny, polished spot in areas subject to repeated rubbing or cleaning. Common on walls at hand height in hallways, around light switches, on doors (especially near handles), and on trim near furniture. Most noticeable with flat or matte sheen paints.
Root Cause Analysis: Burnishing is physical abrasion of the paint film. Contributing factors:
– Low Sheen Paint in High-Wear Areas: Flat and matte paints have less binder at the surface, making them more susceptible to abrasion.
– Frequent Cleaning: Using abrasive cleaners or rough cloths wears down the surface.
– Physical Contact: Repeated brushing against walls from furniture, backpacks, or hands.
– Poor Quality Paint: Low-cost paints may have insufficient binder content to resist abrasion.
Step-by-Step Repair Guide:
1. Clean the Area: Wash gently with mild soap and water to remove dirt and oils. Rinse and dry completely.
2. Light Sanding: Lightly sand the burnished area and a 6-inch perimeter with fine-grit sandpaper to dull the shine and create a uniform surface profile. Wipe away dust.
3. Prime if Needed: If sanding exposed bare substrate or if the area is large, apply a spot primer. For minor burnishing on sound paint, priming may not be necessary.
4. Repaint with Appropriate Sheen: This is the critical correction. Repaint the entire wall section (not just the spot) with a paint of higher durability sheen: satin for moderate traffic areas, semi-gloss for high-wear zones (doors, trim, hallways). Using the same low-sheen paint guarantees rapid recurrence. Feather the new paint seamlessly into the surrounding area.
Prevention Protocol:
– Sheen Selection is Crucial: Use flat/matte only in low-traffic areas (ceilings, formal dining rooms). Use eggshell or satin in living areas, bedrooms, and hallways. Reserve semi-gloss or gloss for trim, doors, cabinets, and high-moisture areas (bathrooms, kitchens).
– Install Protective Elements: Add chair rails in dining rooms, corner guards in hallways, felt pads on furniture legs, and switch plate covers.
– Clean Gently: Use soft cloths and non-abrasive cleaners. Avoid scrubbing painted surfaces vigorously.
– Choose Durable Paints: Select paints labeled “scrubbable,” “washable,” or “high durability” for areas prone to contact.
Critical Mistakes to Avoid:
– Mistake: Repainting the burnished spot with the same flat paint. Result: The new spot will burnish even faster than the original, creating a visible patch. Sheen mismatch is also highly noticeable.
– Mistake: Only repainting the exact burnished spot without feathering into surrounding area. Result: Creates a visible “halo” effect where the new paint meets the old.
– Mistake: Using abrasive cleaners to “remove” the shine. Result: Further damages the paint film, making the problem worse and requiring more extensive repair.
Blocking: When Painted Surfaces Stick Together
Identification: Painted surfaces adhere to each other when pressed together, causing paint to pull off when separated. Classic examples: a painted door sticks to the door jamb when closed; a painted window sash sticks to the frame; cabinet doors stick shut. Often accompanied by a tacky feel.
Root Cause Analysis: Blocking occurs when paint films remain slightly tacky and fuse under pressure. Contributing factors:
– Insufficient Drying/Curing Time: Closing a door or window before paint is fully cured (which can take days or weeks, not just hours).
– High Humidity During Application/Cure: Slows solvent/water evaporation, extending tackiness.
– Paint Formulation: Some paints have higher blocking tendencies. Dark colors absorb heat, increasing tackiness.
– Lack of Non-Blocking Additives: Premium paints include additives to reduce blocking; budget paints may omit them.
Step-by-Step Repair Guide:
1. Separate Carefully: If surfaces are stuck, gently work a thin plastic putty knife or credit card between them to break the bond without damaging paint. Do not force.
2. Clean and Sand: Clean both surfaces with mild soap and water. Lightly sand stuck areas with fine-grit sandpaper to remove transferred paint and create a smooth surface. Wipe clean.
3. Apply Non-Blocking Primer: Prime the contact areas with a primer formulated to reduce blocking, or use a standard bonding primer.
4. Repaint with Blocking-Resistant Paint: Select a topcoat specifically labeled “non-blocking” or “for doors and windows.” High-quality acrylic latex enamels generally have better blocking resistance. Apply thin coats and allow extended drying time before closing surfaces (follow manufacturer’s full cure time, often 7–14 days).
5. Install Physical Barriers: After painting and full cure, apply self-adhesive felt pads or bumpers to contact points (top/bottom of door edge, window sash) to prevent future contact.
Prevention Protocol:
– Respect Cure Times: Do not close painted doors, windows, or cabinets until paint is fully cured. Check technical data sheet for “block resistance” time—often 7+ days. Prop doors/windows open during cure period.
– Choose the Right Paint: Specify paints with documented non-blocking properties for doors, windows, and cabinets. Acrylic latex enamels are generally superior to oil-based for blocking resistance.
– Control Environment: Paint during moderate humidity conditions. Use fans to improve airflow and accelerate curing.
– Use Protective Pads: Install felt pads or bumpers on contact points after full cure as a permanent preventative measure.
Critical Mistakes to Avoid:
– Mistake: Forcing stuck surfaces apart. Result: Tears paint film, requiring extensive repair of both surfaces.
– Mistake: Repainting and closing the door/window after only surface dry time. Result: Blocking recurs immediately because paint hasn’t fully cured through the film thickness.
– Mistake: Using standard interior wall paint on doors or windows. Result: High likelihood of blocking due to formulation not designed for contact surfaces.
Fading and Discoloration: Loss of Color Integrity
Identification: Paint color lightens significantly (fading) or changes hue (discoloration—e.g., white paint turning yellow). Fading is often uneven, worse on sun-exposed areas. Discoloration may be uniform (yellowing) or spotty (stains).
Root Cause Analysis:
– UV Exposure (Fading): Sunlight breaks down pigment molecules. Darker colors fade more noticeably. Low-quality pigments fade faster.
– Heat Exposure (Yellowing): Radiant heat from radiators, heating vents, or direct sun on light-colored paints (especially whites and pastels) can cause yellowing, particularly in oil-based paints or alkyd enamels.
– Chemical Exposure: Nicotine, cooking oils, or certain cleaning agents can cause staining or discoloration.
– Water Stains: Leaks cause yellowish-brown stains that bleed through paint.
– Paint Incompatibility: Applying latex paint over uncured oil-based primer can cause yellowing.
Step-by-Step Repair Guide:
1. Identify Cause: Determine if fading is UV-related (worse on sun-exposed areas) or discoloration is heat/chemical-related (localized near heat sources or stains).
2. Surface Preparation: Clean thoroughly with appropriate cleaner (TSP substitute for general dirt, specialized cleaners for nicotine/oil stains). For water stains or severe discoloration, sand lightly to remove surface layer.
3. Prime Stains Aggressively: For water stains, smoke stains, or areas prone to yellowing, apply a high-hiding, stain-blocking primer. Shellac-based primers are most effective for blocking tannins, water stains, and preventing yellowing. Oil-based primers are also excellent. Apply generously to seal the stain completely.
4. Repaint with Fade-Resistant Paint: Select premium paints with high-quality, lightfast pigments. Look for labels indicating “fade-resistant,” “advanced durability,” or “for sun-exposed areas.” For areas near heat sources, use non-yellowing acrylic paints. For severe fading on large areas, repaint the entire wall or section for uniform appearance.
Prevention Protocol:
– Use UV-Resistant Paints: Specify exterior paints with high UV resistance for sun-exposed areas. For interiors with intense sun, consider UV-filtering window film.
– Choose Non-Yellowing Formulas: For whites, ceilings, and areas near heat sources, select 100% acrylic latex paints labeled “non-yellowing.” Avoid oil-based paints in these locations.
– Address Stain Sources: Fix leaks promptly. Use range hoods while cooking. Install air purifiers in smoking areas.
– Quality Matters: Premium paints use higher concentrations of durable pigments that resist fading significantly longer than economy paints.
Critical Mistakes to Avoid:
– Mistake: Painting over water stains or nicotine stains without a proper stain-blocking primer. Result: Stains bleed through new paint within days or weeks, often darker than before.
– Mistake: Using interior paint on exterior surfaces. Result: Rapid fading and chalking due to lack of UV stabilizers.
– Mistake: Repainting only the faded section of a wall. Result: Creates a visible patch where new paint color doesn’t match aged surrounding paint. Repaint entire wall section for uniformity.
Poor Gloss Retention: When Shine Disappears Prematurely
Identification: Paint loses its sheen unevenly or entirely, becoming dull or flat in areas that should remain glossy or semi-gloss. Common on trim, doors, cabinets, and high-gloss accent walls. Often accompanies chalking on exterior surfaces.
Root Cause Analysis:
– UV Degradation: Sunlight breaks down the binder/resin that creates gloss, especially in lower-quality paints.
– Abrasion: Frequent cleaning or physical contact wears down the glossy surface layer.
– Chalking: As the paint surface degrades to powder (chalking), gloss is lost.
– Improper Application: Over-thinning paint, applying in high heat/humidity, or using incorrect tools can prevent proper film formation and gloss development.
– Low-Quality Paint: Economy paints use lower levels of resins and gloss-enhancing additives.
Step-by-Step Repair Guide:
1. Clean Surface: Wash thoroughly with mild detergent to remove dirt, grease, or chalk residue. Rinse and dry completely.
2. Light Sanding: Lightly sand the entire surface with fine-grit sandpaper to dull any remaining gloss and create a uniform profile for adhesion. Remove all dust.
3. Prime if Necessary: If sanding exposed bare substrate or if the surface is chalky, apply a bonding primer. For sound painted surfaces, priming may not be needed.
4. Repaint with High-Quality Gloss Paint: Select a premium paint specifically formulated for gloss retention. For interiors: high-quality acrylic latex enamel or alkyd enamel (with proper ventilation). For exteriors: 100% acrylic latex with UV inhibitors. Apply in thin, even coats with high-quality brushes/rollers designed for smooth finishes. Maintain a wet edge. Allow full cure time between coats.
Prevention Protocol:
– Invest in Quality: Premium paints contain higher levels of resins and additives that maintain gloss longer. The cost difference is justified by extended service life.
– Choose Appropriate Sheen: Use higher gloss levels (semi-gloss, gloss) in areas where gloss retention is desired and where durability is needed (trim, doors). Accept that flat paints will not retain gloss.
– Protect from UV: Use UV-filtering window film on interior surfaces exposed to direct sun. For exteriors, select paints with high UV resistance ratings.
– Clean Gently: Use soft cloths and non-abrasive cleaners to maintain gloss without wearing the surface.
Critical Mistakes to Avoid:
– Mistake: Applying a gloss topcoat over a poorly prepared, chalky, or dirty surface. Result: New gloss coat adheres poorly and fails rapidly. Surface preparation is paramount.
– Mistake: Using interior gloss paint on exterior surfaces. Result: Rapid loss of gloss due to UV exposure and weathering. Exterior paints have specific formulations for gloss retention outdoors.
– Mistake: Over-thinning paint to “improve flow.” Result: Reduces resin concentration, directly compromising gloss development and durability.
Flashing: The Patchy Sheen Problem
Identification: Visible differences in sheen or color appear after painting, especially noticeable under raking light (light shining across the surface at a low angle). Common after spot repairs, when painting over patched areas, or when cutting in edges doesn’t blend with rolled areas.
Root Cause Analysis: Flashing occurs due to uneven absorption of paint into the surface. Contributing factors:
– Inconsistent Porosity: Patched areas (spackle, joint compound) absorb paint differently than surrounding original surface. Unprimed patches are the most common cause.
– Inadequate Priming: Failure to prime bare spots, patched areas, or feathered edges creates zones of different absorbency.
– Application Technique: Cutting in edges with a brush and then rolling the field without overlapping sufficiently creates a visible line where brush marks meet roller texture.
– Paint Sheen: Higher sheen paints (satin, semi-gloss) make flashing more visible than flat paints.
– Using Different Paint Batches: Slight color/sheen variations between cans cause flashing at overlap zones.
Step-by-Step Repair Guide:
1. Assess the Cause: Determine if flashing is due to unprimed patches, application technique, or batch variation.
2. Light Sanding: Lightly sand the entire affected area (including surrounding sound paint) with fine-grit sandpaper to create a uniform surface profile. This is crucial for blending.
3. Prime Thoroughly: Apply a high-quality primer to all areas that were sanded, especially patches and feathered edges. Use a primer that seals porosity uniformly. For severe cases, prime the entire wall section.
4. Repaint Correctly:
– Use paint from the same batch. Buy enough paint for the entire wall/section upfront.
– “Cut in” a wide area (at least 4–6 inches) along edges and corners with a brush.
– Immediately roll the field while the cut-in paint is still wet, overlapping the brushed area by 2–3 inches to blend textures.
– Maintain a wet edge throughout the process. Work in manageable sections.
– For critical areas, consider rolling the entire wall section rather than spot repairing.
Prevention Protocol:
– Prime Every Patch: Never paint over spackle, joint compound, or bare substrate without priming first. Primer equalizes absorbency.
– Feather Edges Meticulously: When sanding repairs, feather edges gradually over 6–12 inches to avoid abrupt transitions.
– Use the “Wet Edge” Technique: Always keep a wet edge when painting to avoid lap marks that cause flashing.
– Buy Sufficient Paint: Purchase all paint needed for a continuous area (entire wall, room) from the same batch. Store leftover paint for future touch-ups.
– Test First: For spot repairs, test your technique and materials on a scrap board or inconspicuous area first.
Critical Mistakes to Avoid:
– Mistake: Painting directly over spackle or joint compound without priming. Result: Patch absorbs paint differently, causing immediate flashing. Primer is essential for repairs.
– Mistake: Trying to touch up a small spot without blending into surrounding area. Result: Creates a visible “halo” or patch. Repaint to natural breaks (corners, trim) whenever possible.
– Mistake: Using a different can of paint (even same color) for the repair. Result: Batch variations guarantee visible flashing. Always use paint from the original batch.
Essential Tools and Materials for Thoughtful Repairs
Successful paint repair hinges on using appropriate tools and materials for each specific failure mode. This curated list moves beyond basic supplies to include diagnostic and specialized items that prevent common repair pitfalls. Organize your toolkit by function:
Diagnostic and Safety Gear:
– Moisture Meter: Helpful for verifying substrate dryness before painting (e.g., after leaks or cleaning). Target readings: wood should feel dry; drywall should show no condensation under plastic sheet test.
– Magnifying Glass: Reveals subtle crack patterns, mildew spores, or surface contaminants.
– Lead Test Kit (EPA-recognized): Recommended for homes built before 1978 before sanding or scraping. Follow kit instructions precisely.
– Safety Essentials: ANSI Z87.1 safety glasses, NIOSH-approved respirator, nitrile gloves, and hearing protection for power tools. For lead-safe work considerations: plastic sheeting, painter’s tape, HEPA vacuum.
Surface Preparation Tools:
– Scrapers: Flexible putty knife for detail work; rigid scraper for large flat areas; carbide-blade scraper for stubborn coatings.
– Sanding System: Random orbital sander with variable speed; sanding block for edges; assortment of sandpaper (medium to fine grits); sanding sponges for contours. Pro Tip: Use vacuum attachment on sander to minimize dust.
– Cleaning Supplies: Stiff nylon brushes, TSP substitute powder, pump sprayer, microfiber cloths, tack cloths for final dust removal.
– Specialty Tools: Heat gun (for careful paint softening—never on surfaces where lead paint is suspected), chemical paint stripper (for intricate moldings), wire brushes.
Priming and Painting Supplies:
– Primer Selection Guide:
– Bonding Primer: For bare wood, metal, drywall patches.
– Stain-Blocking Primer: For water stains, smoke, knots (shellac-based types for maximum blocking; oil-based for flexibility).
– Masonry Primer: For brick, concrete, stucco with efflorescence history.
– Chalky Surface Primer: Specifically formulated to bind powdery residues.
– Paint Selection Guide:
– Exterior: 100% acrylic latex with UV inhibitors and mildewcides; elastomeric for masonry with hairline cracks.
– Bathrooms/Kitchens: Premium acrylic with advanced mildew resistance.
– Trim/Doors: Acrylic latex enamel or alkyd enamel (with ventilation) for hardness and gloss retention.
– High-Traffic Walls: Scrubbable satin or eggshell finish.
– Application Tools: High-quality synthetic brushes (angled for cutting in, flat for trim); roller frames; roller covers matched to surface texture; paint trays; paint conditioner for improved flow in challenging conditions.
Material Sourcing Tips:
– Budget Tier: Basic functionality for minor repairs. May require more coats or have shorter lifespan.
– Mid-Tier (Recommended): Professional-grade materials available at major home centers. Optimal balance of performance, durability, and value.
– Premium Tier: Specialty products for severe conditions or high-visibility areas. Justified for chronic problem zones.
Critical Reminder: Primer quality significantly impacts repair success. Primer creates the foundation for adhesion and stain blocking. Investing in the correct primer for the specific failure mode prevents most repeat failures.
Safety First: Protecting Yourself and Your Home During Repairs
Paint repair involves physical, chemical, and environmental considerations that demand proactive management. Safety protocols protect your health, your family’s well-being, and your home’s integrity. They are integral to professional, lasting results.
Lead Paint Considerations (Pre-1978 Homes):
– Assume Lead May Be Present: Homes built before 1978 may contain lead-based paint. Disturbing it (sanding, scraping) creates hazardous dust.
– Test Before You Start: Use an EPA-recognized lead test kit on multiple layers of paint in the work area. Follow instructions precisely.
– If Lead is Present or Suspected:
– Contain the work area with plastic sheeting sealed at all edges.
– Use wet scraping methods: mist surface lightly with water before scraping to suppress dust.
– Wear a NIOSH-approved respirator with appropriate filters.
– Clean daily with a HEPA vacuum followed by wet mopping. Never dry sweep.
– Dispose of waste properly: seal debris in heavy-duty plastic bags.
– Wash hands and face thoroughly before eating, drinking, or touching your face.
– For large projects or uncertainty, consult an EPA-certified renovator. The RRP rule mandates specific work practices.
Chemical and Ventilation Safety:
– Read SDS (Safety Data Sheets): Before using any chemical (paint stripper, primer, cleaner), review the SDS for hazards, PPE requirements, and first aid measures. Available online from manufacturers.
– Ventilate Aggressively: Open windows and doors. Use fans blowing outward to create cross-ventilation. For solvent-based products, ventilation is essential.
– Avoid Skin Contact: Wear nitrile gloves. Change gloves if torn or contaminated. Wash skin immediately with soap and water if contact occurs.
– Never Mix Chemicals: Especially bleach with ammonia or acids—creates toxic gases. Clean surfaces thoroughly between different cleaning solutions.
Physical Safety:
– Ladder Safety: Use ladders rated for your weight plus tools. Maintain 3 points of contact. Place on stable, level ground. Extend above landing surface. Never stand on top cap.
– Tool Safety: Unplug power tools before changing accessories. Keep cords clear of work area. Wear safety glasses always—paint chips and sanding debris cause eye injuries.
– Ergonomics: Take frequent breaks. Use knee pads for floor-level work. Lift with your legs, not your back. Alternate tasks to avoid repetitive strain.
Environmental Responsibility:
– Dispose of Waste Properly: Never pour paint, solvents, or cleaners down drains or storm sewers. Use household hazardous waste collection programs.
– Minimize VOC Exposure: Choose low-VOC or zero-VOC paints and primers where performance allows. These reduce indoor air pollution and odor.
– Protect Landscaping: Cover plants and soil near work areas with plastic sheeting. Rinse any overspray immediately with water.
Safety protocols are not obstacles to efficiency—they are the foundation of professional, lasting results. When in doubt, stop and research. No repair is worth compromising safety.
When to Call a Professional Painter
While this guide empowers you to handle most common paint failures confidently, certain scenarios benefit from professional expertise, equipment, or licensing. Recognizing these boundaries protects your investment, safety, and home’s structural integrity. Consult a licensed, insured professional painter when:
- Lead Paint is Confirmed or Suspected on Large Areas: Projects exceeding EPA RRP thresholds legally require certified renovators in the US. Professionals have containment systems, HEPA vacuums, and training to handle lead safely. This is important for health and legal compliance.
- Structural Damage is Present: If substrate damage extends beyond surface repair—degraded structural wood, significant drywall delamination indicating water intrusion behind walls, crumbling masonry, or foundation cracks—address the structural issue first with a qualified contractor. Painting over structural problems is ineffective and potentially unsafe.
- Extensive Microbial Growth is Visible: Growth larger than 10 square feet, growth inside wall cavities, or suspected problematic mold requires assessment by certified remediation professionals. Disturbing large colonies without containment spreads spores.
- Historical Homes or Original Finishes: Homes with historical significance, original woodwork, or specialty finishes benefit from conservators or painters experienced in preservation techniques. Incorrect methods can damage irreplaceable features.
- Recurring Failures Defy Diagnosis: If you’ve executed repairs correctly following this guide and failures persist in the same location, an unseen issue likely exists (hidden leaks, vapor barrier defects, chronic condensation). Professionals have moisture meters, thermal imaging cameras, and experience to diagnose complex moisture dynamics.
- Large-Scale or High-Access Projects: Multi-story exteriors, steep roofs, or complex architectural details require scaffolding, lifts, and fall protection equipment beyond typical homeowner capabilities. Safety risks outweigh DIY savings.
- Time Constraints or Physical Limitations: If project scope exceeds your available time, physical ability, or comfort level, hiring a professional ensures timely, high-quality results without stress or injury risk.
How to Select a Qualified Professional:
1. Verify state licensing and insurance (liability and workers’ compensation).
2. Request references and view completed projects similar to yours.
3. Obtain detailed written estimates specifying products, preparation steps, and timeline.
4. Confirm adherence to EPA RRP rules if applicable (ask for certification number).
5. Trust your instincts—choose someone who listens, explains clearly, and respects your home.
Knowing when to call for help is a sign of wisdom. It ensures problems are resolved correctly the first time, preserving your home’s value and your peace of mind.
Conclusion: Building Confidence Through Systematic Repair
Paint repair is more than surface restoration—it’s an opportunity to strengthen your home’s resilience and deepen your understanding of its needs. By approaching failures as diagnostic clues rather than mere annoyances, you shift from reactive fixes to proactive stewardship.
Recap: Three foundational principles anchor lasting repairs:
1. Diagnose before you act—spend time observing patterns, documenting conditions, and tracing root causes.
2. Address the system, not just the symptom—fix moisture sources, improve ventilation, or repair substrate issues before applying paint.
3. Match materials and methods to context—select primers, paints, and techniques suited to your specific substrate, environment, and constraints.
The 24-Hour Rule: Before starting any paint repair, spend 24 hours observing the failed area under varying conditions. Note changes in lighting, signs of moisture (condensation, dampness), temperature shifts, and usage patterns. This intentional pause prevents rushed decisions and ensures your diagnosis accounts for temporal variables often missed in a single inspection.
The Big Picture: Each repair connects to your home’s broader ecosystem. Fixing peeling bathroom paint by installing an exhaust fan doesn’t just save future repaints—it reduces humidity that could warp cabinetry or encourage mold. Sealing a window leak that caused blistering protects framing from rot. Thoughtful paint repair is holistic home care. It builds knowledge that compounds with every project, transforming maintenance from a chore into confident, capable stewardship. Your home communicates through its surfaces; learning its language creates not just beautiful finishes, but lasting peace of mind.
Your Questions, Answered
Q: How do I test for lead paint before starting repairs?
A: For homes built before 1978, use an EPA-recognized lead test kit available at hardware stores. Follow instructions precisely: typically, make a small incision through all paint layers to the substrate, apply the testing solution, and observe for color change within the specified time. Test multiple locations in the work area. For definitive results, especially if children are present or for large projects, consult a certified lead inspector. Never dry sand or create dust on surfaces that may contain lead without proper containment and PPE. When in doubt, assume lead is present and follow lead-safe work practices.
Q: Can I paint over peeling paint if I sand the edges smooth?
A: No. Sanding the curled edges of peeling paint creates a smooth transition but does not address the fundamental loss of adhesion beneath the surface. The new paint will bond to the old, failing paint layer—not the substrate—significantly increasing the likelihood of premature failure along the original weak boundary. All loose, flaking, or poorly adhered paint must be completely removed down to a sound, well-bonded surface before priming and repainting. This step is essential for lasting results.
Q: Why does blistering keep returning on the same exterior wall section?
A: Persistent blistering almost always indicates an unresolved moisture source behind the wall. Common culprits include: failed window or door flashing allowing water intrusion; roof leaks above the wall; inadequate drainage causing groundwater to wick up the foundation; interior condensation due to missing vapor barriers; or plumbing leaks within the wall cavity. Repainting is the final step, not the solution. Diagnose and repair the moisture source first—this may require consulting a roofing contractor, plumber, or building inspector. Verify the substrate is completely dry using the plastic sheet test before any surface preparation begins.
Q: What’s the practical difference between a primer and a sealer?
A: While often used interchangeably, they serve distinct primary functions. A primer is engineered to promote adhesion between the substrate and topcoat and may provide stain blocking. It contains resins that bond to both surfaces. A sealer is designed to penetrate and bind porous, chalky, or dusty surfaces (like weathered wood, drywall patches, or efflorescence-prone masonry), reducing absorption and creating a uniform base. Some products combine both functions. For most repair scenarios involving bare substrate or patches, a bonding primer is essential. For severely chalky surfaces or masonry with salt deposits, a dedicated sealer or chalky-surface primer is required before topcoating.
Q: How long must I wait after rain before painting exterior surfaces?
A: Wait a minimum of 24–48 hours after rain stops, but verify dryness empirically. Press a sheet of clear plastic tightly against the surface and tape all edges. After 1–2 hours, check underneath: if condensation is present, the surface is still too damp. Ideal painting conditions require substrate temperature within the manufacturer’s specified range, air temperature within the same range, relative humidity below 70%, and no precipitation expected within 24 hours. When in doubt, wait longer—painting on a damp surface is a leading cause of blistering and adhesion failure.
Q: Is it ever acceptable to use interior paint for a small exterior touch-up?
A: No. Interior paints lack UV stabilizers, mildewcides, and the flexible binders required to withstand temperature swings, moisture, and sunlight. Using interior paint outdoors—even for a tiny patch—will lead to rapid fading, chalking, blistering, and failure. The repaired spot will deteriorate faster than the surrounding exterior paint, creating a visible defect. Always use exterior-grade paint formulated for the specific exposure conditions. Keep a small container of your original exterior paint (clearly labeled) for future touch-ups.
Q: My repaired patch looks noticeably different after painting (“flashing”). How do I fix it?
A: Flashing occurs due to uneven paint absorption, usually from unprimed patches or inconsistent application. To fix: 1) Lightly sand the entire repaired area plus a 6–12 inch perimeter with fine-grit sandpaper to create uniform texture. 2) Apply a high-quality bonding primer to all sanded areas, especially patches. 3) Repaint using paint from the original batch (critical for color/sheen match). Cut in a wide area (4–6 inches) with a brush, then immediately roll the field while the cut-in paint is still wet, overlapping by 2–3 inches to blend textures. For best results, repaint to the nearest natural break (corner, trim line).
Q: How can I match paint color for a repair if I don’t have the original paint?
A: Take a clean, dry sample of the existing painted surface (cut a small chip from an inconspicuous area like inside a closet or behind furniture) to a paint store with color-matching technology. Many stores use spectrophotometers to analyze the chip and formulate a matching color. For best results, bring the chip in daylight hours when lighting is optimal. Note that aged paint may have faded; the match will replicate the current color, not the original. For large repairs or critical areas, repainting the entire wall section often yields the most uniform result.
Q: What is the best way to repair paint on textured walls without making the patch obvious?
A: Matching texture is key. First, identify the texture type (orange peel, knockdown, popcorn). For minor repairs: 1) Repair substrate and prime. 2) Apply joint compound with a texture sprayer or specialty roller matching the existing pattern. Practice on cardboard first. 3) Once dry, prime the textured patch. 4) Paint using the “feathering” technique: cut in widely and roll beyond the patch into surrounding area while paint is wet. For significant texture mismatches or large areas, consulting a professional experienced in texture matching is often the most efficient solution.
Q: Are there eco-friendly options for paint repair products?
A: Yes. Many manufacturers now offer low-VOC or zero-VOC primers and paints that reduce indoor air pollution and environmental impact without sacrificing performance. Look for Green Seal, Greenguard, or MPI certifications. For cleaning, consider biodegradable TSP substitutes or vinegar-based solutions for light cleaning. For stripping, soy-based or citrus-based removers offer less toxic alternatives to methylene chloride products (always verify compatibility with your substrate and follow safety instructions). Water-based wood fillers and patching compounds are generally lower in VOCs than solvent-based options.
Q: How do seasonal changes affect paint repair timing and success?
A: Season significantly impacts drying times, adhesion, and durability. Ideal exterior painting conditions occur during mild, dry seasons (typically spring and fall in temperate climates) when temperatures are moderate (50–90°F / 10–32°C), humidity is low, and surfaces remain dry. Avoid painting during: high humidity (slows drying, invites mildew), extreme heat (causes blistering, poor flow), freezing temperatures (prevents proper film formation), or rainy seasons (traps moisture). For interior repairs, winter can be challenging due to low humidity causing rapid drying and poor flow; using a humidifier can help. Always check the specific product’s technical data sheet for temperature and humidity requirements.
Q: Can I use a paint additive to improve the durability of my repair?
A: Yes, but selectively. Paint conditioners (like Floetrol for latex or Penetrol for oil) can improve flow, leveling, and reduce brush marks in challenging conditions (hot weather, porous surfaces). Mildewcide additives can boost resistance in damp areas. However, additives should be used sparingly and only when necessary—overuse can compromise paint film integrity, drying time, or adhesion. Always follow the additive manufacturer’s dilution ratios precisely and test on a small area first. For most standard repairs, high-quality paint applied correctly provides optimal durability without additives.
Explore Our Complete System:
Mastering Surface Preparation: The Unseen Key to Flawless Paint Jobs | Advanced Moisture Management for Homeowners | Choosing the Right Paint: A Decision Framework for Every Surface | The Homeowner’s Guide to Tool Selection and Maintenance | Preventing Common Household Repairs Through Proactive Maintenance | Understanding Paint Chemistry: A Practical Primer | Seasonal Home Maintenance Checklist for Exterior Surfaces | Creating a Healthy Home: Ventilation Strategies for Every Room