Stop Guessing, Start Perfecting: Eliminate the Hidden Mistakes That Compromise Your Projects’ Precision and Longevity
From the subtle tilt of a floating shelf that sends books sliding to alignment issues in structural elements like deck attachments, the consequences of leveling errors span frustration to functional compromise. Yet the tool designed to prevent these issues—the level—is frequently misused, misunderstood, or trusted without verification. This guide dismantles myths surrounding bubble levels, laser levels, and digital levels, exposing pervasive errors while providing actionable protocols to achieve reliable alignment in any scenario. Transform your level from a simple tool into a trusted extension of your precision through systematic practice and awareness.
Introduction: Why “Close Enough” Is Never Enough in Leveling
In construction and home improvement, “measure twice, cut once” is foundational wisdom. But what if the tool enabling that measurement is compromised? Industry analyses consistently identify leveling inaccuracies as a significant contributor to rework, material waste, and alignment concerns. Documentation from renovation case studies indicates that a notable portion of visible alignment issues—crooked moldings, uneven surfaces, or unstable installations—trace back to improper level use or undetected tool error. This extends beyond aesthetics; in applications involving structural elements, even minor deviations can affect performance and longevity.
Understanding the physics behind leveling tools builds informed trust. At its core, a level detects orientation relative to gravity. Bubble levels use a liquid-filled vial where an air bubble centers when the surface aligns perpendicularly to gravity. Laser levels project calibrated beams for horizontal, vertical, or plumb references. Digital levels translate tilt into numerical values. Each type interacts uniquely with technique, environment, and tool condition. This guide synthesizes principles from measurement science, ergonomics, and field-tested practice to create a unified methodology for dependable results. Whether hanging art or framing a room, these protocols foster confidence that every reference line you establish is intentionally true. Projects incorporating systematic verification practices consistently demonstrate improved alignment outcomes and reduced rework.
The Three Pillars of Perfect Leveling: A Framework for Flawless Results
Precision isn’t accidental—it emerges from consciously addressing three interdependent factors. We call this the Three Pillars Framework: Tool Integrity, User Technique, and Environmental Awareness. Neglecting any single pillar introduces vulnerability. This framework, informed by professional measurement protocols and practical craftsmanship, provides a repeatable mental checklist applicable to every leveling task, regardless of tool type or project scale. Consistent application builds reliability across projects.
Pillar 1: Tool Integrity—Verifying Your Level’s Accuracy Before Every Use
A level is only as reliable as its most recent verification. Assuming accuracy without checking is the most frequent—and preventable—error across all experience levels. Tool integrity encompasses physical condition, calibration status, and appropriate selection for the task.
Why This Pillar Is Non-Negotiable:
Imagine using a level with a hairline crack in its vial. The bubble may appear centered on a truly level surface, but internal damage alters liquid behavior, yielding false readings. In laser levels, a misaligned diode or weak battery can shift the beam plane. These flaws aren’t always visible; they manifest as inconsistent results that erode confidence. Regular verification transforms your level from a passive object into a trusted reference. Measurement standards emphasize that uncertainty must be acknowledged and managed—starting with the tool itself.
How to Execute Tool Integrity Checks:
For Bubble Levels (I-Beam, Box Beam, Torpedo):
1. The Two-Position Calibration Test: Place the level on a known-flat surface (like a quality table saw top or granite countertop). Note the bubble’s position. Rotate the level 180 degrees along its long axis without moving the surface. The bubble should settle in the exact same position relative to the vial lines. If it shifts, the level requires adjustment or retirement. Many quality levels feature calibration screws—consult the manufacturer’s instructions.
2. Vial Inspection: Hold the level up to light. Check for cracks, cloudiness, or unintended air bubbles within the liquid. These indicate seal failure or contamination affecting viscosity and movement.
3. Edge Straightness: Sight down the edge against a known straight reference (like a factory-cut plywood edge). Any visible gaps suggest warping. Run a fingernail gently along the edge; catches reveal imperfections invisible to the eye.
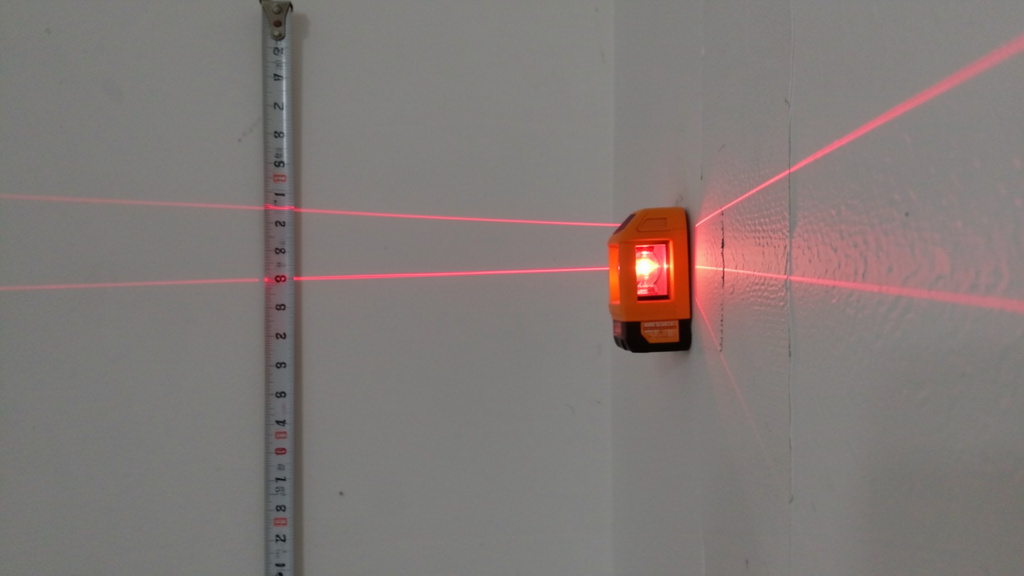
For Laser Levels (Rotary, Line, Dot):
1. The Wall Projection Test: In a room at least 15 feet long, mount the laser securely on a stable tripod. Project a horizontal line onto a wall. Mark the beam’s center point with a fine pencil dot. Rotate the laser 180 degrees and project again onto the same wall section. The new beam should overlap the original mark precisely. For vertical lines, repeat on an adjacent wall. Discrepancies beyond the tool’s stated accuracy range indicate internal misalignment.
2. Battery Check: Weak batteries cause dim beams and erratic behavior in self-leveling lasers. Begin with fresh or fully charged batteries. Heed low-battery indicators if present.
3. Pendulum Lock Verification (for self-leveling models): Engage the pendulum lock, tilt the laser moderately within safe limits, then release the lock. The beam should settle smoothly into position within the specified time. Excessive oscillation, failure to settle, or error signals warrant consultation of the manual before proceeding.
For Digital Levels:
1. Zero Calibration: Place on a verified flat surface. Activate the zero/calibrate function per manufacturer instructions. The display should read 0.0°. Repeat two to three times; consistent readings confirm stability.
2. Consistency Check: Tilt the level to a known angle (using a precision angle block if available) and verify the digital readout aligns. Check both positive and negative angles.
3. Sensor Cleanliness: Gently wipe the sensor area with a microfiber cloth; dust or debris can interfere with readings. Inspect for scratches on optical surfaces.
Common Tool Integrity Mistakes to Avoid:
– Skipping pre-use checks: “It was accurate yesterday” is unreliable. Temperature shifts, minor impacts, or storage conditions can alter calibration. Verification takes less time than correcting an error later.
– Using damaged tools “just this once”: A compromised vial, chipped housing, or warped frame irreversibly affects accuracy. The cost of replacing a tool is minor compared to material waste or project delays.
– Ignoring manufacturer guidance: High-precision lasers may recommend periodic professional recalibration. Review your tool’s documentation.
– Improper storage: Leaning long levels against walls invites warping. Store horizontally on flat supports or vertically on dedicated hooks. Use protective cases during transport.
The Fundamental Principle: A level measures the relationship between gravity and your tool. If the tool is compromised, the reading may be inaccurate—verification is the bridge to trust.
Pillar 2: User Technique—Mastering the Human Element of Precision
Even a perfectly verified level yields unreliable results if handled incorrectly. Technique errors stem from misreading indicators, improper placement, inconsistent pressure, or environmental distractions. Human factors significantly influence measurement reliability—developing deliberate habits transforms technique from effort into instinct.
Why Technique Matters:
Consider two users with identical levels. One places the tool gently, waits for stabilization, and reads at eye level. The other slams it down, reads from an angle, and rushes the check. The first achieves consistency; the second introduces error. Technique bridges tool capability and real-world application. It accounts for perspective, patience, pressure, and cognitive bias (“I think it’s level”). Deliberate practice builds muscle memory for precision.
Bubble Level Technique Deep Dive:
Correct Bubble Reading Protocol:
1. Placement: Align the level parallel to the direction being checked (e.g., for horizontal level, align the long axis with the shelf’s front edge). Ensure full contact along the entire base—no gaps. Apply light, even fingertip pressure at both ends.
2. Stabilization: Wait 3–5 seconds for the bubble to settle completely, especially in cooler environments where liquid viscosity increases. Observe until all motion ceases.
3. Eye-Level Reading: Adjust your position so your eyes are perpendicular to the vial. Viewing from above or below creates parallax error—the bubble appears centered when it is not. Many vials include magnified strips, mirrored backing, or shaded zones to aid alignment; utilize them. Closing one eye can reduce depth confusion.
4. Interpretation: The bubble is “level” only when symmetrically centered between the etched lines. Precision requires this exact alignment—not approximation. Note that finer-graduation vials (common on machinist levels) indicate smaller angular deviations.
Advanced Bubble Techniques:
– The Reverse Check: After noting the bubble position, flip the level end-to-end on the same surface. If the bubble shifts relative to the lines, the surface isn’t level—the discrepancy reveals the true error. This technique also helps cancel minor tool inconsistencies.
– Torpedo Level for Tight Spaces: When checking short surfaces (like a cabinet side), use the torpedo level’s multiple vials. Verify horizontal and vertical references where possible. Rotate gently 90 degrees to check plumb without repositioning.
– Overhead Leveling: For ceiling-mounted fixtures, use a level with strong magnets or a dedicated ceiling level. Press firmly for contact. A small mirror taped beside the vial allows safe, accurate reading without neck strain.
– Long-Span Leveling: For surfaces longer than your level (e.g., a 10-foot countertop with a 48″ level), use the “leapfrog” method: Mark the level point at one end, move the level so its end aligns with the mark, and repeat. Verify the final mark against the starting point.
Laser Level Technique Deep Dive:
Establishing a Reliable Reference Plane:
1. Tripod Stability: Extend legs fully on soft ground; use sandbags, weight bags, or tripod shoes on hard surfaces to prevent vibration. Confirm all leg locks are tight—gently wiggle each leg.
2. Initial Rough Leveling: Use the laser’s built-in bubble vial (if present) to get “in the ballpark” before engaging self-leveling. This reduces strain on internal mechanisms.
3. Self-Leveling Activation: For pendulum-based lasers, release the lock gently. Allow full settling time (watch for beam stabilization; many emit a tone when locked). Avoid bumping the tripod during operation. Confirm the self-leveling indicator is active.
4. Beam Detection: In bright conditions, use a laser detector for rotary lasers. For line lasers, increase ambient darkness or use a target card with high-contrast stripes (black/white) to enhance visibility. Position the card perpendicular to the beam.
5. Projection Surface Matters: Avoid textured, dark, or reflective surfaces. A matte white board, dedicated laser target, or sheet of white paper provides the clearest reference. Temporarily attach a smooth board to rough surfaces at measurement points.
Critical Laser-Specific Considerations:
– Self-Leveling Range Limits: Self-leveling mechanisms operate within a limited tilt range (typically ±3° to ±5°). If tilted beyond this, the tool may not level correctly and might not clearly indicate failure. Always verify the out-of-level indicator (flashing beam or alert). Perform a secondary bubble check on the laser body.
– Beam Visibility at Distance: Laser beams spread over distance. At longer ranges, marking the precise center requires care. For critical work, mark two close points along the beam and bisect to find the true centerline. Green lasers generally offer better visibility than red in varied lighting.
– Detector Precision: When using a detector, move it slowly through the beam plane. The strongest signal (audible peak or visual max) marks the true center. Rushing leads to offset marks.
Digital Level Nuances:
– Zeroing for Relative Measurements: For matching two surfaces (e.g., machinery setup), zero the level on the first surface, then check the second. This cancels minor tool inconsistencies.
– Angle Memory Functions: When transferring angles (like roof pitches), use the hold function to lock the reading before moving. Verify against a known reference before proceeding.
– Temperature Awareness: Allow the tool to acclimate to the work environment for 10–15 minutes before critical measurements. Note ambient conditions if traceability is important.
– Tilt Direction Clarity: Digital displays show positive/negative values. Understand your tool’s convention (e.g., “+” = high on the right) to avoid compounding errors.
Common Technique Mistakes to Avoid:
– The “Tap Test” Fallacy: Tapping a bubble level to “help” the bubble settle introduces vibration, risks surface damage, and may harm the vial seal. Allow physics to work—patience ensures precision.
– Reading Lasers Obliquely: Viewing a laser line from an angle creates perspective distortion, making it appear curved or shifted. Always sight perpendicular to the beam plane. Use a string line as a secondary check for long runs.
– Rushing the Process: Precision requires deliberate pacing. Allocate time for stabilization and verification in your workflow. A mental cue like “Place, pause, observe” builds consistency.
– Inconsistent Pressure: Pressing too hard on one end of a bubble level flexes the tool or workpiece. Use the lightest touch needed for stable contact.
– Poor Body Positioning: Kneeling on unstable surfaces introduces sway. Brace against a stable object or use a kneeling pad on solid ground.
Pillar 3: Environmental Awareness—Accounting for the Unseen Forces
Gravity is constant, but its interaction with your leveling task is influenced by external factors often overlooked. Temperature, surface conditions, lighting, vibration, and magnetic fields can introduce subtle deviations that accumulate into visible issues. Environmental awareness transforms reactive corrections into proactive precision.
Why Environment Matters:
A laser level calibrated indoors may behave differently in a hot attic due to thermal expansion of components. A bubble level’s liquid thickens in cold garages, slowing bubble movement and tempting premature reading. These interactions aren’t tool flaws—they’re physical realities requiring mindful management. Seasoned practitioners develop environmental intuition; this section codifies that awareness.
Temperature Effects Decoded:
– Bubble Levels: Most vials contain ethanol or oil. Viscosity increases in cold conditions, slowing bubble movement. In freezing environments, liquid contraction may alter bubble size. Solution: Warm the level gently in your hands for 30–60 seconds before use in cold settings. Store levels at stable room temperature when possible. Avoid leaving tools in vehicles overnight during temperature extremes.
– Laser Levels: Extreme heat can warp housings; cold reduces battery efficiency and may cause display lag. Solution: Allow the tool to acclimate to the work environment for 15–20 minutes before critical use. Keep spare batteries warm in an inner pocket during cold-weather work.
– Digital Levels: Battery performance and sensor response can vary with temperature. Allow extended acclimation time. For critical outdoor work in extremes, select tools rated for industrial environments (check IP and operating temperature specifications).
Surface and Substrate Challenges:
– Textured or Uneven Surfaces: Placing a level directly on rough concrete, shiplap, or stucco prevents full contact. The level rocks on high points, creating false readings. Solution: Use small, flat leveling pads (metal or plastic shims) under the level’s edges to bridge gaps. For lasers, project onto a straightedge clamped securely to the surface.
– Flexible Materials: Checking level on an unsupported shelf, plywood sheet, or thin countertop can flex the material under the level’s weight. Solution: Support the workpiece at multiple points during measurement (e.g., sawhorses every 24 inches). For critical long spans, use a laser to project a reference line, then check the workpiece against the line at multiple points without placing weight on it.
– Magnetic Interference: Magnetic levels can be attracted to hidden steel studs, pipes, rebar, or nails, pulling the tool off true. Solution: Verify with a non-magnetic level (aluminum or plastic body) if magnetic pull is suspected. Scan the area with a metal-detecting stud finder before leveling. For lasers, ensure the tripod isn’t near large metal objects that could affect pendulum mechanisms.
– Curved or Rounded Surfaces: Standard levels cannot assess curvature directly. Solution: Use a flexible curve level (specialized) or a straightedge with feeler gauges to measure deviation at multiple points. For pipes, use a dedicated pipe level or digital angle finder.
Lighting and Visibility Factors:
– Glare on Bubble Vials: Sunlight reflecting off a vial impedes reading. Solution: Cup your hand over the vial to create shade, use a level with non-reflective vial coating, or attach a small cardboard shade. Schedule outdoor tasks for overcast conditions when possible.
– Laser Beam Washout: Bright daylight overwhelms red laser beams, especially beyond 20 feet. Solution: Use green lasers (more visible to the human eye) for outdoor work, employ a laser detector, or use a target card with fluorescent markings. Schedule critical outdoor laser work for dawn/dusk when ambient light is lower.
– Low-Light Precision: In dim basements or attics, bubble vials are hard to see. Solution: Use levels with backlit vials (some digital models), illuminate the area with a headlamp positioned to avoid casting shadows on the vial, or apply temporary glow-in-the-dark tape to vial lines.
– Color Contrast: A red laser on red brick is nearly invisible. Solution: Temporarily apply masking tape or a white target card to the surface at measurement points.
Vibration and Stability Threats:
– Foot Traffic: Walking near a tripod-mounted laser causes beam oscillation. Solution: Establish a “no-walk” zone (minimum 6-foot radius) around the setup. Use vibration-dampening pads (rubber or sorbothane) under tripod feet on hard surfaces.
– Wind: Outdoor laser work on windy days shifts tripods and causes beam shimmer. Solution: Lower tripod height, add weight (sandbags), use a windbreak, or delay work until conditions improve. For bubble levels, shield the tool with your body.
– Machinery Operation: Running power tools nearby transmits vibrations. Solution: Pause leveling checks during active tool operation. Schedule precision layout work during quiet periods.
– Vehicle Traffic: On street-level projects, passing vehicles cause ground vibration. Solution: Monitor beam stability; if oscillation exceeds tolerance, wait for traffic lulls or use alternative methods (string lines with weights).
Common Environmental Mistakes to Avoid:
– Skipping Thermal Acclimation: Using a tool immediately after moving it from a heated vehicle to a cold jobsite. Always allow tools to reach ambient temperature.
– Assuming All Surfaces Are Suitable: Trying to level directly on insulation, uncured drywall mud, loose gravel, or carpet. Prepare the surface first or use intermediary references.
– Overlooking Magnetic Fields: Using a magnetic level near large steel beams or electrical panels without verification. When in doubt, cross-check with a non-magnetic method.
– Working in Poor Ergonomic Conditions: Straining to see a vial while balanced unsafely. Improve conditions first—add lighting, use mirrors, or reposition yourself securely.
Beyond the Bubble: Specialized Level Types and Their Unique Error Profiles
Selecting the appropriate level for the task prevents frustration and error. This section examines common level varieties, their ideal applications, and specific pitfalls when misapplied. Understanding capabilities and limitations is foundational to the Tool Integrity pillar.
The Spirit Level Family: I-Beam, Box Beam, and Torpedo
I-Beam Levels (Aluminum Frame):
Strengths: Lightweight, affordable, good shock absorption. Ideal for rough framing, concrete work, and general construction where extreme precision is secondary to durability.
Critical Consideration: Frame Flex. Long I-beam levels (48″+) can bend if stored improperly or subjected to stress. A bent frame means vials are no longer parallel to the base, causing consistent directional errors.
Prevention: Store horizontally on flat supports, not leaning against walls. Check straightness monthly against a known straight edge. For critical long-span work (like foundation forms), consider a box beam level. Support the center of long levels during measurement to prevent sag.
Practical Tip: For occasional use, a 24″ I-beam offers versatility. Avoid ultra-low-cost models with plastic vial housings—they are prone to cracking.
Box Beam Levels (Rectangular Cross-Section):
Strengths: Rigid aluminum or composite construction resists twisting and bending; often include multiple vials (horizontal, vertical, 45°); ideal for finish carpentry, cabinet installation, window/door setting, and precision work.
Critical Consideration: Edge Damage. Dropping a box beam level can dent precision-ground edges, creating high spots that prevent full surface contact. Even minor dents introduce measurable error over distance.
Prevention: Use levels with protective rubber or polymer end caps. Set the level down gently—avoid sliding it into position, which can catch on debris. Inspect edges regularly with a fingernail test.
Insight: High-end box beams may feature milled edges for grip on wood and smooth edges for metal—select based on primary use. Some include replaceable vial cartridges for long-term value.
Torpedo Levels (Pocket-Sized):
Strengths: Fits in tight spaces (window casings, plumbing pipes, electrical boxes), often magnetic, highly portable.
Critical Consideration: Vial Readability. Small vials (under 1″) are challenging to read accurately, increasing the risk of approximation errors. Parallax error is magnified due to the short sight line.
Prevention: Choose models with magnified vials, mirrored strips, or glow-in-the-dark indicators. For critical tasks, verify with a larger level when space allows. Avoid using torpedo levels for spans beyond their design intent (typically under 12 inches)—error compounds with distance.
Specialized Use: Ideal for checking plumb on short posts, level on pipe runs, or angles on HVAC ducts. Keep one in your tool pouch for quick verification.
Laser Level Categories: Line, Dot, Rotary, and Self-Leveling
Line Lasers (Cross-Line or Single Plane):
Strengths: Projects straight horizontal/vertical lines for tile layout, wainscoting, drop ceilings, cabinet installation, and picture hanging. Cross-line models show 90° intersections.
Critical Consideration: Squareness Verification. While cross-line lasers aim for 90° accuracy between lines, budget models may have slight deviations. Over distance, even small angular errors become visible.
Prevention: Verify the 90° angle using the 3-4-5 triangle method: Mark 3 feet on one line, 4 feet on the other; the diagonal should measure exactly 5 feet. Adjust or calibrate per manufacturer instructions. For critical room layout, use a framing square as a secondary check at the laser origin.
Visibility Tip: In bright rooms, a temporary, low-tack laser line enhancer spray on target surfaces can improve beam visibility. Remove after marking.
Dot Lasers (Point Projection):
Strengths: Simple, affordable, effective for transferring points vertically (e.g., from floor to ceiling for light fixtures) or horizontally over short distances.
Critical Consideration: Stability During Transfer. Hand-holding introduces shake. Even mounted, thermal shifts or minor bumps can move the dot over time, especially over long vertical runs.
Prevention: Mount securely on a stable tripod or clamp. For vertical transfers over 8 feet, use a plumb bob as a secondary check at the midpoint. Mark the dot promptly after stabilization. Avoid breathing directly on the tool during critical transfers.
Alternative: For single-point transfers where electronics aren’t essential, a plumb bob offers reliable, battery-free accuracy.
Rotary Lasers (360° Plane):
Strengths: Essential for grading, foundation work, slab pours, deck layouts, and large-room alignments. Projects a rotating beam creating a level plane around the space.
Critical Consideration: Mode Awareness. Many rotary lasers include slope modes for drainage (e.g., driveways, patios). Forgetting to reset to “level” mode after slope work causes widespread errors.
Prevention: Develop a pre-use ritual: Check the mode display, verify with a bubble level on the laser body, and confirm against a known benchmark (e.g., a previously verified grade stake). Use models with clear visual indicators for slope vs. level mode. Label the mode switch with bright tape as a reminder.
Safety Note: Use the laser’s safety key or lockout feature when not in active use to prevent accidental mode changes.
Self-Leveling vs. Manual Lasers:
Self-Leveling: Convenient for controlled indoor environments but sensitive to vibration and out-of-range tilts. Always confirm the self-leveling indicator is active (steady beam/light).
Manual (Non-Self-Leveling): Require careful bubble vial adjustment but offer robustness in high-vibration settings (workshops with heavy machinery) or extreme slopes. Ideal for rough grading or unstable conditions.
Hybrid Approach: Some lasers offer both modes. Use manual mode for initial rough setup in challenging conditions, then switch to self-leveling once stable.
Digital and Smart Levels: The New Frontier
Digital Inclinometers:
Strengths: Numeric readouts eliminate bubble interpretation subjectivity; measure exact angles (e.g., roof pitch, machinery setup); often include data hold, relative zero, and connectivity features.
Critical Consideration: Calibration Stability. Digital sensors can drift from impacts, temperature extremes, or battery changes. Readings may shift subtly over time.
Prevention: Perform zero calibration before each use on a verified flat surface. Store in protective cases with shock absorption. For critical work, cross-verify angles with a traditional protractor or framing square.
Application: Highly valuable for solar panel installation (matching roof pitch), HVAC duct alignment, or machinery setup where specific angles matter.
Smart Levels (Bluetooth/App-Connected):
Strengths: Record angles, share data, guide complex layouts via augmented reality overlays, store project histories.
Critical Consideration: Screen Parallax and Dependency. Relying solely on phone screen feedback without verifying the physical tool’s position introduces error. Viewing the phone screen from an angle creates parallax in the displayed angle.
Prevention: Treat the app as a supplementary reference. Always cross-check critical measurements with the tool’s primary display or a traditional level. Hold the phone perpendicular to the tool when reading the screen. Ensure stable connectivity before starting work.
Data Practice: Use recording features to document critical angles for permits, client approvals, or future reference—this adds professional transparency.
The Twelve Most Common Leveling Errors—And Exactly How to Fix Them
Drawing from project reviews, community discussions, and field observations, these twelve recurring errors transcend experience levels. Each entry details the symptom, root cause, consequence, and step-by-step correction. Systematic vigilance prevents these pitfalls.
Error 1: The Phantom Level (Bubble Appears Centered on Uneven Surfaces)
Symptom: The bubble sits between the lines, but the installed shelf sags or a cabinet door doesn’t close properly.
Root Cause: The level’s base isn’t making full contact with the surface. Common on curved, textured, or debris-covered surfaces. The level rocks on high points, creating a false “level” reading—frequent on drywall (with hidden studs), rough concrete, or weathered wood.
Consequence: Installed items appear correct during installation but reveal misalignment under load or when adjacent elements are added. In structural contexts, this can cause uneven stress distribution.
Correction Protocol:
1. Clean the surface thoroughly—remove dust, paint drips, adhesive residue, or mortar crumbs. Use a brush or compressed air.
2. Place the level and gently rock it side-to-side with light fingertip pressure. If it rocks, identify high points by listening for clicking or feeling movement.
3. Use feeler gauges, business cards, or plastic shims to fill gaps under the level’s low spots until it sits flat without rocking. Re-check the bubble.
4. For critical installations (like countertops), use a straightedge longer than the workpiece to check for flatness before leveling. Mark high spots for sanding or filling.
Pro Tip: For drywall installations, locate studs first. Place the level across two studs to avoid rocking on the hollow cavity between them. When leveling on concrete, sweep the area and use a small trowel to fill minor voids before setting forms.
Error 2: Parallax Misreading (Viewing the Bubble from an Angle)
Symptom: Two people checking the same surface get different readings. Or, a shelf looks level when installed but appears crooked from across the room.
Root Cause: The viewer’s eye is not perpendicular to the vial. From an angle, the bubble appears centered when offset. This optical illusion worsens with smaller vials and distance.
Consequence: Cumulative errors in multi-step projects (e.g., framing a wall where each stud is slightly off) lead to visibly crooked results. In tile work, parallax errors cause grout lines to “walk.”
Correction Protocol:
1. Position your head directly above the vial. Crouch or kneel to achieve eye-level alignment.
2. Close one eye to eliminate binocular vision confusion. Focus solely on the bubble’s position relative to the lines.
3. Use levels with “parallax-free” vials (featuring a mirrored strip below the bubble; center the bubble over its reflection). This is highly effective for precision reading.
Budget Alternative: Tape a small mirror strip along the vial base. Align the bubble with its reflection—this forces perpendicular viewing.
Verification Step: After marking, place a long straightedge along the line and re-check level at multiple points.
Error 3: Laser Beam Misinterpretation (Confusing the Beam Center)
Symptom: Marks made along a laser line result in visibly crooked installation—tiles drift, cabinets misalign, or a shelf bracket is off.
Root Cause: The laser beam has physical width, which increases with distance. Users often mark the edge of the beam instead of the precise center. Ambient light washes out edges, making center identification subjective.
Consequence: Systematic offset in layout lines. Over distance, consistent minor errors create noticeable cumulative deviation.
Correction Protocol:
1. Use a target card with a fine crosshair. Adjust until the beam is centered on the crosshair. Mark the crosshair point.
2. For line lasers, mark two points close together (6–12 inches apart) on the beam, then use a sharp pencil and straightedge to draw the precise centerline between them. Verify the line is equidistant from both beam edges.
3. In bright conditions, use a laser line enhancer spray (temporary, low-tack) or dim room lights temporarily.
Advanced Technique: For rotary lasers with detectors, slowly sweep the detector horizontally and vertically through the beam plane; the peak signal strength indicates true center. Mark this point.
Verification Step: After marking your reference line, place a long bubble level along the line at multiple points. Consistent level readings confirm accuracy.
Error 4: Ignoring Level Calibration Drift
Symptom: Consistent but unexplained errors across projects—everything seems “a little off,” eroding trust in measurements.
Root Cause: Levels lose calibration from drops (even minor ones), temperature shifts, humidity changes, or normal wear. Users assume “it’s always been accurate” without verification.
Consequence: Erosion of confidence, project delays, rework, and in professional settings, damaged reputation.
Correction Protocol:
1. Perform the Two-Position Test weekly for frequently used levels; monthly for occasional use. Document results simply (e.g., “verified,” “adjusted,” “retired”).
2. For adjustable levels, follow the manufacturer’s calibration procedure precisely—usually involves turning set screws while monitoring the bubble against a known reference. Make micro-adjustments.
3. Maintain a basic calibration log: Date, tool, test result, action taken. This supports quality awareness.
When to Retire a Tool: If a bubble level’s vial is cracked, cloudy, or unadjustable after careful attempts; if a laser’s self-leveling mechanism fails repeatedly after battery replacement and reset; if a digital level’s readings fluctuate erratically after recalibration. Safety and accuracy outweigh sentiment.
Insight: Keep a dedicated “reference level”—a high-precision machinist level stored solely for verifying other tools. Verify it periodically against a known standard.
Error 5: Magnetic Interference with Magnetic Levels
Symptom: A magnetic level sticks firmly to a steel stud but gives inconsistent readings when moved slightly. Or, readings vary along a metal beam.
Root Cause: Hidden ferrous materials (nails, screws, pipes, rebar, structural steel) attract the level’s magnets with varying force, pulling the base away from true level. Magnetic fields are not uniform.
Consequence: Framing attached to “level” studs may be skewed, causing drywall seams to gap, siding to warp, or cabinets to bind.
Correction Protocol:
1. Verify with a non-magnetic level (aluminum or plastic body) on the same surface. If readings differ, magnetic interference is confirmed.
2. If magnetic pull is suspected, place a non-magnetic shim (plastic, wood, or thick cardboard) between the level and surface to break magnetic contact, then re-check. The shim must be flat and rigid.
3. For critical work, use a laser level to establish a reference line independent of magnetic fields. Project the line onto a non-magnetic straightedge clamped to the surface.
Prevention: Scan the area with a metal-detecting stud finder before leveling. Note locations of pipes, ducts, or rebar. When working near known steel, assume interference and use non-magnetic verification.
Clarification: Stronger magnets do not equal a better level for all tasks. Strong magnets increase interference risk. Choose magnetic levels with moderate strength or on/off switches for versatility.
Error 6: Thermal Expansion Errors in Long-Span Leveling
Symptom: A deck ledger board checks level during installation but shows deviation when inspected later. Or, a long countertop is level when installed but develops a visible dip after temperature changes.
Root Cause: Wood, metal, and composite materials expand and contract with temperature and moisture changes. Leveling the board at one temperature versus another yields different results due to material movement.
Consequence: Elements level during installation become misaligned as temperatures change, stressing connections, causing fasteners to loosen, or creating gaps in finishes.
Correction Protocol:
1. Level critical structural elements during stable ambient temperatures (e.g., mid-morning). Avoid rapid temperature swing periods (sunrise/sunset).
2. For very long spans (over 10 feet), level at multiple points (ends and center) and adjust until the bubble is centered at the midpoint. This accommodates natural curvature.
3. Use materials with lower thermal expansion coefficients (like engineered lumber, aluminum, or stone) for critical applications. Allow for expansion gaps per manufacturer specifications.
Insight: In precision fields, measurements are often taken at dawn to minimize thermal effects. For DIY, check weather forecasts and plan precision work for stable-temperature days.
Verification Step: Re-check critical level points 24 hours after installation, after materials have acclimated. Document any shifts for future reference.
Error 7: Tripod Instability for Laser Levels
Symptom: The laser beam drifts during use, requiring repeated re-marking. Marks made early don’t align with marks made later.
Root Cause: Tripod legs sinking into soft soil, loose leg locks, vibration from foot traffic or machinery, or wind causing sway. Lightweight tripods lack mass for stability.
Consequence: Wasted time, inaccurate layouts, frustration, and compromised project quality. In grading work, tripod drift can lead to improper drainage slopes.
Correction Protocol:
1. Extend tripod legs fully on soft ground to reach stable soil; use tripod shoes (wide metal plates) or boards under feet on mud, sand, or gravel. On hard surfaces, use rubber feet or vibration pads.
2. Tighten all leg locks and the head mount before mounting the laser. Wiggle each leg to confirm security. Re-check locks after initial setup.
3. Hang a weight (sandbag, bucket of tools, or dedicated weight hook) from the tripod’s center hook to dampen vibration and lower the center of gravity.
4. Establish a “laser zone” free of foot traffic, machinery operation, or door slamming during critical layout. Communicate this to others on-site.
Budget Alternative: Mount the laser on a heavy, stable surface (like a filled cooler, concrete block, or sturdy sawhorse) if a tripod isn’t available—but verify stability first by tapping the surface and watching for beam movement. Never mount on unstable furniture.
Upgrade Consideration: Invest in a quality tripod with geared center column for micro-adjustments and twist locks (more secure than lever locks). Carbon fiber reduces weight without sacrificing rigidity.
Error 8: Overlooking the Level’s Own Weight
Symptom: A long level bends when placed on a flexible surface (like a thin shelf, plywood subfloor, or hollow-core door), giving a false reading. The surface appears level during measurement but sags when the level is removed.
Root Cause: The level’s weight deflects the workpiece, especially near the center of a long span. This is distinct from frame flex; here, the workpiece flexes under the tool’s weight.
Consequence: The shelf is installed “level” but sags in the middle when loaded. Subfloors checked level during installation develop dips after underlayment is added.
Correction Protocol:
1. Support the workpiece at multiple points during leveling (e.g., place sawhorses under a long shelf at 24-inch intervals, or use temporary braces under subfloor edges).
2. Use the shortest level practical for the task—less weight, less deflection. For a 24″ shelf, a 12″ torpedo level is sufficient and lighter.
3. For critical long spans, use a laser level to project a reference line, then check the workpiece against the line at multiple points without placing weight on it. Use a straightedge held lightly against the surface.
Advanced Method: For engineered applications, consult material span tables to understand expected deflection. Pre-camber the workpiece slightly upward to compensate for expected sag under load. For shelves, install a center support bracket.
Verification Step: After installing the item, place the level on it without additional support. If it reads level now, your initial measurement accounted for deflection correctly.
Error 9: Rushing Bubble Stabilization
Symptom: The bubble seems centered, but shifts seconds later after the user has already marked the surface or driven a fastener. Repeated checks yield inconsistent results.
Root Cause: Viscous damping in the vial liquid requires time to settle, especially in cold temperatures, with thick damping fluid, or after movement. Human impatience overrides physics.
Consequence: Marks made before stabilization lead to incremental errors. In multi-step projects, these compound into visible misalignment. Users may blame the tool when technique is the issue.
Correction Protocol:
1. Place the level gently—no slamming or sliding. Set it down with controlled motion.
2. Wait a minimum of 5 seconds (10 seconds in temperatures below 50°F or with high-viscosity fluid). Watch the bubble until all motion ceases—do not look away.
3. For critical work, count “one-Mississippi, two-Mississippi…” to ensure consistent timing. Develop a ritual: “Place, pause, observe, confirm.”
Teaching Moment: Practice on a known-level surface to develop patience and recognize true stabilization. Note how long it actually takes versus how long you think it takes.
Tool Tip: Some levels feature “fast-settling” fluid (lower viscosity) for speed, but this sacrifices damping against vibration. Choose based on your environment—fast-settling for stable workshops, high-damping for job sites.
Error 10: Misusing the Level’s Edge
Symptom: A level with a milled (serrated) edge leaves scratches on finished surfaces (stained wood, painted drywall, granite). Or, a smooth-edge level slips on metal studs or pipes during use.
Root Cause: Using the wrong edge type for the material. Milled edges grip wood and prevent slippage on rough surfaces but damage finishes. Smooth edges are designed for metal, glass, or finished surfaces but can slide on oily or smooth materials.
Consequence: Surface damage requiring repair, inaccurate readings due to slippage, or safety hazards from sudden tool movement.
Correction Protocol:
1. Match the level edge to the task: Use smooth-edge levels for metal studs, pipes, glass, or finished wood; use milled-edge levels for rough framing, concrete forms, or outdoor lumber.
2. For delicate surfaces (glass shelves, polished stone countertops, lacquered cabinets), place low-tack painter’s tape on the contact points of the level. Remove tape immediately after use.
3. For slippery surfaces (galvanized steel, wet pipes), use levels with rubberized grips, non-slip pads, or textured coatings on the base. Lightly sanding the contact area (if permissible) increases grip.
Modification Tip: Apply adhesive-backed non-slip tape (like shelf liner) to the base of a smooth-edge level for versatile use. Cut precisely to avoid overhang. Replace when worn.
Safety Note: Never modify a level’s edge with files or grinders—this compromises structural integrity and calibration. Select the right tool for the job.
Error 11: Assuming Laser Levels Are Always Perfectly Level
Symptom: A self-leveling laser stabilizes and shows “ready,” but subsequent checks with a high-quality bubble level reveal discrepancies over distance.
Root Cause: Self-leveling mechanisms operate within tolerance ranges. Budget lasers may function near the edge of tolerance. Additionally, the laser body itself may not be level even if the beam is—critical when using the top surface as a reference. Pendulum mechanisms can wear over time.
Consequence: False confidence leading to compounded errors in multi-step layouts. In tile work, this causes grout lines to drift. In framing, it leads to out-of-plumb walls.
Correction Protocol:
1. After the laser self-levels, place a high-quality bubble level on the laser’s top surface or mounting plate. Verify it reads level. This checks the tool’s physical orientation.
2. Perform the Wall Projection Test monthly. For critical work, verify before each use.
3. For critical work, cross-verify laser lines with a long bubble level at multiple points along the projected line. Mark discrepancies and investigate cause.
Professional Practice: Skilled practitioners use multiple independent methods to verify critical references—a habit DIYers can adopt. Never rely on a single measurement source for high-stakes work.
Selection Tip: For precision work, choose lasers with published accuracy specifications and clear documentation. Avoid brands with vague claims like “high accuracy” without context.
Error 12: Neglecting Post-Installation Verification
Symptom: A project passes initial level checks during installation but develops visible misalignment weeks or months later—shelves sag, tiles crack, or doors stick.
Root Cause: Materials settle, fasteners loosen under vibration or thermal cycling, adhesives cure and shrink, or environmental changes cause movement. Leveling was verified only at installation, not after stabilization.
Consequence: Dissatisfaction, callbacks, warranty concerns, or safety issues (e.g., structural elements shifting). In professional work, this damages reputation.
Correction Protocol:
1. Re-check critical level points 24–48 hours after installation (after adhesives cure, materials acclimate, or fasteners settle). For structural elements, schedule a follow-up check after the first significant seasonal change.
2. Document initial and follow-up measurements with photos and notes. This provides evidence of due diligence and helps diagnose movement causes.
3. For permanent installations, incorporate adjustment points where possible (e.g., adjustable shelf pins, shimming space behind cabinets).
Professional Habit: Take timestamped photos of level readings during installation—show the bubble centered in the vial. This is valuable for quality assurance and transparency.
Prevention Strategy: Use stable materials (kiln-dried lumber, engineered wood), proper fastening techniques (pilot holes to prevent splitting), and allow for expansion/contraction per manufacturer guidelines. Environmental control during curing (e.g., humidity for adhesives) minimizes movement.
Leveling in Action: Scenario-Based Error Prevention Guides
Theory becomes practice when applied to real projects. These walkthroughs integrate the Three Pillars Framework into common tasks, highlighting decision points where errors typically occur. Each scenario includes tool selection rationale, step-by-step execution with embedded error checks, and field-refined tips.
Scenario 1: Hanging Floating Shelves Without Visible Brackets
Goal: Install three floating shelves on a plaster wall, perfectly level and evenly spaced, with no visible hardware.
Tools Needed: 24″ box beam level (smooth edges), laser level (optional but recommended), stud finder, pencil, measuring tape, small mirror.
Why These Tools: Box beam ensures rigidity; smooth edges prevent wall damage; laser speeds layout for multiple shelves. Avoid torpedo levels—they lack span accuracy for this task.
Pillar Integration:
– Tool Integrity: Verify the box beam level’s calibration using the Two-Position Test on a known-flat surface (e.g., countertop). Check the laser with the Wall Projection Test. Inspect level edges for nicks.
– User Technique:
1. Locate and mark studs. For shelves over 24″, anchors must hit studs for safety. Use a stud finder with deep-scan mode for plaster walls (which often have wood lath).
2. Determine shelf height. Use a measuring tape from a consistent reference (e.g., floor) to mark the bottom of the first shelf location lightly in pencil.
3. Critical Error Point: Parallax misreading. Place the level on the wall at the mark. Crouch to eye level with the vial. Use the mirror taped beside the vial if overhead. Draw a faint horizontal guideline along the level’s top edge with a sharp pencil.
4. For multiple shelves, use a laser level to project a single horizontal line at the first shelf height. Verify the line is level at left, center, and right with the bubble level. Mark shelf positions along this line. Use a story pole (a marked board) to transfer consistent spacing vertically.
5. Install brackets into studs. Place the shelf on brackets. Re-check level on the shelf surface before securing final screws. Have a helper support the shelf while you check.
– Environmental Awareness: Plaster walls may have hidden lath ridges or voids. If the level rocks, use a small plastic shim behind the level during marking. Avoid working in direct sunlight that creates glare on the vial—close blinds or work with task lighting. Humidity can affect plaster; avoid installation during rainy periods if the wall is exterior-facing.
Pro Tip: Pre-assemble shelves and brackets off-wall on sawhorses. Level the assembly, then transfer bracket positions to the wall using a level and square. This reduces on-wall measurement errors and ensures brackets are perfectly aligned relative to each other.
Verification Step: After installation, place a marble on the shelf. If it rolls, re-check level and shim brackets as needed. Document with a photo showing a level resting on the shelf.
Scenario 2: Installing Kitchen Cabinets Level and Plumb
Goal: Hang upper and lower cabinets so doors align perfectly, countertops sit flat, and the installation withstands long-term use.
Tools Needed: 48″ box beam level (milled edges for grip), torpedo level, laser level (cross-line), shims (plastic and wood), pencil, story pole.
Why These Tools: 48″ level spans multiple cabinets; torpedo checks tight spaces; laser establishes room-wide reference; story pole ensures consistency.
Pillar Integration:
– Tool Integrity: The 48″ level must be straight—check against the cabinet’s factory-cut top edge. Verify laser calibration. Inspect shims for warping.
– User Technique:
1. Establish a level reference line around the room at the desired height for the bottom of upper cabinets. Use a laser for speed, but verify with the 48″ level at multiple points (corners, center of walls). Mark the line lightly in pencil.
2. Critical Error Point: Assuming the floor is level. It rarely is. Find the highest point in the room using the level and tape measure. Start cabinet installation from this point. Use shims under base cabinets to achieve level, not by adjusting wall cabinets—this preserves countertop alignment.
3. Install the first upper cabinet at a corner. Place the 48″ level on the top edge—check front-to-back and side-to-side. Shim behind mounting rails with plastic shims (they resist compression). Tighten screws gradually in a crisscross pattern to avoid twisting.
4. Use the torpedo level to check the face frame’s vertical (plumb) alignment at multiple points. Cabinets can be level on top but twisted if the wall is uneven. Clamp adjacent cabinets together before securing to ensure faces are co-planar. Re-check level across the entire run.
5. For base cabinets, set on shims to match the reference line. Check level front-to-back and side-to-side. Use a straightedge across multiple cabinets to ensure tops are co-planar.
– Environmental Awareness: New construction may have settling walls. Allow cabinets to acclimate to the room’s humidity for 48 hours before installation. Avoid installing during extreme temperature swings. Concrete floors may have high spots—address before setting base cabinets.
Pro Insight: Professional cabinet installers use a story pole—a marked board that transfers consistent measurements around the room, reducing cumulative errors. Create one: Cut a straight 1×4 longer than your tallest cabinet. Mark critical heights (countertop, bottom of uppers) on it. Use it to set every cabinet height consistently.
Verification Step: After all cabinets are hung, stretch a string line tightly along the top front edge. Check for gaps with a feeler gauge. Place a long level across adjacent cabinet doors to verify alignment. Take photos for reference before proceeding.
Scenario 3: Laying Ceramic Tile with Perfectly Straight Grout Lines
Goal: Install floor tile with uniform grout lines, no lippage (height differences between tiles), and alignment that enhances the room’s geometry.
Tools Needed: Laser level (line type, green beam preferred), 24″ level, straightedge (aluminum), tile spacers, target cards.
Why These Tools: Laser projects long straight lines unaffected by floor irregularities; straightedge checks flatness; level verifies individual tiles. Green laser maximizes visibility on light-colored tiles.
Pillar Integration:
– Tool Integrity: Verify the laser projects a straight line over the room’s length using the Wall Projection Test. Check the straightedge for warping against a known flat surface. Inspect level vials.
– User Technique:
1. Find the room’s visual center. Measure both directions, find midpoints, and snap chalk lines. But verify with the laser level. Project a line along the longest wall; adjust until the line is parallel to the wall at both ends (measure perpendicular distance at multiple points).
2. Critical Error Point: Laser beam width. At the far wall, the beam may be wide. Mark the true center of the beam at multiple points (every 4 feet) using target cards. Snap a chalk line along these center marks. This becomes your primary layout line.
3. Dry-lay the first row of tiles along the reference line. Place the 24″ level across multiple tiles to check for lippage. Insert spacers consistently. Use tile leveling clips and wedges for large-format tiles (>12″).
4. After setting adhesive and placing tiles, re-check level before it skins over. Use a rubber mallet with a beating block to tap tiles flush—check level after each tap.
5. For walls, use the laser to project vertical lines at corners. Verify 90° with the 3-4-5 method before tiling.
– Environmental Awareness: Concrete subfloors may have high spots or dips. Use the straightedge and level to identify; address high spots or fill low spots with self-leveling compound before tiling. Work in sections to avoid adhesive skinning over. Ambient temperature affects adhesive cure time—follow manufacturer specs.
Budget Alternative: Without a laser, use a long straightedge and level to establish the first row. Check diagonals for squareness (equal measurements corner-to-corner). Use a taut string line with a weight as a visual guide.
Pro Tip: Lay out the entire floor dry first. Step back and view from the doorway—the most common sightline. Adjust layout to minimize cut tiles at focal points. Take a photo to reference during installation.
Verification Step: After grouting, place a straightedge across multiple tiles. Check for gaps with a feeler gauge. Shine a flashlight parallel to the floor to reveal lippage shadows. Walk the floor barefoot to feel inconsistencies.
Scenario 4: Building a Deck Ledger Board Attachment
Goal: Attach a ledger board to the house rim joist level to ensure proper drainage, structural integrity, and alignment with the planned deck frame.
Tools Needed: 48″ or longer box beam level (high-precision), laser level (rotary preferred), framing square, pencil, feeler gauges.
Why These Tools: Structural application demands high accuracy; long level spans ledger length; rotary laser verifies plane over distance; framing square checks for twist.
Pillar Integration:
– Tool Integrity: For structural work, use a level appropriate for the task and verify calibration meticulously with the Two-Position Test. Check laser calibration. Inspect level edges for straightness.
– User Technique:
1. Temporarily attach the ledger board with one fastener at each end. Do not fully secure yet.
2. Place the long level on top of the ledger. Critical Error Point: The ledger may be bowed. Check level at multiple points along its length (ends, center, quarters). Shim behind the ledger where needed using galvanized steel shims (not wood—they compress). Goal: consistent level reading at all points.
3. For long ledgers (over 12 feet), use a rotary laser set to level. Project the beam along the intended ledger height on the house wall. Mark the beam line at multiple points. Align the ledger top to this line. Verify with the bubble level at each mark.
4. Check for twist: Place the framing square vertically against the ledger face at multiple points. The square should sit flush without gaps. Shim to eliminate twist—critical for load distribution.
5. Verify plumb: Use the level vertically on the ledger end to ensure it’s perpendicular to level.
– Environmental Awareness: Work on a calm day to avoid wind moving the ledger during attachment. If the house siding is uneven (e.g., wood lap siding), remove a section behind the ledger for direct wood-to-wood contact with the rim joist. Flash properly per local building practices. Temperature affects wood moisture content—avoid installation during rain or high humidity if possible.
Safety Note: Ledger board attachment is critical for deck safety. Follow local building code requirements explicitly: use appropriate fasteners spaced per code, install proper flashing, and consult a qualified professional if attaching to engineered rim boards or uncertain substrates. Leveling is one component of a safe installation—never compromise on fastening or flashing.
Verification Step: After final attachment, re-check level at multiple points. Measure down from the ledger top to a fixed reference (e.g., foundation) at both ends and center—measurements should be consistent. Document with photos showing level readings and fastener patterns.
When Things Go Wrong: Troubleshooting Persistent Leveling Issues
Even with careful practice, projects sometimes present challenges. This section provides a diagnostic framework for complex scenarios where standard protocols need adaptation. Approach troubleshooting systematically—eliminate variables one by one.
Problem: “My Level Reads Differently on the Same Surface Each Time”
Diagnosis Path:
1. Check tool integrity first: Perform the Two-Position Test immediately. If the bubble shifts position after rotation, the level requires calibration or retirement.
2. Inspect the surface: Use a straightedge and feeler gauges to check for flatness. Rock the level gently to detect high spots or debris. Clean the surface thoroughly.
3. Evaluate user technique: Film yourself leveling (slow-motion mode if available). Review for parallax (viewing angle), inconsistent pressure, or rushing stabilization. Practice on a known benchmark until consistent.
4. Consider environmental factors: Is the surface vibrating (near machinery)? Is temperature fluctuating rapidly? Is lighting causing glare? Address these first.
Solution: If the level fails calibration, retire it. If the surface is uneven, shim the level during measurement or prepare the surface. If technique is inconsistent, practice deliberate repetition on a controlled surface. If environment is the culprit, modify conditions (add lighting, dampen vibration).
Insight: Keep a “known good” reference surface in your workshop (e.g., a granite tile or machined aluminum plate) solely for verifying tools and technique. Test suspect levels here first.
Problem: “The Laser Beam Is Faint, Flickering, or Inconsistent”
Diagnosis Path:
1. Battery status: Replace with fresh, high-quality batteries. Clean battery contacts with isopropyl alcohol if corroded.
2. Lens cleanliness: Blow off dust with compressed air (canned air held upright). Gently wipe the lens with a microfiber cloth and lens cleaner—never paper towels. Check for scratches.
3. Ambient light: Test in a dark room. If beam is clear and steady, the issue is visibility—use a detector, green laser, or target cards.
4. Internal status: Check for error codes on the display (consult manual). Perform a factory reset per manufacturer instructions.
5. Temperature: Is the tool within operating temperature range? Allow acclimation time.
Solution: For persistent issues after these steps, the laser diode, pendulum mechanism, or circuitry may require professional service. Contact the manufacturer—do not attempt internal repairs. Most quality brands offer repair services or warranties.
Prevention: Store lasers in protective cases with lens caps on. Remove batteries during long-term storage. Avoid exposing to moisture or extreme temperatures. Handle with care—drops are a leading cause of internal damage.
Problem: “Everything Checks Level During Installation, But Looks Crooked Afterward”
Diagnosis Path:
1. Visual illusion: Check against a long straightedge, string line, or secondary level. Sometimes adjacent elements (uneven floors, sloped ceilings, misaligned windows) create optical illusions that make a level surface appear crooked.
2. Material movement: Wood expands/contracts with humidity; concrete settles; adhesives shrink. Re-check level after 24–48 hours and after seasonal changes.
3. Fastener shift: Screws can pull materials out of alignment as they seat fully or under load. Pre-drill holes to reduce torque effects. Use clamps to hold position during securing.
4. Foundation shift: In structural applications, ground settlement may occur. Check for cracks in surrounding materials.
Solution: For optical illusions, trust verified measurements—but confirm with multiple independent methods. Document initial readings with photos. For material movement, use stable materials (engineered wood, metal), allow acclimation time before installation, and incorporate adjustment points. For fastener issues, use clamps and gradual tightening sequences. For foundation concerns, consult a qualified professional.
Professional Habit: Take “before,” “during,” and “after” photos with a level visibly showing correct alignment. This provides evidence if questions arise later and builds confidence.
Maintenance and Long-Term Care: Extending Your Level’s Lifespan and Accuracy
A well-maintained level remains a reliable partner for years. Neglect turns precision tools into liabilities. Implement these protocols to protect your investment and ensure consistent performance. Tool care directly supports project quality and safety.
Bubble Level Care Protocol
- Cleaning: After each use, wipe the body with a damp cloth to remove dust, grease, or residue. For vials, use lens cleaner and a microfiber cloth—never abrasive pads, solvents, or paper towels. For stubborn grime, use a soft-bristled brush.
- Storage: Hang vertically on a pegboard with dedicated hooks to prevent warping. If storing horizontally, place on a flat surface with support along the entire length—never cantilevered off a shelf edge. Store in a climate-controlled area away from direct sunlight, moisture, or extreme temperatures.
- Impact Protection: Use levels with shock-absorbing end caps (rubber or polymer). Transport in a dedicated tool pouch or compartmentalized toolbox—not loose with hammers and wrenches.
- Calibration Schedule: Check monthly for frequent use; quarterly for occasional use. After any drop or impact, calibrate immediately. Keep a simple log of calibration dates and results.
- Vial Care: Avoid exposing to temperatures above 120°F (can crack vials or alter fluid) or below freezing (can cause fluid contraction). If a vial becomes cloudy, it likely indicates seal failure—retire the level.
Laser Level Care Protocol
- Lens Maintenance: Before storage, blow off dust with compressed air. Gently wipe the lens with a microfiber cloth slightly dampened with lens cleaner. Store with lens cap on. Never touch the lens with fingers.
- Battery Management: Remove batteries during long-term storage (over 30 days) to prevent corrosion. For rechargeable batteries, store at 50% charge in a cool, dry place. Replace weak batteries promptly—low power affects performance.
- Moisture Protection: Avoid use in rain unless rated for moisture resistance (check specifications). If exposed to moisture, dry thoroughly with a soft cloth and allow to air-dry completely before storage. Silica gel packs in the storage case absorb ambient moisture.
- Pendulum Care: For self-leveling models, engage the pendulum lock during transport to prevent internal damage. Avoid operating in high-vibration environments beyond the tool’s specifications.
- Professional Calibration: For high-precision lasers used in critical work, consider periodic professional recalibration per manufacturer recommendations. Keep records for quality assurance.
- Firmware Updates: For smart lasers, check the manufacturer’s website periodically for firmware updates that improve performance or fix bugs.
Digital Level Care Protocol
- Sensor Protection: Keep the sensor window covered with the provided cap when not in use. Clean gently with a microfiber cloth—never apply liquids directly to the sensor.
- Battery Contacts: Clean corroded contacts with a cotton swab dipped in isopropyl alcohol. Allow to dry completely before inserting new batteries.
- Software Updates: For Bluetooth-connected models, check the companion app for firmware updates that enhance accuracy or add features. Update before critical projects.
- Impact Prevention: Always use the protective case. Digital sensors are sensitive to shock. Avoid dropping, even from low heights.
- Storage: Store in a temperature-stable environment. Extreme cold can damage LCD screens; extreme heat can warp housings. Remove batteries for long-term storage.
Universal Tool Care Principles
- Label Your Tools: Engrave or label levels with your name/contact info. This aids recovery if misplaced.
- Dedicated Storage: Assign a specific place for each level in your toolbox or workshop. “A place for everything, everything in its place” prevents damage.
- Pre-Use Ritual: Develop a 30-second pre-use check: Inspect for damage, verify calibration quickly, clean vial/lens. This builds consistency.
- Retirement Policy: Establish criteria for retiring tools: cracked vials, uncalibratable lasers, inconsistent digital readings. Retire compromised tools from critical work—donate to educational settings for non-critical use if appropriate.
- Investment Perspective: View quality levels as long-term investments. A well-chosen level used consistently for years delivers exceptional value per use. Cheap tools that fail frequently cost more in frustration and rework.
Your Questions, Answered
Q: How often should I calibrate my level?
A: Frequency depends on use and project criticality. For bubble levels used weekly, perform the Two-Position Test before major projects or monthly. For DIY use, check quarterly. For laser levels, verify calibration monthly with the Wall Projection Test. After any significant impact (dropping), calibrate immediately. For high-stakes projects (structural work, machinery setup), verify calibration right before use. When in doubt, verify—it takes less time than correcting an error.
Q: Can I use a smartphone app as a level instead of a dedicated tool?
A: Smartphone accelerometers can provide rough estimates for non-critical tasks (like hanging a small picture frame where perfect level isn’t essential). However, they lack the precision, calibration traceability, durability, and dedicated ergonomics of purpose-built levels. Apps are prone to software inconsistencies, case interference, unverified accuracy, and screen parallax errors. For any project where alignment affects safety, function, aesthetics, or longevity—installing shelves, cabinets, tile, or structural elements—invest in a quality physical level. Smartphones are excellent for reference photos or notes, but not as primary measurement tools.
Q: Why does my bubble level have multiple vials?
A: Different vials serve distinct measurement purposes. The large center vial on the top edge checks horizontal level (parallel to the horizon). Vials on the sides check vertical alignment (plumb—perpendicular to level). Some levels include a 45-degree vial for miter cuts, stair stringers, or roof pitches. Using the correct vial for the task is essential—checking plumb with the horizontal vial yields incorrect results. High-end levels may include additional vials for specific angles used in specialized trades. Always read the vial aligned with the direction you’re measuring.
Q: What’s the difference between “level” and “plumb”?
A: In construction terminology, “level” refers to horizontal alignment—parallel to the horizon or perpendicular to the direction of gravity. “Plumb” refers to vertical alignment—perfectly perpendicular to level, following the direction of gravity (like a plumb bob string). A surface can be level but not plumb (e.g., a shelf that’s horizontal but the wall behind it is leaning), or plumb but not level (e.g., a wall that’s vertical but the foundation beneath it is uneven). Both conditions are critical for different aspects of a project.
Q: How do I calibrate a bubble level that has adjustable vials?
A: First, verify inaccuracy using the Two-Position Test on a known-flat surface. If the bubble shifts position after rotation, proceed: Place the level on the flat surface in its original position. Locate the calibration screws (usually near the vial ends—consult your manual). Using the correct small tool (often a hex key), make minute adjustments to the screws while observing the bubble. Adjust until the bubble centers in the first position. Rotate the level 180 degrees and check again. Repeat adjustments incrementally until the bubble centers in both positions. Avoid over-tightening screws. Test on another known surface to confirm.
Q: Can I use a laser level outdoors in daylight?
A: Yes, but visibility is the challenge. Red laser beams wash out quickly in bright sunlight, especially beyond 20 feet. Green lasers (520nm wavelength) are significantly brighter to the human eye and perform better outdoors. For best results: Use a laser detector (receiver) with rotary lasers—it beeps when it finds the beam plane regardless of visibility. Use a target card with high-contrast stripes (black/white) or fluorescent markings. Schedule critical outdoor work for dawn, dusk, or overcast conditions. For long-distance outdoor work (grading, foundations), a rotary laser with a detector is the professional standard.
Q: What is the best level for hanging a single picture frame?
A: For a small, lightweight frame where perfect level isn’t critical, a small torpedo level or even a smartphone app may suffice. For larger frames, artwork, or situations where alignment matters (e.g., above a mantel), use a 6–12″ bubble level with a magnified or mirrored vial for accuracy. Place the level directly on the frame’s top edge or on the wire/hook before hanging. For multiple frames in a gallery wall, a laser level projecting a horizontal line ensures consistent alignment across all pieces. Always verify after hanging by placing the level on the frame itself.
Q: How can I check if a surface is flat (not just level)?
A: Level checks orientation relative to gravity; flatness checks surface uniformity. To check flatness: Use a long, known-straight straightedge (like a quality level or aluminum straightedge). Place it on the surface and look for gaps between the straightedge and surface. Use feeler gauges to measure gap size. For large surfaces (floors, countertops), use the “three-point method”: Place three equal-height blocks at the surface corners. Stretch a taut string or use a laser line between them. Measure deviations from the string/line at multiple points across the surface. A surface can be level (all points at same height relative to gravity) but not flat (wavy or dished).
Q: Why does my self-leveling laser sometimes fail to level?
A: Self-leveling mechanisms have a limited tilt range (typically ±3° to ±5°). If the tripod or surface is tilted beyond this range, the pendulum cannot compensate, and the laser may not indicate failure clearly (some flash or beep; others do not). First, ensure the tripod is on stable, level ground. Use the laser’s built-in bubble vial for rough leveling before engaging self-leveling. Check for error indicators per your manual. If it still fails, perform a manual bubble check on the laser body. If problems persist, the internal mechanism may need service—consult the manufacturer. For very uneven surfaces, a manual laser (non-self-leveling) may be more appropriate.
Q: What is the difference between a line laser and a rotary laser?
A: A line laser projects a straight visible line (horizontal, vertical, or both) onto a surface—ideal for indoor tasks like tile layout, cabinet installation, or drop ceilings within a single room. A rotary laser spins a beam 360 degrees to create an invisible level plane around the entire space. You detect this plane using a laser detector (receiver) held at measurement points. Rotary lasers excel at outdoor grading, foundation work, slab pours, or large indoor spaces where a visible line isn’t practical. Line lasers are generally more affordable and user-friendly for home projects; rotary lasers are professional tools for expansive or outdoor work.
Q: How do I level a very long surface (like a countertop) that is longer than my level?
A: Use the “leapfrog” method: Start at one end. Place your level, mark the level point, then move the level so its end aligns precisely with that mark. Repeat this process along the entire length. After reaching the end, verify the final mark against the starting point—if they align, the surface is level. For greater accuracy, use a laser level to project a continuous reference line along the entire length, then check the surface against the line at multiple points without placing weight on it. Alternatively, use a water level (clear tubing filled with water)—the water seeks its own level at both ends, providing an accurate reference over very long distances.
Q: Are digital levels worth the investment over traditional bubble levels?
A: Digital levels offer distinct advantages in specific scenarios: numeric readouts eliminate bubble interpretation subjectivity; exact angle measurement (e.g., for roof pitches, machinery setup); relative zero function for matching surfaces; data recording capabilities. They excel in low-light conditions (backlit displays) and for users with visual challenges. However, they require batteries, can be less durable in harsh conditions, and may have a learning curve. For general DIY tasks (hanging shelves, installing cabinets), a quality bubble level is often simpler, more reliable, and more cost-effective. Consider a digital level if you frequently need precise angle measurements, work in variable lighting, or value data documentation. Many professionals keep both types for different applications.
Conclusion and Next Step
- Recap: True leveling mastery rests on three interconnected pillars: diligently verifying your tool’s integrity before each use, refining user technique to eliminate human-induced error, and maintaining awareness of environmental factors that influence readings. These principles apply universally across bubble levels, laser levels, and digital tools—transforming measurement from guesswork into a repeatable, trustworthy process.
- The 24-Hour Rule: Before your next project requiring precision alignment, dedicate 24 hours to preparation: verify your primary leveling tool’s calibration using the Two-Position Test, assess your workspace for environmental factors (lighting, temperature, surface conditions), and gather any supplementary items needed (shims, target cards, mirrors). This small, intentional step prevents disproportionate rework and builds project confidence from the start.
- The Big Picture: Precision leveling is not an isolated task but a foundational element of quality craftsmanship. Consistent attention to alignment strengthens structural integrity, enhances visual harmony, and reflects care in every detail. Whether for personal satisfaction in a home project or professional reputation, mastering these principles cultivates a mindset where accuracy becomes habitual, trust in your work deepens, and every line you establish carries intention.
Explore Our Complete System:
The Art of Measuring Twice: Beyond the Tape Measure | Choosing the Right Layout Tools for Every Project | Preventing Common Woodworking Mistakes Before They Happen | Understanding Material Behavior: How Wood, Metal, and Concrete Respond to Environment | Safety-First Workshop Practices for Home Crafters | The Finish Carpenter’s Guide to Perfect Joints and Alignments | Building Confidence: From First Project to Last Detail