Stop guessing, start breathing: A systematic blueprint for ventilation that eliminates smoke, odors, and grease—without noise, frustration, or wasted money.
True kitchen ventilation isn’t about installing a shiny appliance under your cabinets. It’s a precisely engineered system where airflow physics, building science, and daily cooking habits converge. When executed correctly, it silently manages steam from boiling pasta, neutralizes the scent of seared salmon, and protects cabinetry from gradual grease accumulation. When done poorly? Foggy windows, sticky surfaces, and compromised indoor air quality follow. This guide moves beyond marketing claims and fragmented advice. Grounded in International Residential Code (IRC) standards, Home Ventilating Institute (HVI) testing protocols, and documented industry installation patterns, we deliver a complete, actionable framework. You’ll learn how to determine appropriate airflow needs for your space, avoid critical ducting errors, select hardware aligned with your cooking habits and kitchen layout, and implement sustainable maintenance. No jargon without explanation. No skipped steps. Just clarity.
Introduction: Why Ventilation Systems Fail—and How to Build One That Works
Walk into many newly built or renovated kitchens, and you’ll find a range hood mounted above the cooktop. It may feature stainless steel curves, LED lighting, or digital controls. Turn it on, and it hums convincingly. Yet within minutes of searing meat or stir-frying vegetables, smoke drifts upward. Mirrors fog. Days later, a faint oily film appears on nearby cabinets. This isn’t user error—it’s systemic failure. The root cause? Treating the hood as a standalone product rather than the visible component of an integrated air-handling system. Air must be captured at the source, transported efficiently through ductwork, and exhausted cleanly outside. Break any link, and performance collapses.
Industry analysis indicates poorly installed systems can lose significant airflow due to restrictive ducting, improper sizing, or inadequate makeup air considerations. Building science research consistently identifies insufficient kitchen ventilation as a contributor to indoor moisture issues, finish degradation, and compromised air quality. This extends beyond comfort—it relates to preserving your home’s integrity and supporting a healthier living environment. The solution lies not in purchasing the most expensive unit, but in applying a methodical, layered approach that respects airflow dynamics, local code requirements, and your unique cooking patterns. Whether renovating a historic home, building new, or troubleshooting an existing setup in a multi-unit dwelling, this framework adapts to your context. Let’s rebuild understanding from the ground up.
The Five-Pillar Performance Framework: Engineering Ventilation That Lasts
Forget oversimplified “CFM is king” advice. True ventilation efficacy emerges from five interdependent pillars. Neglect one, and the entire system underperforms. Strengthen all five, and you achieve reliable, quiet air management. This framework—developed through analysis of HVI performance data, documented installation case studies, and recurring homeowner feedback—transforms ambiguity into actionable precision. Each pillar addresses a critical failure point observed across diverse kitchen environments. Master them sequentially.
Pillar 1: Precision Capacity Calculation (Beyond Generic CFM Advice)
CFM (Cubic Feet per Minute) measures airflow volume, but a labeled rating means little without context. Generic rules like “100 CFM per linear foot of cooktop” ignore heat output, room volume, cooking style, and layout. Here’s how to determine appropriate capacity for your specific situation.
The Dual-Method Verification Approach
Calculate capacity using two independent methods. Significant divergence signals hidden constraints requiring attention.
Method A: BTU-Based Calculation (Primarily for Gas Cooktops)
Gas cooking generates intense, localized heat. A common engineering guideline: 100 CFM per 10,000 BTUs of total burner output.
– Example: A gas range with burners totaling 44,000 BTU suggests a minimum of approximately 440 CFM.
– Critical nuance: For frequent high-heat cooking (wok use, commercial-style ranges), incorporate a modest buffer. Undersized systems cannot overcome the thermal plume rising from intense heat sources.
– Why this matters: Airflow must overcome the upward momentum of heat and vapor. Insufficient capacity allows contaminants to escape the capture zone.
Method B: Room Volume Exchange Rate (Universal Application)
Ventilation should replace contaminated air with fresh air. Standards like ASHRAE 62.2 reference 15 air changes per hour (ACH) for kitchens during active cooking.
– Step 1: Calculate kitchen volume: Length × Width × Ceiling Height.
Example: A 12 ft × 10 ft kitchen with 9 ft ceilings = 1,080 cubic feet.
– Step 2: Calculate baseline CFM: (Volume × ACH) ÷ 60 minutes → (1,080 × 15) ÷ 60 = 270 CFM.
– Critical nuance: For open-concept layouts, include adjacent living areas in your volume calculation. A large open space may require substantially higher capacity to achieve effective air exchange. Ignoring this is a frequent cause of underperformance.
Synthesizing the Results
– Scenario 1: BTU method suggests 440 CFM; Room method yields 270 CFM → Prioritize the BTU-derived figure for gas cooking intensity. Target approximately 450–500 CFM.
– Scenario 2: BTU method suggests 300 CFM (electric cooktop); Room method yields 650 CFM (large open plan) → Prioritize the room volume requirement. Target approximately 650–700 CFM.
– Important consideration: Systems exceeding certain airflow thresholds (often cited around 400–600 CFM depending on local adoption of codes like IRC M1503.4) in tightly constructed homes may require makeup air to prevent pressure imbalances affecting other combustion appliances. Consult a qualified HVAC professional when planning high-capacity systems. This is a critical safety consideration frequently overlooked.
Common Calculation Considerations
– Consideration: Manufacturer “maximum CFM” ratings reflect laboratory conditions. Real-world performance depends heavily on duct configuration.
– Consideration: Island-mounted hoods face greater aerodynamic challenges due to lack of a rear wall baffle and exposure to room air currents. They often benefit from increased capacity (approximately 15–20% higher) compared to wall-mounted units of similar size.
– Consideration: Excessive airflow creates unnecessary noise, drafts, and energy use. It may also disrupt flame stability on gas burners. Precision tailored to your needs outperforms brute force.
Pillar 2: Capture Zone Engineering (Where Physics Meets Geometry)
Airflow doesn’t teleport into the hood. It must be captured within a defined three-dimensional space above the cooktop—the “capture zone.” This zone is shaped by hood dimensions, mounting height, design geometry, and user position. Misalignment here renders even powerful motors ineffective.
Critical Dimensions: Size and Height
– Width: The hood should extend at least 3 inches beyond the cooktop on each side. For a standard 30-inch range, a 36-inch hood is typically appropriate. Cooking vapors and splatter spread laterally; a flush-mounted hood misses edge burners. HVI testing data indicates hoods extending adequately beyond the cooktop significantly improve capture efficiency.
– Depth: Hood depth should cover the front burners. Standard ranges are 24–25 inches deep; select a hood at least 21 inches deep. Shallow models common in slim under-cabinet designs often fail to capture steam from front burners.
– Mounting Height: Follow manufacturer specifications and local code requirements. General guidance:
– Electric cooktops: Typically 24–30 inches above cooking surface.
– Gas cooktops: Typically 28–36 inches above cooking surface (higher clearance for flame safety).
– Critical note: For high-BTU gas ranges or frequent high-heat cooking, mounting at the lower end of the recommended range (while maintaining safe clearance) can strengthen capture.
– Why height matters: Too high weakens capture efficiency as airflow dissipates. Too low creates safety hazards, obstructs view, and risks flame interference. Precise measurement is essential—eyeballing invites error.
Hood Configuration Considerations
– Wall-Mount Hoods: Generally the most aerodynamically efficient design. The wall acts as a baffle, preventing airflow escape rearward. Ideal for standard layouts. Models with a deep, tapered throat (inlet) help accelerate airflow into the duct.
– Island Hoods: Face greater challenges due to exposure on all sides. Counter this with:
– Wider width (extend 4+ inches per side beyond cooktop)
– Appropriately increased capacity
– Baffle filters oriented to guide airflow effectively
– Downdraft Systems: Physics presents inherent challenges—heat and smoke rise naturally. Downdrafts require significant power to overcome this. Testing data suggests capture efficiency, particularly for rear burners, is often lower than overhead systems. Consider only if:
– Overhead mounting is structurally or architecturally impossible
– Cooking is predominantly low-heat (simmering, baking)
– Local building codes permit the installation for your specific cooktop type
– Practical note: If downdraft is necessary, pairing it with supplemental overhead ventilation for high-heat tasks may be beneficial where feasible.
The Human Element
Your position while cooking affects airflow. Standing directly between the cooktop and hood inlet can disrupt the capture path. Solutions include:
– Positioning the hood so its front edge aligns with or slightly overhangs the cooktop front.
– For island setups, shifting stance slightly to the side during high-heat cooking.
– Selecting hoods with design features like angled front panels that help guide airflow around the user.
The Fundamental Principle: Capture efficiency depends not on motor strength alone, but on the geometric harmony between cooktop, hood, user position, and room dynamics. A correctly sized and positioned hood operating at moderate capacity will consistently outperform a misaligned high-CFM unit.
Pillar 3: Ducting Integrity Protocol (The Performance Foundation)
This is where many installations falter. The hood is an air pump; the ductwork is the pathway. Restrictions, leaks, or improper materials severely diminish performance. Building codes provide essential safety baselines—this section translates engineering principles into actionable practice.
Material Selection: Safety and Efficiency
– ✅ Recommended: Rigid Metal Ducting (Galvanized Steel or Aluminum)
Smooth interior walls minimize airflow resistance. Non-combustible. Required by IRC Section M1502 for residential exhaust systems. Diameter must match the hood’s outlet size. Never reduce diameter at connections.
– ⚠️ Limited Use: Semi-Rigid Aluminum Flex Duct
Only acceptable for the final short connection (typically under 18 inches) between the hood and rigid ducting to absorb vibration. Must be fully extended—not coiled—to reduce resistance. Even extended, it creates more resistance than rigid duct. Avoid where possible.
– ❌ Prohibited: Plastic, Vinyl, or Ribbed Flexible “Dryer” Ducts
Fire hazard (melts at cooking temperatures). Ribbed interior traps grease rapidly. Violates building codes universally. If suggested, seek alternative solutions.
Optimizing the Duct Path
Every foot of duct and every bend adds resistance (“static pressure”), reducing effective airflow. Engineering data quantifies these impacts:
– Straight run: Longer runs increase resistance incrementally.
– 90-degree elbow: Creates resistance equivalent to a significant length of straight duct.
– 45-degree elbow: Creates less resistance than a 90-degree bend.
– Termination cap: Adds measurable resistance.
Practical Ducting Guidelines
1. Shortest Path Possible: Plan the route from hood outlet to exterior termination. Measure total length. Shorter, straighter paths preserve performance.
2. Minimize Bends: Maximize straight runs. If bends are unavoidable:
– Prefer two 45-degree elbows over one 90-degree elbow.
– Space bends apart where possible.
– Specify smooth-radius bends over sharp crimps.
3. Slope for Drainage: Run ducts with a ¼-inch per foot slope downward toward the exterior termination point. This prevents condensation from pooling inside the duct (a corrosion and potential mold risk), especially important in colder climates or unconditioned spaces.
4. Termination Details:
– Wall cap: Must include a functional backdraft damper (flapper) to prevent cold air, wind, or rain ingress when the hood is off. Install cap per code requirements (e.g., IRC M1503.3 specifies minimum distances from windows, doors, or mechanical air intakes—typically 3 feet).
– Roof cap: Use flashing appropriate for your roof pitch. Ensure cap extends sufficiently above the roof ridge to avoid wind downdrafts. Seal penetrations properly.
– Critical reminder: Always verify termination location complies with local building codes and manufacturer instructions.
Recirculating (Ductless) Hood Considerations
Recirculating hoods filter air through charcoal filters and return it to the kitchen. They represent a compromise with significant limitations:
– Generally appropriate only where external ducting is prohibited by building rules (obtain written confirmation) and cooking is very light (occasional baking, low-heat electric cooking).
– Not recommended for gas ranges, frequent frying/searing, or high-BTU cooktops. They do not remove heat or moisture effectively.
– Critical maintenance: Charcoal filters lose effectiveness over time. Replace per manufacturer schedule (typically every few months). Neglect renders the system ineffective and can redistribute grease.
If recirculation is unavoidable:
– Select a model with the largest possible filter surface area.
– Run the hood for several minutes after cooking ends to process lingering particles.
– Consider supplementing with a standalone air purifier featuring true HEPA and activated carbon filtration for general air quality.
Pillar 4: Noise Mitigation Strategy (Usability as a Core Metric)
A hood avoided due to noise is a failed system. Sone ratings (standardized measure of perceived loudness) require context. A low sone rating at the quietest speed may not reflect noise at the medium or high speeds used during cooking. True usability balances effective airflow with acoustic comfort.
Understanding the Sone Scale
– 0.5 sones: Near silence
– 1.0 sone: Soft whisper
– 2.0 sones: Quiet library
– 3.0 sones: Normal conversation level
– 4.0+ sones: Increasingly intrusive
Target: ≤ 3.0 sones at the speed you typically use for active cooking (often medium-high). Ratings above 5.0 sones at maximum speed may be disruptive in open layouts.
Engineering Approaches for Quieter Operation
1. External Blower Placement:
– How it works: The motor is mounted remotely—on the roof, in the attic, or on an exterior wall—connected via ducting. Only air moves through the hood housing.
– Benefit: Significantly reduces noise at the cooktop (often 50–70% perceived reduction). Ideal for open-plan kitchens or noise-sensitive environments.
– Considerations: Higher initial cost, more complex installation requiring weatherproofing and structural support, and slightly longer duct runs may affect airflow efficiency. Best evaluated during planning.
- Internal Blower Quality:
- Centrifugal (Squirrel Cage) Blowers: Generally move air more efficiently at lower rotational speeds than basic axial fans, reducing turbulence noise. Common in quality residential hoods.
- Insulated Housing: Sound-dampening materials (like mass-loaded vinyl) lining the hood cavity reduce resonance.
-
Vibration Isolation: Rubber grommets or mounts between motor and housing prevent structure-borne noise transmission into cabinets.
-
Ducting Acoustics:
- Lining the first few feet of rigid duct (inside the cabinet) with high-temperature-rated duct liner can absorb motor noise.
- Avoid sharp bends immediately after the hood outlet—turbulence here creates “whooshing” noise. Use gradual sweep elbows.
-
Ensure all duct joints are sealed tightly with UL 181A-P aluminum foil tape. Loose joints can rattle.
-
Speed Control Intelligence:
- Variable Speed Motors (ECM): Electronically Commutated Motors allow precise RPM adjustment. Run at the minimum effective speed for the task (e.g., lower speed for simmering, higher for frying). Less speed generally means less noise.
- Delayed Shutoff: Automatically continues running at low speed for several minutes post-cooking to clear residual odors quietly.
- Practical tip: When comparing models, seek sone ratings specified at medium cooking speed, not just the lowest speed. If possible, listen to units operating in a showroom environment.
Pillar 5: Sustainable Maintenance Protocol (Preserving Long-Term Performance)
Performance degrades silently without care. Grease accumulates, filters clog, and components wear. This protocol transforms maintenance from a chore into a predictable, manageable routine—essential for preserving system effectiveness and safety.
Filter Management: The Core Routine
– Baffle Filters (Metal): Standard on most quality hoods. Aluminum or stainless steel slats trap grease.
– Cleaning Frequency: Every 1–2 weeks for frequent cooks; every 3–4 weeks for light use.
– Method: Soak in hot water with a degreasing agent. Scrub gently with a non-abrasive brush. Rinse thoroughly. Avoid dishwashers—heat and detergents can warp baffles over time, reducing efficiency.
– Replacement: Replace if bent, corroded, or no longer seals properly in the housing (typically every few years with proper care).
– Mesh Filters (Disposable): Common on budget models.
– Replacement: Replace regularly per manufacturer guidance (often monthly). Clogged mesh significantly increases resistance.
– Charcoal Filters (Recirculating Hoods ONLY):
– Replacement: Replace per schedule (typically every few months). Saturation is not visually obvious. Set calendar reminders.
Seasonal and Annual Care Schedule
– After Each Use (Habit Integration): Wipe exterior surfaces with a damp cloth to prevent grease buildup.
– Monthly: Clean filters. Wipe interior housing accessible from below. Check that the exterior cap damper moves freely.
– Seasonally (Especially before high-use periods like holidays): Remove filters. Shine a light into the duct inlet. If visible grease buildup is present in the first section of duct, clean carefully with an appropriate brush. Inspect visible duct runs (in accessible attic/crawlspace areas) for sagging, disconnections, or significant buildup.
– Annually:
– Test all fan speeds and lighting.
– Listen for new or unusual noises (grinding, screeching, excessive rattling).
– Verify exterior termination cap is secure, clear of debris, and damper operates smoothly.
– Note: Only lubricate motor bearings if explicitly specified by the manufacturer; many modern motors are sealed for life. Forcing lubrication can cause damage.
– As Needed (Based on Use and Observation): If you cook heavily with oils, have a long/complex duct run, or notice reduced performance despite clean filters, consider professional duct cleaning services specializing in range hood systems. Prefer dry-cleaning methods over steam/moisture-based techniques to avoid moisture retention in ducts.
Recognizing Performance Changes
| Symptom | Potential Cause | Initial Action |
|———|—————–|—————-|
| Reduced suction | Clogged filter, disconnected duct section, blocked termination cap | Clean filters thoroughly. Verify exterior cap damper opens freely when hood runs. |
| Unusual noise (grinding, screeching) | Worn bearings, loose component | Turn off immediately. Contact a qualified technician. Continuing operation risks further damage. |
| Grease accumulation near hood | Inadequate capture (size/height), saturated filters, recirculating hood limitations | Reassess capture zone geometry. Clean/replace filters. For recirculating units, strict filter replacement is critical. |
| Condensation in cold weather | Uninsulated duct in unconditioned space, improper slope, damper not sealing | Insulate duct runs in attics/crawlspaces. Verify downward slope toward termination. Ensure damper closes tightly when off. |
| Persistent odors | Saturated charcoal filter (recirculating), deep duct buildup, inadequate runtime | Replace charcoal filters. Extend hood runtime 5–10 minutes after cooking ends. Consider professional duct inspection if issue persists. |
Shifting Perspective
View maintenance not as a burden, but as essential system stewardship. Consistent, minor efforts preserve performance, extend equipment life, and support a healthier kitchen environment. Integrating filter cleaning into existing routines (e.g., “after Sunday meal prep”) makes it sustainable.
Navigating Hood Types: Matching Hardware to Habitat and Constraints
With the Five-Pillar Framework understood, selecting hardware becomes strategic. This section translates technical requirements into real-world product categories, highlighting ideal applications and critical selection criteria. Avoid focusing solely on spec sheets—integration realities matter most.
Under-Cabinet Hoods: Space-Efficient Integration
Best for: Galley kitchens, smaller spaces, renovations with existing cabinetry, budget-conscious projects.
How they work: Mount flush beneath upper cabinets. Ducting exits through the cabinet back or top.
Critical Selection Criteria:
– Depth is essential. Must be ≥21 inches deep to effectively cover front burners. Many slim models are shallower—avoid these for standard ranges.
– Filter access: Should allow easy removal without disassembling the hood. Models requiring complex disassembly for filter cleaning are often neglected.
– Lighting placement: LEDs should illuminate the entire cooktop surface. Test conceptually: will light reach the front edge?
– Ducting path: Verify cabinet depth allows a reasonably straight duct run. Shallow cabinets forcing immediate sharp bends will compromise performance.
Value Focus: Prioritize models with metal baffle filters, appropriate capacity for your needs, and all-metal internal construction. Avoid units with plastic internal components near the heat source.
Installation Note: Confirm structural support within the cabinet above. Mounting must be secure.
Wall-Mount Chimney Hoods: The Performance Standard
Best for: Most single-wall kitchen layouts, traditional to contemporary aesthetics, regular home cooks.
How they work: Mount directly to the wall above the range. Chimney stack conceals the vertical duct run.
Critical Selection Criteria:
– Chimney adjustability: Must accommodate your ceiling height (standard 8–9 ft; vaulted higher). Telescoping chimneys offer flexibility.
– Baffle filter quality: Look for robust, closely spaced baffles. Stainless steel generally offers better durability and heat resistance than painted steel.
– Structural mounting: Requires secure attachment to wall studs. Verify stud locations before finalizing purchase. Never mount solely to drywall.
– Design functionality: Curved edges and angled front panels can improve aerodynamics and capture efficiency compared to sharp, boxy designs.
Value Focus: Mid-tier brands often provide reliable performance with sound insulation and quality blowers. Prioritize units with clear documentation of tested performance data.
Planning Tip: Coordinate chimney width with your range and cabinetry for visual harmony.
Island Mount Hoods: Commanding Open Spaces
Best for: Kitchen islands, open-concept homes where the hood serves as a focal point.
How they work: Suspended from the ceiling. Ducting runs up through the chimney into the ceiling cavity.
Critical Selection Criteria:
– Width extension: Typically requires greater width extension beyond the cooktop (e.g., 6+ inches total) to compensate for lack of a rear wall baffle.
– Ceiling clearance: Maintain required clearance between cooktop surface and hood bottom per manufacturer and code. Confirm ceiling height accommodates this plus chimney height.
– Structural support: Weight can be significant. Mounting must anchor securely to ceiling joists or a reinforced support beam. Consult a structural professional early in planning.
– Lighting strategy: Downward-focused task lighting is essential for cooktop visibility.
Value Focus: Given the aerodynamic challenges, external blowers are often a worthwhile consideration to manage noise and maintain performance over potentially longer duct runs.
Design Integration: Consider how the hood’s scale relates to the island and overall room proportions.
Professional-Grade & Custom Hoods: For Specific High-Demand Scenarios
Best for: Very high-BTU ranges (e.g., 60,000+ BTU), frequent high-heat cooking techniques, architectural integration where ventilation is part of the design statement.
Critical Realities:
– Capacity demands are significant: Systems often require 900+ CFM. This frequently triggers makeup air requirements per building codes (e.g., IRC M1503.4) in modern, tightly constructed homes. Consult an HVAC professional before specification.
– Ducting is critical: Requires large-diameter rigid ducting, minimal bends, and short, direct runs. Retrofitting into existing homes can be complex and costly.
– Noise management is challenging: Even with external blowers, high airflow rates generate audible operation. Set realistic expectations.
– Total investment is substantial: Includes hood unit, potential external blower, complex installation, and possible makeup air system.
When justified: Daily restaurant-style cooking, very large open-plan spaces, and budgets allowing for full-system engineering.
When to reconsider: Occasional high-heat cooking. A well-specified residential hood (600–800 CFM) with excellent ducting often provides ample performance. Avoid over-engineering for typical home use.
Verification Tip: Seek HVI-certified performance data for the specific model, focusing on installed performance metrics rather than laboratory maximums.
Material & Finish Considerations: Durability and Maintenance
- Stainless Steel (Brushed): Practical choice. Hides fingerprints, scratches, and minor grease splatter better than polished finishes. Clean with the grain.
- Painted Metal (Matte): Allows color integration. Ensure a durable powder-coated finish. Keep touch-up paint accessible for scratches.
- Copper: Develops a natural patina over time. Requires occasional maintenance if a bright finish is desired. Verify structural support due to weight.
- Wood (Custom): Must be finished with high-heat, non-yellowing sealant. Maintain safe clearance from heat sources (especially gas flames). Generally better suited for electric cooktops.
- Glass: Visually striking but high-maintenance. Shows fingerprints and grease readily. Requires frequent cleaning with appropriate solutions.
Universal Principle: Regardless of exterior finish, the interior housing and filter chamber must be constructed of smooth, non-porous, heat-resistant metal. Avoid designs with painted or wood interiors in the airflow path near the cooking zone.
Installation Deep Dive: Critical Decision Points for Success
Installation transforms design into performance. This section outlines precise decision points where attention to detail prevents common failures. Use this to inform contractor discussions, guide feasible DIY efforts, and avoid costly rework.
Pre-Installation Site Assessment (Complete Before Purchase)
- Verify Structural Support:
- Wall-mount: Locate studs behind the intended mounting area. Hood must anchor securely into structural framing.
- Island-mount: Access the space above the island ceiling. Confirm joists can support the hood’s weight. If mounting to drywall alone is proposed, structural reinforcement is essential.
- Map the Duct Path:
- Physically trace the shortest, most direct route to an exterior termination point. Note obstacles: plumbing vents, electrical lines, HVAC ducts, structural members.
- Estimate total equivalent length (TEL). Long runs (>25 feet) or multiple bends signal the need for careful blower selection or external blower consideration.
- Confirm termination location complies with code (distance from windows, doors, intakes) and is accessible for installation and future maintenance.
- Electrical Requirements:
- Most hoods require a dedicated circuit. Confirm an appropriately located, code-compliant electrical box is available or can be installed.
- For external blowers, plan for a separate, weatherproof electrical connection at the blower location.
- Clearance Verification:
- Re-measure required clearance between cooktop surface and hood bottom against both manufacturer specifications and local code requirements. Account for tall cookware or splatter screens.
Installation Sequence: Key Phases
Phase 1: Rough-In (During Framing or Major Renovation)
– Install structural blocking between studs at the precise hood mounting height.
– Run rigid metal ducting from the planned termination point toward the hood location. Leave a short stub accessible for final connection.
– Install the dedicated electrical box and cable at the hood location.
– Pro Tip: Clearly mark the duct stub (e.g., bright tape) to ensure it’s not overlooked during final install.
Phase 2: Final Installation (Post-Cabinets, Pre-Final Clean)
1. Mounting:
– Use a level to mark exact hood position. Double-check height and centering over the cooktop.
– Secure the mounting bracket firmly to structural blocking.
– Lift hood into place (use assistance—units are heavy and awkward).
2. Duct Connection:
– Connect hood outlet to duct stub. Minimize use of flex duct; if used, fully extend and secure with stainless steel clamps.
– Seal all joints with UL 181A-P aluminum foil tape (not cloth duct tape, which degrades). Overlap tape securely.
– Insulate duct runs passing through unconditioned spaces (attic, crawlspace) with appropriate high-temperature insulation to prevent condensation.
3. Electrical:
– Connect wiring per National Electrical Code (NEC) Article 422 and manufacturer instructions. Ensure secure grounding.
– Install recommended lighting (LED preferred for lower heat output and longevity).
4. Termination:
– Install roof or wall cap with a functional backdraft damper. Seal the penetration properly with high-temperature, exterior-rated sealant.
– Verify the damper moves freely—test by gently blowing into the duct from inside.
DIY vs. Professional Guidance
– Potentially DIY-Friendly: Replacing an existing hood with identical duct path, electrical setup, and mounting configuration. Under-cabinet models in accessible locations with straightforward duct runs.
– Strongly Recommend Professional Help For:
– Any new duct run requiring wall/ceiling modifications
– Roof or complex wall penetrations (waterproofing is critical)
– External blower installation
– Situations involving gas appliance proximity or structural concerns
– Homes with complex framing, insulation, or existing finishes
– Vetting Contractors: Ask specific questions: “Will you use rigid metal ducting throughout?” “Can you discuss how you verify installed airflow performance?” “How do you address makeup air requirements if needed?” Vague or dismissive answers warrant caution.
Post-Installation Verification
Don’t assume function—validate it:
1. Smoke Test (Use Caution): With hood on medium speed, hold an extinguished incense stick (or similar safe smoke source) 6 inches above the front burner. Smoke should be drawn steadily upward into the hood. Repeat at rear and side burners.
2. Tissue Test: Tape a single-ply tissue to the filter area. Turn hood on low speed. Tissue should adhere firmly. Weak adhesion suggests airflow issues.
3. Operational Check: Run through all speeds. Listen for unusual noises (rattles, grinding). Verify lights function and illuminate the cooktop evenly.
4. Termination Check: Go outside. Have an assistant run the hood. Feel for strong, steady airflow at the cap. Ensure the damper opens when running and closes tightly when off.
Document results. Address any failures before considering the installation complete.
Troubleshooting Real-World Scenarios
Even well-designed systems encounter issues. This section provides root-cause analysis and actionable remedies for common frustrations.
Scenario 1: Smoke or Steam Escapes During High-Heat Cooking
Symptoms: Visible vapor drifts above the hood level when searing, stir-frying, or boiling vigorously.
Potential Root Causes:
1. Capture zone compromised (hood too narrow, mounted too high, or island placement without adequate capacity buffer).
2. Airflow restriction (clogged filter, disconnected duct section, blocked termination).
3. Capacity insufficient for actual cooking intensity or room volume.
Action Plan:
– Step 1: Clean or replace filters. Re-test with the smoke test.
– Step 2: Verify mounting height against specifications. If too high and adjustable, lower within safe limits.
– Step 3: Check exterior cap damper operates freely. Listen for motor straining (indicates blockage).
– Step 4: For frequent high-heat cooking, run the hood on the appropriate speed before heating the pan to establish airflow.
Prevention: When calculating needs, incorporate a modest buffer for high-heat cooking habits. Perform the tissue test periodically.
Scenario 2: Hood Operation is Disruptively Loud
Symptoms: Noise interferes with conversation, music, or causes avoidance of higher speeds.
Potential Root Causes:
1. Duct turbulence (sharp bends near hood, undersized duct, loose connections).
2. Motor vibration transmitted to cabinetry or structure.
3. Excessive static pressure from long/complex duct runs forcing motor strain.
Action Plan:
– Step 1: Inspect the first section of ducting. Replace flex duct with rigid where possible. Ensure all joints are tight and sealed.
– Step 2: Place a hand on the hood housing while running. If vibration is pronounced, check mounting hardware and consider adding vibration isolation pads.
– Step 3: For existing long/complex runs, consult a professional about potential solutions like optimizing the duct path or evaluating blower suitability.
– Step 4: For future installations, prioritize models with sound insulation, quality blowers (centrifugal), and consider external blowers for island mounts or noise-sensitive layouts.
Prevention: During selection, seek sone ratings at medium cooking speed. If possible, audition units.
Scenario 3: Grease Accumulation on Nearby Cabinets
Symptoms: Sticky film develops on upper cabinets near the hood despite regular cleaning.
Potential Root Causes:
1. Inadequate capture efficiency (hood size, height, or airflow insufficient).
2. Infrequent filter cleaning/replacement allowing grease bypass.
3. Limitations of recirculating hood systems.
Action Plan:
– Step 1: Clean filters immediately. Perform the smoke test to verify capture.
– Step 2: Clean cabinets with an appropriate degreaser. Monitor for recurrence.
– Step 3: If using a recirculating hood, replace charcoal filters and strictly adhere to the replacement schedule. Strongly evaluate feasibility of ducting if building rules allow.
– Step 4: Consider adding a removable, cleanable grease shield (e.g., stainless steel panel) on the cabinet front below the hood.
Prevention: Maintain a consistent filter cleaning schedule. Ensure hood width and depth adequately cover the cooktop.
Scenario 4: Condensation Forms in Cold Weather
Symptoms: Water droplets appear on the hood interior, duct joints, or drip, especially during colder months.
Potential Root Causes:
1. Uninsulated duct running through unconditioned spaces (attic, crawlspace).
2. Improper duct slope allowing moisture to pool.
3. Termination cap damper not sealing tightly, allowing cold air infiltration.
Action Plan:
– Step 1: Inspect duct runs in unconditioned spaces. Wrap the entire duct with appropriate high-temperature duct insulation. Seal seams.
– Step 2: Verify duct slopes downward continuously toward the exterior termination point. Adjust hangers if sagging is present.
– Step 3: Clean the termination cap damper mechanism. Ensure it closes completely when the hood is off.
– Step 4: Run the hood for several minutes after cooking ends to purge residual moisture-laden air.
Prevention: Insulate all ductwork passing through unconditioned spaces during initial installation. This is especially critical in colder climates.
Scenario 5: Noticeable Decline in Suction Over Time
Symptoms: Performance feels weaker after several months or years, even with filter cleaning.
Potential Root Causes:
1. Grease buildup deep within the duct run, particularly at bends.
2. Motor component wear (bearings, capacitor).
3. Loose duct connections developed over time due to vibration.
Action Plan:
– Step 1: Remove filters. Shine a bright light into the duct inlet. Clean any visible buildup in the accessible section.
– Step 2: Go outside during operation. Feel airflow at the termination cap. Weak flow suggests blockage or motor issue.
– Step 3: Check all accessible duct joints for separation. Re-seal with foil tape if needed.
– Step 4: If airflow is weak at the cap and connections are secure, the motor may require professional service or replacement.
Prevention: Adhere to the seasonal inspection schedule. For heavy cooking with oils, consider professional duct cleaning every few years as part of long-term maintenance.
Adaptive Pathways: Smart Choices Across Constraints
Ventilation effectiveness is achievable across diverse situations. Strategic choices maximize value and performance within your specific constraints—budget, layout, building rules, or renovation scope.
Entry-Level Pathway: Maximizing Core Function
Ideal for: Apartments/condos with ducting restrictions (verify rules first), light cooking habits, tight renovation budgets, rental properties.
Non-Negotiable Priorities:
– Ducted installation is strongly preferred where building structure and rules permit.
– Appropriate capacity for your cooktop type and typical use (e.g., minimum 300–400 CFM for standard gas ranges).
– Metal baffle filters over disposable mesh for better performance and long-term value.
– Rigid metal ducting for the entire run where feasible.
Strategic Compromises:
– Select under-cabinet styles for simpler integration.
– Accept higher noise levels at higher speeds—use the hood consistently at effective speeds rather than avoiding it.
– Focus budget on proper ducting materials and installation over premium hood features.
Key Insight: A correctly installed modest-capacity hood with rigid ducting will outperform a higher-rated unit compromised by poor ducting. Seek “builder grade” or value lines from reputable brands known for core component reliability. Prioritize units with clear maintenance access.
Balanced Pathway: The Sustainable Sweet Spot
Ideal for: Primary residences, regular home cooks, standard renovations where ventilation is a priority.
Strategic Investments:
– Capacity precisely matched to your calculated needs (typically 400–700 CFM for most homes).
– Wall-mount chimney style for optimal capture efficiency and aesthetic integration.
– Quality blower type (centrifugal) and sound-dampening features for usable noise levels.
– Tool-free or easy-access filter design to encourage consistent maintenance.
– ECM variable-speed motor for precise airflow control and energy efficiency.
Where to Focus Resources:
– Standard durable finishes (brushed stainless) over custom colors.
– Adequate LED task lighting over complex lighting systems.
– Professional installation for ducting and mounting if DIY skills or access are limited.
Key Insight: This tier often delivers the strongest long-term value. Brands offering HVI-certified performance data and clear documentation provide confidence. Prioritize published installed performance metrics over marketing claims.
High-Performance Pathway: Engineered for Demand and Integration
Ideal for: Serious cooks, large open-concept homes, high-BTU ranges, architectural projects where ventilation is integral to design.
Worthwhile Considerations:
– External blower for significant noise reduction at the cooktop, especially for island mounts or open plans.
– Premium materials (e.g., heavier gauge stainless steel) for durability and acoustic performance.
– Advanced features like delayed shutoff, precise speed control, or integration with whole-home ventilation strategies.
– Professional system design including duct sealing verification and makeup air planning if required.
Avoiding Diminishing Returns:
– Capacity beyond calculated needs offers little benefit and introduces complexity (makeup air, noise).
– Ornate non-functional design elements that complicate cleaning or airflow.
– “Smart” features with limited practical utility during cooking tasks.
Key Insight: Allocate resources wisely: robust system design and professional installation often yield greater returns than marginal upgrades to the hood unit alone. A flawlessly installed quality mid-tier hood frequently outperforms a premium unit with compromised installation.
Retrofit and Constraint Navigation
Scenario: Upgrading an existing inadequate system (weak recirculating unit, undersized ducted hood).
Step 1: Diagnose the Primary Limitation.
– Is the hood unit itself underpowered?
– Is ducting the critical flaw (flex duct, long run, multiple bends)?
– Is recirculation the fundamental constraint?
Step 2: Prioritize Fixes by Impact and Feasibility.
– Highest Impact (If Structurally Possible): Convert recirculating to ducted ventilation. This often delivers the most significant performance improvement.
– High Impact: Replace flexible duct sections with rigid metal ducting. Straighten the path where possible.
– Medium Impact: Upgrade the hood unit only if the ducting system can support the increased airflow (verify duct size and path).
– Supportive Action: Implement a strict filter maintenance schedule to maximize existing system performance.
When Constraints Are Absolute: If structural limitations prevent ducting and recirculation is the only option, select the highest-quality recirculating unit available with the largest filter capacity, commit rigorously to the filter replacement schedule, and supplement with a dedicated air purifier. Acknowledge the inherent limitations while optimizing within them.
Your Questions, Answered
Q: Can I vent my range hood into the attic, garage, or crawl space to avoid exterior ducting?
A: No. Building codes (such as IRC Section M1503.3) explicitly prohibit this. Exhaust contains moisture, grease particles, and combustion byproducts (with gas cooking). Venting indoors can lead to mold growth within insulation, wood deterioration, fire hazards from accumulated grease, and potential indoor air quality issues. Exhaust must always terminate outside the building envelope. This is a critical safety and code compliance requirement.
Q: How often should I replace charcoal filters in a recirculating hood?
A: Replace charcoal filters according to the manufacturer’s schedule, typically every few months. Saturation is not visually obvious—filters lose effectiveness long before appearing dirty. Set a recurring calendar reminder. In high-humidity environments or with frequent frying, replacement may be needed more often. Using expired filters reduces effectiveness and can redistribute odors and particles. Factor the recurring cost and effort of replacement into the decision to use a recirculating system.
Q: My hood is labeled “convertible” for ductless use. Is its ducted performance equivalent to a dedicated ducted hood?
A: Often not. Convertible hoods are primarily engineered for recirculation. Their internal airflow path, blower sizing, and filter housing may be optimized for the resistance of charcoal filters, potentially compromising ducted performance. For reliable ducted operation, select a hood designed and tested specifically for external venting. Verify HVI certification or published performance data for ducted installation before purchasing. The minor initial savings of a convertible model are rarely worth the potential performance deficit.
Q: Do I need makeup air for my range hood?
A: Possibly. Building codes (e.g., IRC Section M1503.4) may require makeup air for high-capacity exhaust systems (often thresholds around 400–600 CFM) in tightly constructed modern homes. Signs suggesting evaluation is needed:
– Unusual drafts near windows or doors when the hood operates
– Difficulty opening/closing exterior doors during operation
– Pilot lights on other gas appliances flickering when the hood runs
Consult a qualified HVAC professional. Solutions range from passive vents to dedicated powered makeup air systems. Never ignore potential pressure imbalance issues, as they can affect the safe operation of other fuel-burning appliances.
Q: Can I use a bathroom exhaust fan instead of a range hood?
A: Strongly discouraged. Bathroom fans lack the necessary airflow capacity, grease-handling design, heat resistance, and capture geometry required for cooking applications. They typically use plastic components vulnerable to heat and grease, have inadequate or no proper filtration, and are not rated for the thermal loads and particulate levels of kitchen use. Substituting creates potential fire hazards and voids warranties. Range hoods are engineered specifically for the demands of cooking environments. Invest in the appropriate tool.
Q: How do I clean ductwork that runs inside walls or ceilings?
A: Deep cleaning inaccessible duct sections is not a DIY task. Focus on prevention and accessible areas:
1. Clean the first 12 inches of duct accessible from the hood inlet regularly using a long-handled brush.
2. Maintain a strict filter cleaning/replacement schedule to minimize grease entering the duct.
3. For suspected deep buildup, hire a certified duct cleaning service specializing in range hood systems. Verify they use camera inspection and dry-cleaning methods (avoid moisture-based techniques that can leave residue). Schedule based on usage (e.g., every few years for heavy frying). Prevention through consistent filter maintenance is significantly more effective and economical than remediation.
Q: Is a higher sone rating always louder? How can I fairly compare noise between brands?
A: Yes, the sone scale is linear: 2.0 sones is perceived as twice as loud as 1.0 sone. However, manufacturers often publish the rating at the lowest speed. Request or seek sone ratings at the speed you will use most frequently (typically medium). Reputable brands providing HVI certification often include more comprehensive performance data. When comparing:
– Check independent review sources for real-world noise assessments
– Visit showrooms to hear units operating at various speeds
– Prioritize models featuring sound insulation, quality blowers (centrifugal), and vibration isolation
Remember: A hood with slightly higher noise at an effective speed used consistently provides better air quality than a quieter hood avoided due to insufficient airflow.
Q: Can I install a range hood myself?
A: It depends on the scope and your skills:
– Potentially DIY: Replacing an existing hood with identical duct path, electrical setup, and mounting configuration. Under-cabinet models with straightforward access.
– Recommend Professional Help For: New duct runs requiring wall/ceiling modifications, roof or complex wall penetrations, external blower installation, island mounts requiring structural assessment, or any electrical work beyond simple connection.
Critical risks of improper installation include fire hazards from incorrect ducting, structural failure from inadequate mounting, moisture damage from poor seals, and voided warranties. If uncertain about any aspect, hiring a licensed contractor specializing in kitchen ventilation provides safety, code compliance, and peace of mind. The investment is often justified.
Q: What’s the difference between baffle and mesh filters? Which is better?
A:
– Baffle filters (metal): Use angled metal plates to trap grease through impingement. Generally more effective at capturing grease (higher efficiency ratings), washable repeatedly, and maintain better airflow when clean. Standard on quality residential hoods.
– Mesh filters (disposable): Typically fiberglass or aluminum mesh. Less effective at grease capture, clog more quickly, and require regular replacement. Common on budget-oriented models.
Recommendation: Baffle filters are superior for performance, long-term value, and sustainability. Avoid hoods that only accept mesh filters unless constraints are severe. Never operate a hood without an appropriate filter—grease will rapidly coat internal components and ductwork.
Q: Does the hood’s color or finish affect its performance?
A: The exterior finish does not directly impact airflow performance. However, material choices affect durability, maintenance effort, and longevity:
– Brushed stainless steel hides fingerprints and minor grease better than high-gloss finishes.
– Painted finishes require care to avoid chipping; touch-up kits are helpful.
– Copper and wood require specific maintenance routines to preserve appearance.
Crucially, the interior housing and filter chamber must be smooth, non-porous, heat-resistant metal regardless of exterior finish. Avoid designs with painted or combustible materials in the internal airflow path near the cooking zone. Choose a finish aligned with your willingness to maintain it.
Q: What is the required clearance between a range hood and a gas range flame?
A: Clearance requirements are critical for safety. Always follow the stricter requirement between your hood manufacturer’s specifications and local building codes (which often reference standards like NFPA 54). General guidance:
– Standard gas ranges: Minimum 24–30 inches from cooking surface to hood bottom.
– High-BTU ranges: Often require greater clearance (e.g., 30–36 inches); consult the range manufacturer’s installation manual.
Never mount a hood lower than the specified minimum clearance to “improve capture.” Safety must override performance considerations. If clearance is tight, select a hood with a deeper capture zone design or ensure adequate capacity to compensate within safe limits.
Q: Will a range hood help manage humidity from boiling pots and steaming?
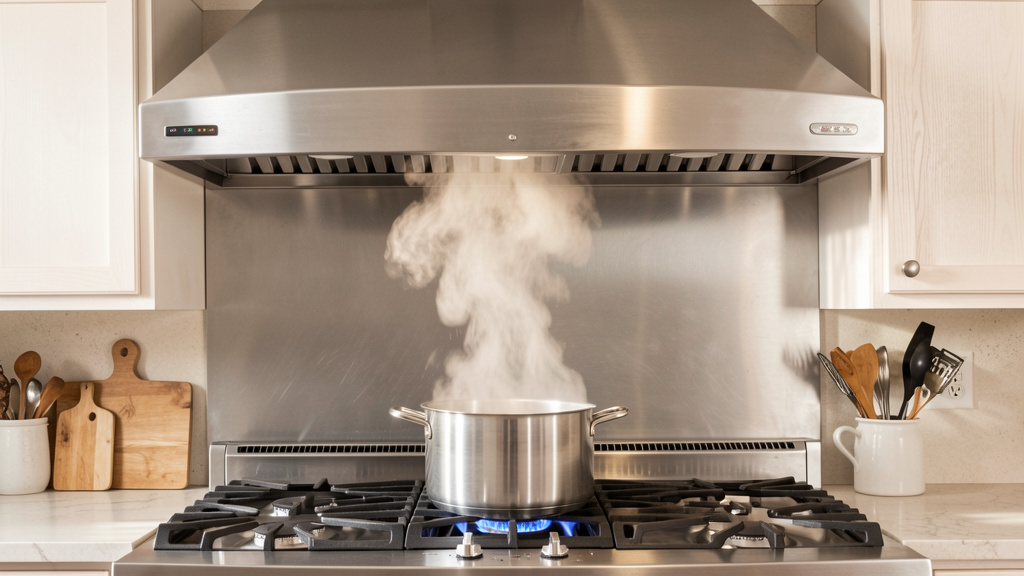
A: Yes, effectively. Range hoods are highly efficient at removing localized moisture generated directly above the cooktop—far more targeted than relying solely on whole-house ventilation. Running the hood during and for several minutes after boiling pasta, steaming vegetables, or making soup helps prevent condensation on windows, mirrors, and nearby surfaces. This reduces the risk of moisture-related issues in the kitchen environment over time. For best results, ensure the system has adequate capacity (use the room volume calculation method) and terminates exhaust outside.
Conclusion and Your Next Step
Kitchen ventilation operates quietly in the background, yet its impact is profound. It’s the difference between a kitchen that feels fresh and inviting after preparing a family meal, and one requiring immediate cleanup of sticky residues. Between cabinetry that maintains its appearance for years, and surfaces gradually dulled by airborne grease. Between cooking with confidence, and constantly monitoring for smoke alarms.
This guide reframed ventilation not as an appliance purchase, but as a thoughtfully engineered system built on five pillars: precise capacity assessment, capture zone geometry, ducting integrity, noise-conscious design, and sustainable maintenance. You now hold a framework grounded in building science principles, code standards, and practical application—not marketing narratives. Whether selecting new equipment, troubleshooting an existing setup, or planning a renovation, these principles adapt to your unique context.
Recap: Three Foundational Principles
1. Assess before you acquire. Determine appropriate capacity using both cooktop output and room characteristics. Avoid guesswork.
2. Ducting is integral to performance. Prioritize rigid metal, the shortest practical path, proper slope, and code-compliant termination.
3. Maintenance sustains value. Integrate filter cleaning and system checks into your routine. Performance degrades silently without care.
Your Next Step: One Action Within 24 Hours
Choose one small, concrete action to build momentum:
– If evaluating options: Measure your cooktop width and note your range’s total BTU rating (found on a label under the cooktop or in documentation).
– If troubleshooting: Perform the tissue test. Tape a tissue to the filter area, run the hood on medium speed. Does it hold firmly?
– If planning: Sketch your kitchen layout. Trace the most direct potential path from cooktop to an exterior wall or roof. Note any obvious obstacles.
This single step transforms knowledge into personal insight. Clarity follows action.
The Broader Perspective
True home stewardship involves understanding the systems that shape daily living. Ventilation is one thread in a larger tapestry of intentional design—where thoughtful choices about airflow, materials, and integration compound into spaces that support well-being and function. By applying this framework, you invest in cleaner air, preserved finishes, and the quiet satisfaction of a system working as intended. You reclaim the simple joy of cooking without compromise.
Start with one measurement. Make one informed choice. Breathe easy.
Explore Our Complete Kitchen Systems Guide:
Designing a Workflow-Optimized Kitchen Layout | Countertop Materials Decoded: Durability vs. Beauty | Cabinet Construction: What “All-Plywood” Really Means | Under-Cabinet Lighting That Eliminates Shadows | The Silent Kitchen: Acoustic Strategies for Open Plans | Appliance Integration: Avoiding Costly Measurement Mistakes | Sustainable Kitchen Renovations: Materials That Last Generations